Checking In With Chelsea

DIY ideas, crafts, and tips for your home

subscribe and never miss a thing!

Receive Free Email Updates

  • About
  • Videos
  • Projects
    • Indoor Projects
    • Outdoor Projects
    • Craft Projects
  • House Tour
You are here: Home / Videos / How to Store Door Wreaths

How to Store Door Wreaths

December 1, 2018 By Chelsea Lipford Wolf 6 Comments

Video Playback Not Supported

How To Make Covers To Store Wreaths
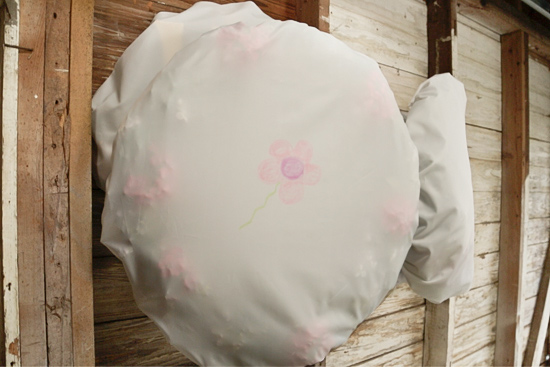
Different Ways to Decorate Seasonal Wreath Covers

It’s one thing to store wreaths, but you need to protect them from moisture and dust too! So that’s where this month’s episode idea came from! It’s really easy to make your own wreath covers and I’m going to show you how!

Materials

  • fabric shower curtain*
  • 1/4″ elastic*
  • swivel towel bar*
  • sewing machine
  • fabric markers (I got ‘neon’.)
  • safety pin

You’ll definitely want a fabric shower curtain so you can easily iron and sew it. Also-the price on the elastic goes up and down. When I bought mine it was the same price as buying in a store ($5). So just consider that before ordering online!

One thing that makes this project so great is that precision is not necessary! You don’t have to measure anything! Eyeballing is enough!

Cut Curtain to Size

The first step is to cut the 72″x72″ shower curtain into 4 equal parts. Then cut a roughly 45 degree angle on each corner to create…a stop sign!
Wreath Cover Panel with Corners Cut

Cut smaller corners for larger wreaths and this size or similar for smaller wreaths. The whole point of this is to help make the cover rounder after we install the elastic later on.

Create Channels

OK, so you need to create a channel on each edge of your octagonal cover. The easiest way I found to do this is to hold your elastic in place while you fold the cover over and iron the seam. It doesn’t have to be the exact same all the way around, but you do want it to be wider than the elastic.
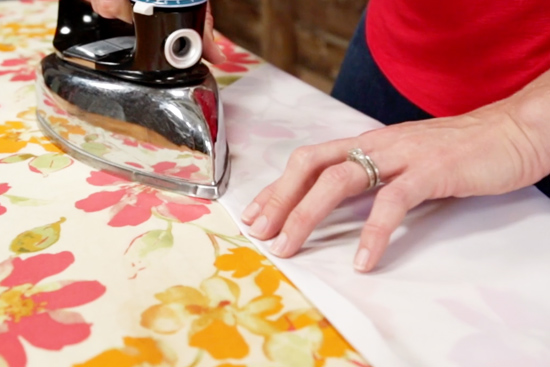
Ironing Shower Curtain to Create Channel for Elastic

Depending on which part of the curtain you’re working with, you may have a channel already in place. I was able to utilize the top of the curtain (where the curtain rings would normally go) as a channel without creating a new one on that edge.

Once you have all edges ironed, you’ll need to snip off the corners where the newly ironed seams overlap. It should be pretty obvious where you folded the corner one way to iron one edge and then folded the same corner again to iron the adjoining edge. If you stitch them the way they are, you won’t have an open channel to thread the elastic through.

Now whip out your sewing machine for some quick stitches.
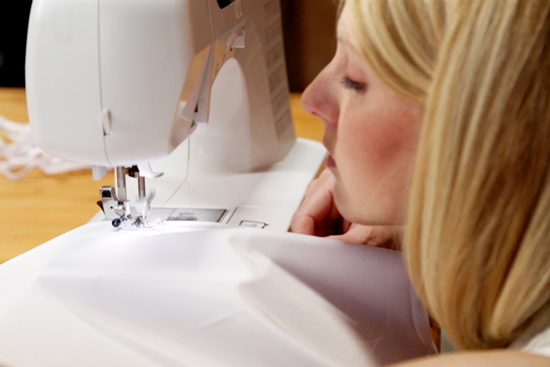
Stitching Elastic Channel into Place

Again, you don’t have to be precise or make it pretty. Just make sure you’re leaving enough room for the elastic. I definitely recommend using a zigzag stitch. I started with a straight, basic stitch and the fabric slipped right through it!

Decorate

Using the fabric markers, fabric paints or whatever you want, draw or write on each cover to label which wreath goes inside! I drew a Christmas tree, a pink flower for spring/summer, an orange leaf for fall, and then wrote “Mardi Gras” for my 4 wreaths.

Thread Elastic

Pin a regular-sized safety pin to one end of your elastic. Then feed it through the channel an inch or so at a time. So easy! Once you’ve made it all the way around, overlap the elastic ends and stitch them together before cutting the excess elastic.

You can shift the cover around to evenly distribute the elastic before putting your cover on the appropriate wreath!

Install Towel Bar

The last trick is to install a 4-arm towel bar to hang the wreaths with new covers! The one I ordered from Amazon just required 2 screws, so it was easy-peasy to install on a stud in my garage. If you’re installing on drywall, it came with the appropriate drywall anchors to install before the screws.

Add a wreath to each arm, swiveling them open to keep them flat against the wall!

DIY Covers to Hang and Protect Holiday Wreaths

It’s not the most beautiful project I’ve made or shared, but it’s so practical! And sometimes that’s all you want or need! 🙂 I hope this helps you store your wreaths throughout the year. Please share any wreath hacks you’ve learned in the comments!

Thanks for Checking In! ~Chelsea

*This post contains affiliate links*

Subscribe for Free Updates!

Stay up-to-date on Chelsea's latest projects, tips, useful resources and more.

Previous Post
DIY Fall Metal Door Hanger
Next Post
DIY Wainscoting with Beadboard Planks

Related Content

Completed Wire Shelf Pantry UpgradeWire Shelf Pantry MakeoverSequined Glam Pumpkins for Halloween and Fall3 Pumpkin Decorating IdeasSmall Laundry Room Makeover Facelift CompleteDivide and Conquer Laundry Room ClutterToday's Homeowner Episode with Tips for Creating a Room with Many PurposesDouble-Duty Homeschool Playroom

Comments

  1. Anne Copping says

    December 6, 2018 at 7:13 pm

    Great idea, I wonder if the elastic can be serged

    Reply
    • Chelsea Lipford Wolf says

      December 7, 2018 at 11:03 am

      Hi Anne! Great question! Unfortunately I’m not a very sophisticated seamstress, so I don’t know! It seems like it though. ~Chelsea

      Reply
  2. DAWN A BRATCHER says

    December 22, 2018 at 5:28 pm

    Super idea, Chelsea! I have been toying with different wreath storage ideas for years, but now that we have down-sized this will work perfectly!

    Reply
    • Chelsea Lipford Wolf says

      December 27, 2018 at 11:23 am

      Awesome, Dawn! Glad you like the idea! ~Chelsea

      Reply
  3. Sharon says

    December 30, 2018 at 10:46 pm

    Chelsea, How did you attach the wreath to the towel bars?

    Reply
    • Chelsea Lipford Wolf says

      January 2, 2019 at 11:14 am

      Hi Sharon! The wreath is just hanging on it! No attaching necessary. Hope that helps! ~Chelsea

      Reply

Please Leave a Comment Cancel reply

Your email address will not be published. Required fields are marked *

Welcome!

I’m Chelsea. DIY
enthusiast who loves
sharing my victories
and mishaps!
Learn more
here.

CHECK IN WITH CHELSEA ON INSTAGRAM

Lookie! It’s a shelf for your bookies! 🤣Build Lookie! It’s a shelf for your bookies! 🤣Building a shelf unit custom for ANY space in your home is so simple and can be done over and over again to add much needed storage aka sanity! The kids were running all over the house at bedtime trying to find a book to read because we had them stashed in baskets and shelves in several different rooms. So I took advantage of this space in the hall next to a closet to create a central location for their books and some of mine too! Plus it adds a little character to an otherwise blah space!🙌🏻
.
.
A full how to video is on checkinginwithchelsea.com! Book nerds can be DIY nerds too!🤓
.
.
#booknerdsunite #diyskills #beginnerdiy #bookshelfie #halldecor #storagesolutions #storageideas #bookstorage #bookstorageideas
5 months in and she’s at the top of my favorites 5 months in and she’s at the top of my favorites list!🥰
.
.
Couldn’t resist using this audio.😅
Using my grandmother’s cookie press to make 🎄 Using my grandmother’s cookie press to make 🎄cookies I used to make as a kid in our brand new kitchen. My heart could burst!😭 I hope you are enjoying the preparation for the main event 😇and bring love and joy to your home, no matter what it looks like.❤️💚
.
.
#christmascookies #christmastrees #familytraditions #christmasbreak #newkitchen #kitchendecor #kitchendesign #madewithlove
3D art install in my girls’ girly bedroom!🦋😍Love this $13 pack of butterflies that comes with everything you need to fill a large wall! And it only takes 30 minutes!🙌🏻 Putting the link to the butterflies in my bio! (https://amzn.to/3VmfZsB)
.
.
First step is to layout the flow of your fluttering butterflies with the large and medium sizes from the pack, leaving room for the small ones. Then fill in spaces with the small size and pat yourself on the back! So easy!
The whole Wolfpack has been staying at my parents’ house on the river for the past week while our hardwood floors are being refinished. Since the kids had the whole week off of school it has really felt like a vacation! Complete with a sunny Sunday boat ride after Mass!🥰🚤☀️Enjoy the rest of your weekend! 😘
.
.
#generationalliving #3generations❤️ #4kidlife #grandparentlife #boatday #riverside #riverlifestyle #fowlriver #alabamalifestyle #alabamablogger #nofilterneeded
Dad and I got our tickets to the gun show!💥 . . Dad and I got our tickets to the gun show!💥
.
.
@todayshomeowner @visitmobileal #exploreyourhometown #hometownpride #mobilealabama #battleship #ussalabama #visitmobile
Load More... Follow on Instagram

Indoor Projects Outdoor Projects Craft Projects
Facebook Pagelike Widget
  • Contact
  • FAQs
  • Advertise with Chelsea
  • Media
  • Today’s Homeowner

Search This Site

Receive Free Updates Via Email

Copyright © 2023 Checking in With Chelsea • All Rights Reserved