Checking In With Chelsea

DIY ideas, crafts, and tips for your home

subscribe and never miss a thing!

Receive Free Email Updates

  • About
  • Videos
  • Projects
    • Indoor Projects
    • Outdoor Projects
    • Craft Projects
  • House Tour
You are here: Home / Videos / DIY Wainscoting with Beadboard Planks

DIY Wainscoting with Beadboard Planks

February 15, 2019 By Chelsea Lipford Wolf 12 Comments

Video Playback Not Supported

Adding Beadboard to Dining Room
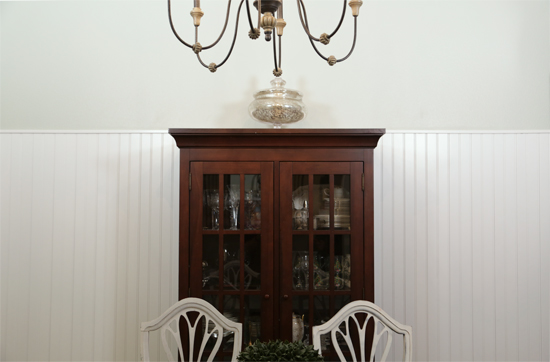
White Beadboard Wood Accent Wall in Dining Room Completed

Beadboard is such a classic way to dress up or add an accent to any room! So in this video (watch above) I’m showing how I added it to a dining room with planks, instead of paneling!

Materials

  • prefinished beadboard planks*
  • construction adhesive & caulk gun
  • miter saw
  • jigsaw
  • tape measure**
  • 4′ level
  • painter’s tape
  • lip gloss**
  • nail gun**

The first step is to measure your room or the area where the beadboard will be going! You’ll need the square footage. The main span of wall shown in this video was 140″ long (by 6′ high), so that translates to 3 boxes of WoodHaven beadboard planks*.

*This episode is sponsored by Armstrong Ceilings! All opinions are 100% my own, which works out nicely since I loved using their product for this project!

Measure and Mark

I love that this dining room has 10′ ceilings. It makes it feel so grand! So to match that grandness, I decided to install my wainscoting 6′ high, so a little over halfway up the wall.

To make sure the boards are level across the whole wall, I marked 6′ up the wall every few feet. Then used my 4′ level to draw a line between my marks while also making them level. This is important since not all floors are level! But you do want your finished wainscoting to be level.

Remove Old Moldings

At this point, you can remove any existing moldings that may be in the way! For this room, I was doing away with the chair rail. You can’t tell in the video (or picture), but it was installed at a weird height and needed to go regardless.
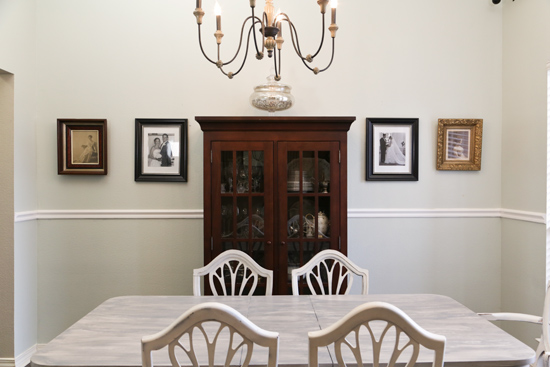
Dining Room with Chair Rail Before

Since the planks I’m using here are 3/8″ thick, they wouldn’t look good installed on top of the existing baseboard. So I carefully removed the baseboard and shoe molding so I could install the planks behind them. Set aside for re-installation later.

Next, head to your miter saw to make a bunch of cuts! Hint-I found it much easier to measure what you were cutting off the board rather than measuring what you were keeping! Since these planks were 84″ long and I was keeping 72″, I measured 12″ from the end with the tongue and made my cuts there.

Glue And Smooth

Just for efficiency’s sake, once you have most of your planks cut to length, get your caulk gun and construction adhesive ready! The planks are made of MDF and I’m attaching them to drywall, so just about any construction adhesive will work!

Apply adhesive to the back of a few boards and then place on the wall! Rub your hand in a circular motion over the board to ensure good tack on the wall. Then slide your next board into place, making sure the tongue goes into the adjoining groove fully.

Slowly, but surely, make your way down the wall-glue, press, repeat.

Trim It Out

To cap off the top of my planks and give them that ‘finished’ look, I glued a thin piece of screen molding to the top. (It’s plastic from the exterior molding section of the hardware store. I used the same adhesive as the wood planks.) This will disguise any slightly taller or slightly shorter boards and make it look like one big piece of beadboard!?

Then, re-install any baseboard or shoe molding you may have removed previously.

I did have to do a little puttying and touch up painting on the baseboard to cover the new nail holes. But the planks and the screen molding were prefinished, so no painting or sealing needed! Whoop!
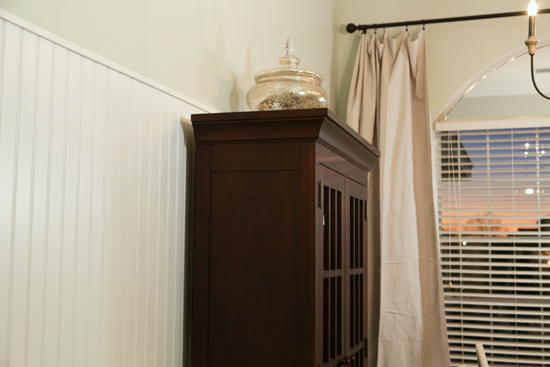
Sun Setting At the End of Another Finished Project

That sunset though!?

White Beadboard Wood Accent Wall in Dining Room Completed

I love the extended height and how it exaggerates the height of the room! You can still do this with shorter ceilings, but you may want to make the boards 5′ tall instead, or a little over halfway up the wall!

Let me know if you have any questions and what you think of this decorative project in the comments!

Thanks for Checking In! ~Chelsea

**This post contains affiliate links**

Subscribe for Free Updates!

Stay up-to-date on Chelsea's latest projects, tips, useful resources and more.

Previous Post
How to Store Door Wreaths
Next Post
DIY Wooden Initial Herb Garden

Related Content

Completed Wire Shelf Pantry UpgradeWire Shelf Pantry MakeoverRear View of Tan Vinyl House and Wood DeckHow to Refresh Your Wood Deck for a New LookHoney Oak Wood-Look Front Door Painting KitHow to Paint a Door to Look Like WoodCompleted DIY Bin for Hanging Things on PegboardDIY Pegboard Hanging Bins

Comments

  1. Debbie P says

    February 15, 2019 at 1:44 pm

    I swear you are in my head (project list). I need to give this a little thought as who would have “thunk it”! Nicely done – again!

    Reply
    • Chelsea Lipford Wolf says

      February 15, 2019 at 1:45 pm

      ?Haha! Thanks, Debbie! ~Chelsea

      Reply
  2. Brian C says

    February 16, 2019 at 6:41 am

    Great project Chelsea. Keep up the good work.

    Reply
    • Chelsea Lipford Wolf says

      March 1, 2019 at 10:29 am

      Thanks Brian! ~Chelsea

      Reply
  3. Anne Copping says

    February 16, 2019 at 8:23 am

    You must be physic as I have been wondering what to use for my kitchen. I wanted prefinished, I dislike painting as my Dad was a perfectionist and once took 6 months to do the trim in one room! I would like to hang sideways like shiplap just 4 feet high. I assume this as available at Home Depot. Thanks again, enjoy your no nonsense attitude to DIY.

    Reply
    • Chelsea Lipford Wolf says

      March 1, 2019 at 10:29 am

      Hi Anne! Armstrong has several styles available that can be hung horizontally, so check out their site! This particular one is available at Lowe’s. Good luck with your kitchen! ~Chelsea

      Reply
  4. Barbi K. says

    February 17, 2019 at 9:44 pm

    I love how high you took this up the wall, love it!!

    Reply
    • Chelsea Lipford Wolf says

      March 1, 2019 at 10:30 am

      Thanks, Barbi! I thought it was appropriate and turned out great! 🙂 ~Chelsea

      Reply
  5. tracy says

    March 6, 2019 at 3:47 pm

    Looks Great! Just wondering how you addressed the issue of receptacle now 3/8 of an inch recessed from the finished wall. How do you make it flush?

    Reply
    • Chelsea Lipford Wolf says

      March 13, 2019 at 12:55 pm

      Hi Tracy! Great question! You just unscrew the screws holding it into the electrical box to pull them out and around the plank! Then the cover goes over that. ~Chelsea

      Reply
  6. Judy Ketchum says

    August 4, 2022 at 2:12 pm

    Did you turn the power off when pulling out the electric outlet? When you put the 3/8 inch tongue and groove panel on? Also did you use liquid nails?

    Reply
    • Chelsea Lipford Wolf says

      September 8, 2022 at 11:45 am

      Yes I turned off the breaker for that outlet! And yes I used a construction adhesive to attach to the wall. ~Chelsea

      Reply

Please Leave a Comment Cancel reply

Your email address will not be published. Required fields are marked *

Welcome!

I’m Chelsea. DIY
enthusiast who loves
sharing my victories
and mishaps!
Learn more
here.

CHECK IN WITH CHELSEA ON INSTAGRAM

Lookie! It’s a shelf for your bookies! 🤣Build Lookie! It’s a shelf for your bookies! 🤣Building a shelf unit custom for ANY space in your home is so simple and can be done over and over again to add much needed storage aka sanity! The kids were running all over the house at bedtime trying to find a book to read because we had them stashed in baskets and shelves in several different rooms. So I took advantage of this space in the hall next to a closet to create a central location for their books and some of mine too! Plus it adds a little character to an otherwise blah space!🙌🏻
.
.
A full how to video is on checkinginwithchelsea.com! Book nerds can be DIY nerds too!🤓
.
.
#booknerdsunite #diyskills #beginnerdiy #bookshelfie #halldecor #storagesolutions #storageideas #bookstorage #bookstorageideas
5 months in and she’s at the top of my favorites 5 months in and she’s at the top of my favorites list!🥰
.
.
Couldn’t resist using this audio.😅
Using my grandmother’s cookie press to make 🎄 Using my grandmother’s cookie press to make 🎄cookies I used to make as a kid in our brand new kitchen. My heart could burst!😭 I hope you are enjoying the preparation for the main event 😇and bring love and joy to your home, no matter what it looks like.❤️💚
.
.
#christmascookies #christmastrees #familytraditions #christmasbreak #newkitchen #kitchendecor #kitchendesign #madewithlove
3D art install in my girls’ girly bedroom!🦋😍Love this $13 pack of butterflies that comes with everything you need to fill a large wall! And it only takes 30 minutes!🙌🏻 Putting the link to the butterflies in my bio! (https://amzn.to/3VmfZsB)
.
.
First step is to layout the flow of your fluttering butterflies with the large and medium sizes from the pack, leaving room for the small ones. Then fill in spaces with the small size and pat yourself on the back! So easy!
The whole Wolfpack has been staying at my parents’ house on the river for the past week while our hardwood floors are being refinished. Since the kids had the whole week off of school it has really felt like a vacation! Complete with a sunny Sunday boat ride after Mass!🥰🚤☀️Enjoy the rest of your weekend! 😘
.
.
#generationalliving #3generations❤️ #4kidlife #grandparentlife #boatday #riverside #riverlifestyle #fowlriver #alabamalifestyle #alabamablogger #nofilterneeded
Dad and I got our tickets to the gun show!💥 . . Dad and I got our tickets to the gun show!💥
.
.
@todayshomeowner @visitmobileal #exploreyourhometown #hometownpride #mobilealabama #battleship #ussalabama #visitmobile
Load More... Follow on Instagram

Indoor Projects Outdoor Projects Craft Projects
Facebook Pagelike Widget
  • Contact
  • FAQs
  • Advertise with Chelsea
  • Media
  • Today’s Homeowner

Search This Site

Receive Free Updates Via Email

Copyright © 2023 Checking in With Chelsea • All Rights Reserved