
How to Refresh Your Wood Deck for a New Look
Stripping Stain to Bring New Life to an Old Deck
Using a chemical stripper and scrub brush you can refresh your wood deck by stripping the stain to breathe new life into your worn deck in a weekend. Then seal it to keep it looking fresh for months to come!

Materials
- pressure washer*
- deck stain stripper*
- scrub brush*
- chemical-resistant gloves*
- eye protection*
- bucket*
- plastic*
- spray nozzle for hose*
- old toothbrush
- respirator, optional since they are hard to come by these days!

If you’re always doing a bunch of projects like I am, you probably already have most of these things on hand! My husband and I made a few mistakes, so we ended up using about 5 gallons of the stain stripper for our moderately-sized 14×11 deck. We could have easily gotten away with only using 4 gallons but I’ll tell you more about that later.
Clean For an Easy Refresh
The first step in any deck refresh project is to clean it! And preferably clean it more often than we apparently did. Ouch.


I used a simple, 1900 PSI electric pressure washer that was provided by RYOBI. However, I had previously purchased a 1600 PSI that I LOVE and still use. It’s easy to set up and doesn’t require gas, so you don’t have to remember to fuel up before you begin nor do you have to crank it!🙌🏻 Just push the button!

I cleaned the back of the house, windows, and door before I started on the deck handrails and boards. All-in-all it took about 45 minutes and already it looked so much better and refreshed!

But this story doesn’t end there…I wanted to remove the old stain that was mistakenly applied 8 years ago.
Plan It Out
One of the tricky things about stripping stain from your deck for me is the timing of it all. You do not want to use the stain stripper in direct sunlight (it will dry too quickly and you’ll end up using a ton of it!) Nor do you want to do it if it’s too hot (same reasons apply). So it’s important to plan out when you’ll be able to use the chemical stripper and get pumped to work as long as it’s light enough to see! Early mornings on the weekends, every evening between work and dinner.

Then to help keep track of where you’ve stripped and where you haven’t yet (besides the obvious), work in small sections that can be completed in one work session. We divided the deck boards into 4 sections. The handrails were divided by the 4×4 posts and further divided between inside and outside. The stairs and inside handrails there were their own section. I estimate that each section took about an hour, plus set up and clean up. In total it took us about 15 hours and $110 to strip the stain.
Cover and Protect
When you’re ready to refresh your deck by stripping the stain, you’ll want to cover yourself and the plants around your deck. Start by wetting plants and grasses that are up to 5 feet from your deck. Then cover them with your plastic sheeting. My extra tip is to then wet the plastic also to keep it from blowing up in a breeze.

Now for yourself. You’ll want to wear long pants, long sleeves, closed-toe shoes, chemical-resistant gloves and safety glasses. The chemical stripper burns if it makes contact with your skin. Ask me how I know…
You can watch the full process and my thoughts on refreshing a deck by stripping the stain in my Instagram story Deck Stripping highlight.
It’s also recommended to wear a respirator. But since you’ll be outside and respirators are in short supply due to the pandemic, I’d venture to say it is not necessary.
Apply Stain Stripper
OK, so you watched my Instagram story, you planned out when you’re going to refresh your deck and you’re still moving forward?? Just checking.
Pour some of the wood stain stripper into your bucket and apply using the scrub brush. Just get a good coating over your whole section, no scrubbing needed at this point. If you have some tight spaces that your brush won’t fit in, use an old toothbrush to apply the stripper. This really came in handy around the handrails on our steps for me!
Let it soak and work on the stain for at least 10 minutes before you test the waters by scrubbing.

Then go back to the part where you first applied it, and lightly scrub it. You should be able to see the dirty, goopy stain stripper and the clean wood underneath. If it doesn’t seem like the stripper is getting yuck and discolored, then you may want to wait another 10 minutes before trying again. (I know not everyone is on Instagram, but it might be worth signing up for an account and following me so you can watch my Instagram highlight on stripping our deck. There’s a good illustration of stripped vs not stripped!)
I don’t know how to explain it, but you will know if the stain is coming off. You’ll want to pay attention to the differences in color. Because if you don’t scrub all of the stain off, it will still be left behind and you’ll see it when it dries.
I thought, ‘Oh that’s good enough’ and didn’t get some of the nooks and crannies 100%. Well, it looked terrible after it had been rinsed and dried. I had to do an entire section again. Hence the mention about using more stripper than we probably needed.🤪
If it looks like it’s drying out before it’s time to scrub it, the directions tell you to apply more stripper to keep it damp. My tip is to use the spray nozzle on MIST and very lightly mist the surface to keep it damp. That way you don’t have to use more stripper and burn through more.
But as you’re scrubbing, you’ll see your brush is getting filthy! Keep a bucket with a small amount of stripper nearby and refresh your brush every few scrubs with more stripper. A few times I diluted the stripper in the bucket with a little water and that seemed to work just fine too!
You’ll also want to keep your water hose with a spray nozzle nearby to rinse off the brush between scrubbings. You don’t want to push around old stripper as you’re scrubbing. You want to be pulling new stripper off your deck as you work your way across each section.
(At this point can we just get over the fact that no matter how the word ‘stripper’ is used in this post it sounds inappropriate??😩😩)
Rinse It Off
Speaking of rinsing…when you’ve completely scrubbed a section and are satisfied you’ve scrubbed it enough, turn your spray nozzle onto the jet setting. You’ll want to methodically blast the remaining stripper off your deck. You will see the difference in your deck right away!! Keep rinsing until the water comes clean. Any stripper left behind will leave a milky residue when everything is dry.

My rinse water was yellow even though the previous stain on my deck was pretty red.🤷🏼 But once the water turned clear, I knew that section was rinsed well.

It is not recommended that you use anything stronger than a spray nozzle, like a pressure washer, for this step. It can damage the wood of your deck since the pores of the wood are already venerable from the chemical stripper. BUT I will say I wished we had pressure washed our deck maybe the day after we completed the stain stripper. It looks fine, but when I look closely (aka try to find something wrong with it🙄) I can tell that some sections look dingy compared to others.
However, this would not be a problem if we had gone back with another deck stain. More on this in a bit.
When you’ve rinsed everything to your satisfaction, rinse off your plants and grass and your plastic too! And move on down to the next section!
To Stain or Seal
This post is already getting pretty lengthy, but who doesn’t love a backstory to a DIY project?? A few months after my beautiful deck was built, we had a deck stain sponsor and needed a location for a video of applying stain.

I selected the stain color and was set to stain the deck. However, the stain arrived on the day of the shoot and it was THE WRONG COLOR.
Well we needed the video shot that day and didn’t have an opportunity to get another stain in time. So I had to begrudgingly stain my beautiful natural-colored deck a campy, orange Cedar.
Shortly after my husband and I were married, it was time to address the deck stain situation. (Probably 2 years after the initial staining.) We decided to strip it but I wasn’t that good at it and didn’t have the work ethic/stamina I have now. So we didn’t put that much effort into refreshing our deck by stripping the stain back then and compromised by re-staining it after the stripping to an in-between color. It was in-between what I wanted (natural deck boards) and what we had (orange). It ended up being fine. But I still yearned for that natural wood look.
So here we are, 6 years later, making my dreams come true!🤗

Alll that to say, we never planned to stain it after stripping this go-round. We were going to seal it with a clear waterproofing sealer* and call it a day. SO we put extra emphasis on stripping it and stripping it well.
If I had to do it again, on an 8 year old deck like this, I would go the semi-transparent wood stain route in the lightest color option. Pressure-washing and stain stripper can only do so much on wood that old. It has aged and there’s only so much you can do about it.
SO, keep that in mind if you’re in a similar situation. A new deck can be sealed with clear, 5+ years use a semi-transparent stain, and a 10+ year old deck deserves a solid deck stain. As a last result before replacement, then you can consider one of the products like DeckOver.
Finish It Up
Either way you go, you’ll want to wait until the deck is dry, say 24 hours. The same weather conditions as the stripper apply too.
I liked the sealer since it could quickly be back-brushed since you wouldn’t be able to see the brushstrokes. I loaded up my pump-up sprayer, sprayed 2 boards at a time, brushed it with a large brush and moved on to the next boards. (Again this is in my Instagram highlights. At this point in the project I was ready to be DUN. Not done. But DUN!)
But of course in true Chelsea fashion, I decided to change out the light fixture and paint the back door. Oh and we also had 2 rotten boards we needed to replace.

It all brings us to this point where the deck is DUN and it looks beautiful! Despite my grumblings earlier…


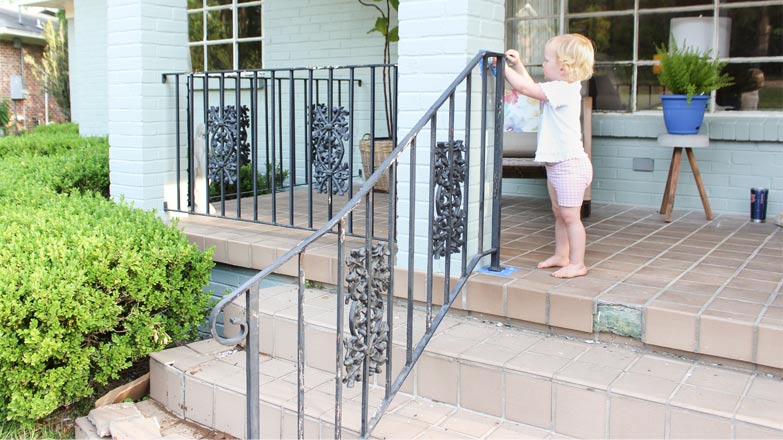
And as a finishing touch, I added a 2×2 on either side of our stairs for the younger residents of our house to use! Quick little addition for less than $5!

Now, it doesn’t look like a brand new deck by any means. But it’s so much better and refreshed after stripping the stain.💯


Sources:
Deck gate tutorial
Thanks for sticking around to the end of this post! And thanks for Checking In! ~Chelsea

*This post contains affiliate links. I will earn a small commission from your purchase without increasing the price for you!*

2 Comments
Darryl Hill
I love your Dad’s show and I watch you guys every Sunday here in Hawaii.
Can you tell me the best way to remove the Bear deck over paint. My deck was built in 2017, I let the pressure treated wood dry for 3 months. I followed the directions to the T. Now in 2 yrs it’s pealing like crazy. I want it up so what’s the best way. I can remove most of it by hand but I have a bad back. Should I scrape it or what. Please help.
John James McDonald
To apply stripper, one can also use an inexpensive garden sprayer. The stripper will get in all small spaces.