Checking In With Chelsea

DIY ideas, crafts, and tips for your home

subscribe and never miss a thing!

Receive Free Email Updates

  • About
  • Videos
  • Projects
    • Indoor Projects
    • Outdoor Projects
    • Craft Projects
  • House Tour
You are here: Home / Videos / DIY Fall Metal Door Hanger

DIY Fall Metal Door Hanger

November 1, 2018 By Chelsea Lipford Wolf 2 Comments

Video Playback Not Supported

How to Make a Wreath Out of Metal Flashing
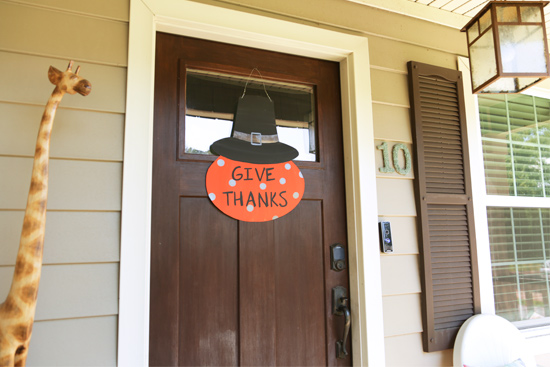
Give Thanks Pilgrim Pumpkin Hanging on Front Door

I’ve seen people on my personal Facebook with wreaths or door hangers in cute shapes made out of metal. But when I went to search what to use, all I found were $45-50 already-made ones on Etsy. While, there’s nothing wrong with that, I obviously wanted to make my own!! So I found a solution and now I’m sharing with all of you, in case you want to make a metal wreath for the fall or any occasion! The options are endless when you make it yourself!?

Materials

    • aluminum flashing
    • gloves
    • metal snips*
    • acrylic craft paint
    • paint brushes
    • nail/hammer
    • 20 gauge wire*

Cut the Metal

I showed in the video above how I printed a stencil to trace onto the metal. Here is the stencil you can download and print yourself! Click the image below to take you to the PDF for a higher quality image!

Pilgrim Pumpkin Door Hanger Stencil

Simply cut the outline of the pumpkin and hat and tape to your metal before tracing with a permanent marker. Then with small snips, slowly cut around the outline on the metal. And WEAR GLOVES for this part! The metal can easily slice your finger if you accidentally slide along the edges, but once you’re done cutting it’s not that hazardous!

Pumpkin Painting

Use whatever paint you want! I used acrylic craft paints since they are so cheap and come in so many colors! You can find them at Michael’s, Hobby Lobby, Walmart, etc. As I mentioned in the video, I cut up my stencil so I could use the curve of the hat to trace onto the metal before painting along it with my black and orange paints. Just an FYI in case you’re leery of free-handing like me!

Also be sure to paint uniformly since the brush strokes will be somewhat visible once the paint dries. After the first coat dries, apply a second coat of paint. I found that if the first coat wasn’t thoroughly dried or if I didn’t keep enough paint on my brush, the first coat of paint would peel off.

Once the second coat is dry, jazz it up! You can add paint to the hat strap or leave the metal bare while adding a buckle. I wrote ‘Give Thanks’ on mine with a permanent marker before going back over it with black paint to make the letters thicker.

You can add lines on the pumpkin in a lighter color to add some interest or keep it simple with some polka dots! Because polka dots are always in season!?

Add Hanger

I used a 6d finish nail to tap holes in the top of my wreath. Then used some wire I had on hand to create a hangar. Of course you can adjust the length of the wire to suit your door! My favorite part of DIY-ing=customization!

After I was finished with my pumpkin a coworker pointed out that it’s the same shape as Frosty the Snowman’s hat and face and I could easily paint the backside to make a winter decoration too! Genius level stuff right there!!

Let me know if you make a metal wreath for your door in the comments below! I’d love to see them! Since I made this pumpkin, I also used the same techniques to make a yellow jacket (my high school’s mascot) for a friend whose son plays for their football team. (I cheated and used my Cricut to cut out and apply the #31. But everything else is hand-painted.)
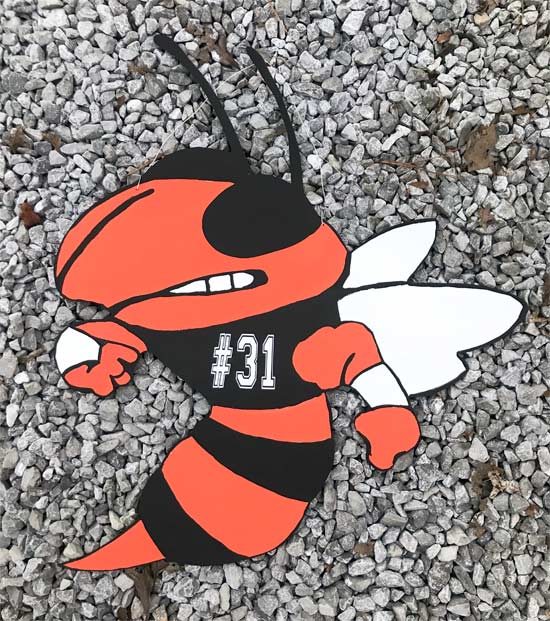
Yellow Jacket Mascot Metal Door Hanger

The possibilities are endless once you know the how-to!

Thanks for Checking In! ~Chelsea

*This post may contain affiliate links*

Subscribe for Free Updates!

Stay up-to-date on Chelsea's latest projects, tips, useful resources and more.

Previous Post
Tips for Painting Interior Doors
Next Post
How to Store Door Wreaths

Related Content

Completed Girls Bedroom Makeover Pink PanelingPink Girls’ Shared Bedroom Evolution1950s Ranch Kitchen Before Renovation1950s Kitchen Renovation IdeasTips for Selling Your Stuff OnlineHow to Make Big Money Decluttering Your HomeMoodboard for Calm and Cozy Family Room DenCreating a Calm and Cozy Family Room

Comments

  1. Michael Hoffman says

    October 24, 2019 at 7:02 pm

    pdf file does not come up.

    Reply
    • Chelsea Lipford Wolf says

      October 25, 2019 at 11:28 am

      Thanks for letting me know! It’s all fixed now! ~Chelsea

      Reply

Please Leave a Comment Cancel reply

Your email address will not be published. Required fields are marked *

Welcome!

I’m Chelsea. DIY
enthusiast who loves
sharing my victories
and mishaps!
Learn more
here.

CHECK IN WITH CHELSEA ON INSTAGRAM

Lookie! It’s a shelf for your bookies! 🤣Build Lookie! It’s a shelf for your bookies! 🤣Building a shelf unit custom for ANY space in your home is so simple and can be done over and over again to add much needed storage aka sanity! The kids were running all over the house at bedtime trying to find a book to read because we had them stashed in baskets and shelves in several different rooms. So I took advantage of this space in the hall next to a closet to create a central location for their books and some of mine too! Plus it adds a little character to an otherwise blah space!🙌🏻
.
.
A full how to video is on checkinginwithchelsea.com! Book nerds can be DIY nerds too!🤓
.
.
#booknerdsunite #diyskills #beginnerdiy #bookshelfie #halldecor #storagesolutions #storageideas #bookstorage #bookstorageideas
5 months in and she’s at the top of my favorites 5 months in and she’s at the top of my favorites list!🥰
.
.
Couldn’t resist using this audio.😅
Using my grandmother’s cookie press to make 🎄 Using my grandmother’s cookie press to make 🎄cookies I used to make as a kid in our brand new kitchen. My heart could burst!😭 I hope you are enjoying the preparation for the main event 😇and bring love and joy to your home, no matter what it looks like.❤️💚
.
.
#christmascookies #christmastrees #familytraditions #christmasbreak #newkitchen #kitchendecor #kitchendesign #madewithlove
3D art install in my girls’ girly bedroom!🦋😍Love this $13 pack of butterflies that comes with everything you need to fill a large wall! And it only takes 30 minutes!🙌🏻 Putting the link to the butterflies in my bio! (https://amzn.to/3VmfZsB)
.
.
First step is to layout the flow of your fluttering butterflies with the large and medium sizes from the pack, leaving room for the small ones. Then fill in spaces with the small size and pat yourself on the back! So easy!
The whole Wolfpack has been staying at my parents’ house on the river for the past week while our hardwood floors are being refinished. Since the kids had the whole week off of school it has really felt like a vacation! Complete with a sunny Sunday boat ride after Mass!🥰🚤☀️Enjoy the rest of your weekend! 😘
.
.
#generationalliving #3generations❤️ #4kidlife #grandparentlife #boatday #riverside #riverlifestyle #fowlriver #alabamalifestyle #alabamablogger #nofilterneeded
Dad and I got our tickets to the gun show!💥 . . Dad and I got our tickets to the gun show!💥
.
.
@todayshomeowner @visitmobileal #exploreyourhometown #hometownpride #mobilealabama #battleship #ussalabama #visitmobile
Load More... Follow on Instagram

Indoor Projects Outdoor Projects Craft Projects
Facebook Pagelike Widget
  • Contact
  • FAQs
  • Advertise with Chelsea
  • Media
  • Today’s Homeowner

Search This Site

Receive Free Updates Via Email

Copyright © 2023 Checking in With Chelsea • All Rights Reserved