Checking In With Chelsea

DIY ideas, crafts, and tips for your home

subscribe and never miss a thing!

Receive Free Email Updates

  • About
  • Videos
  • Projects
    • Indoor Projects
    • Outdoor Projects
    • Craft Projects
  • House Tour
You are here: Home / Indoor Projects / Double-Duty Homeschool Playroom

Double-Duty Homeschool Playroom

August 5, 2019 By Chelsea Lipford Wolf Leave a Comment

What You Need for A Homeschool Room
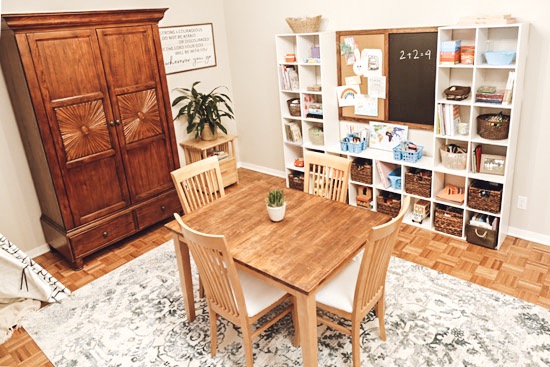
What You Need for a Homeschool Playroom Multipurpose Room

Yes! You can have a room pull double-duty as a homeschool room and playroom with just a few organizational ideas and zones with purpose!

I love helping homeowners find solutions to their home problems, whether it’s a repair type of problem or a design dilemma! For the homeowners we worked with on this project (for an episode of Today’s Homeowner which you can watch online here!), they didn’t know how to incorporate all of the functionality they needed out of this room. So it just kind of sat there.
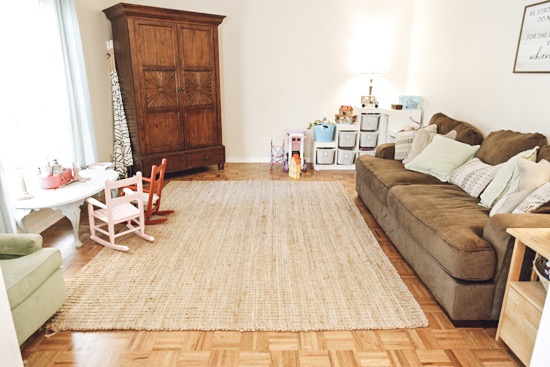
Formal Living Room Before Updates for Multipurpose Room

Repurpose What Doesn’t Work

My favorite part about this project is that Emily and John are making their house work for them! They don’t need a formal living room, but they do need a separate space for homeschooling. Their original situation was ‘doing school’ at the dining table in the kitchen. As you can imagine having to clear school work for meals and vice versa would get old fast. Not to mention mentally switching back and forth when you’re in the same space can be difficult for adults, let alone young children!

So our first step was to bring a table into the new school room. We found a small, but adequate, table on Facebook Marketplace. We recovered the seat cushions with cleanable white vinyl and re-stained the top. It became the centerpiece for the room.

Multipurpose Room in Old Formal Living Room

(Check out my video on how I painted and recovered chairs for my dining table!)

Actually the size of the table was perfect since it didn’t fill up the room and left space for playing for the 2 younger children!

Reading Corner and TeePee for Kids Playroom

As we removed things from the room that weren’t going back in, Emily took pictures and sold them on Facebook. So by the time we left at the end of the week, she had sold their old organizers, the couch and the rug.😅 Gotta love it!

Reconfigure Store-Bought Items

A big workhorse we added to this room is cube organizers! 4 of them to be exact! But we didn’t just assemble and forget. We laid 2 on their side on the floor and then stacked 2 more vertically on top of those. They were glued and screwed together and attached to the wall so they won’t be a tipping hazard.

This configuration created a space in the middle for a small chalkboard and bulletin board. It also created A LOT of storage! But not just for homeschooling materials. We were also able to store toys in baskets!
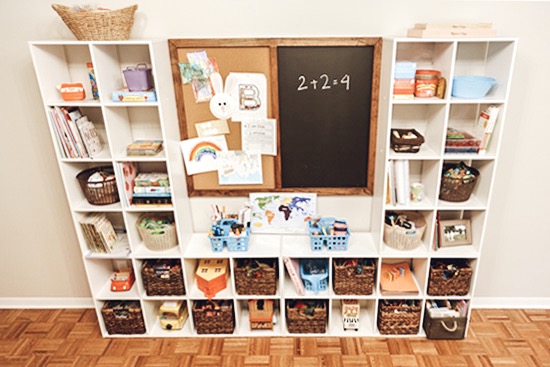
Cube Organizers Mounted Together for Homeschool Storage

Add Lighting

A big issue with the ‘before’ of this space was lack of overhead lighting. You know you need to be able to see what you’re learning! This part did require an electrician to run wires in the ceiling, but I think it’s definitely an investment in education! We selected and installed this wide light fixture with lots of bulbs for maximum light!

Industrial Light Fixture with 8 Bulbs for Large Room

Hide the Mess

The biggest downside to transforming a formal living room into a space primarily occupied by kids is there usually aren’t doors to hide the mess. So our solution was to add sliding doors. We bought regular 6-panel doors that matched the rest of the doors in their house and installed them with barn door-type hardware.

Double Barn Doors to Close Off Old Formal Living Room

Now when guests stop by and the kids have torn up the room while playing, slide the doors closed and make the mess disappear! This is something I can definitely appreciate!☺️
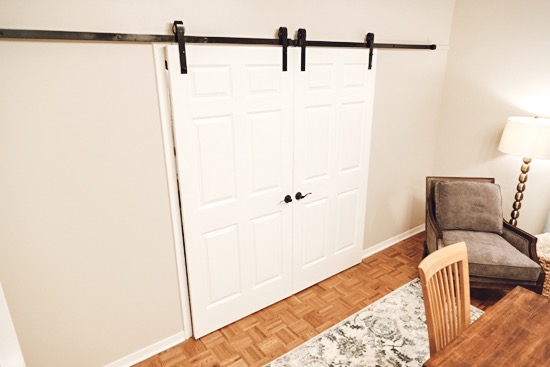
6 Panel Doors Used with Barn Door Hardware

I love the way this room turned out and I love being able to share a different side of the story than what you might see in the TV episode! I’ve got more Today’s Homeowner projects planned to share, so I hope you like reading about them and seeing them here!

Thanks for Checking In! ~Chelsea
Subscribe for Free Updates!

Stay up-to-date on Chelsea's latest projects, tips, useful resources and more.

Previous Post
Introducing Lucy Anne!
Next Post
DIY Artwork Display Wire

Related Content

Completed Girls Bedroom Makeover Pink PanelingPink Girls’ Shared Bedroom Evolution1950s Ranch Kitchen Before Renovation1950s Kitchen Renovation IdeasCompleted Wire Shelf Pantry UpgradeWire Shelf Pantry MakeoverTips for Selling Your Stuff OnlineHow to Make Big Money Decluttering Your Home

Please Leave a Comment Cancel reply

Your email address will not be published. Required fields are marked *

Welcome!

I’m Chelsea. DIY
enthusiast who loves
sharing my victories
and mishaps!
Learn more
here.

CHECK IN WITH CHELSEA ON INSTAGRAM

Ask me how I know😑Whether you’re doing a smal Ask me how I know😑Whether you’re doing a small patch or a whole room, this drywall sanding hack will keep the dust at bay and keep the rest of your house looking good😎
.
.
#drywall #diyhack #tipsandtricks
A Spring Break to remember! Thanks to CeeCee and P A Spring Break to remember! Thanks to CeeCee and Pop Daddy for bringing the Wolfpack along on vacation! A long travel day ahead of us but it’s always worth it to spend time with family and get some r&r.☀️😴 Happy weekend!
9 years!✨Brandon and I will be celebrating 9 yea 9 years!✨Brandon and I will be celebrating 9 years of marriage this week. And how perfect we were invited to a wedding tonight walking distance from our home.🥰Sometimes reality is better than the movies and this weekend is one of those times. Enjoy, friends!☀️
What else do you use paper plates for besides eati What else do you use paper plates for besides eating?? Spray paint onto a paper plate and dab a small paint brush to do spot touch ups! Life hack when you’re working on a project but don’t need to paint the whole surface!👏🏻
.
.
#lifehack #diyhacks #spraypainting #painttips #paintprep #paintpro #shutters #craftsman #1940style
Didn’t mean for this to be #ASMR but here we are Didn’t mean for this to be #ASMR but here we are!🤷🏼‍♀️ I bought this orchid 15 months ago to use the flowers in our hair for my sister’s wedding. I’ve already repotted it once and it’s bloomed 3-4 times! Time to do it again with a pretty new pot that matches our new kitchen cabinets!🤩
.
.
Steps to repot an orchid:
1-large pot without drainage holes
2-plastic pot slightly smaller with holes
3-trim if needed so plastic pot is at or below outside pot
4-add layer of orchid specific potting mix (it looks like bark!)
5-add orchid, fill in around roots with more bark- don’t forget to add some mix under the leaves!
6-to water, soak bark and fill up outside pot, rinse the leaves too!
7-let sit for 5-10 minutes, then drain and dry the outside of your pot.
8-set in place and enjoy!🌷
New laundry, who dis? Our laundry room was a BLANK New laundry, who dis? Our laundry room was a BLANK slate after the kitchen renovation left it reconfigured too. So Dad and I tackled simple projects that make this space functional and of course visually pleasing too!👏🏻The full project airs this weekend on @todayshomeowner!
.
.
I love that the cabinets and hardware match what we have in the kitchen since the spaces are right next to each other! Synergy!
.
.
What do you love about your laundry room?
Load More... Follow on Instagram

Indoor Projects Outdoor Projects Craft Projects
Facebook Pagelike Widget
  • Contact
  • FAQs
  • Advertise with Chelsea
  • Media
  • Today’s Homeowner

Search This Site

Receive Free Updates Via Email

Copyright © 2023 Checking in With Chelsea • All Rights Reserved