Checking In With Chelsea

DIY ideas, crafts, and tips for your home

subscribe and never miss a thing!

Receive Free Email Updates

  • About
  • Videos
  • Projects
    • Indoor Projects
    • Outdoor Projects
    • Craft Projects
  • House Tour
You are here: Home / Videos / How to Create Workshop on a Budget

How to Create Workshop on a Budget

April 20, 2020 By Chelsea Lipford Wolf 1 Comment

Video Playback Not Supported

Budget-Friendly Garage Workshop Makeover

Painting and reusing old cabinets is a great way to create a defined workshop area in a garage. And adding casters to an old table saves money and gives you a portable workbench!
Pink Cabinets in Workshop with White Pegboard

Materials

  • milk paint (ballet pink)*
  • paint sprayer (my most favorite one ever!)*
  • scrap cardboard
  • sandpaper
  • respirator
  • 3 inch screws
  • drill/driver
  • casters (30% off right now!)*
  • 3/8″ and 3/4″ drill bits
  • 2-part epoxy glue like this

Clean and Paint

Depending on how old your cabinets are and where they’ve been stored, they may require some repairs before they can be painted! Mine needed a good cleaning to get rid of the mildew (just 50/50 vinegar and water in a spray bottle) and a good sanding. I used 120-grit sandpaper to knock off any build up and smooth out any bare spots. Then wiped it down again to wash off the sanding dust.

Can you believe these cabinets are 79 years old?!

To paint, I’m using my tried-and-true paint sprayer* I got from Woodcraft*!

*This episode is sponsored by Woodcraft. However, I’ve been shopping their website for many years and all opinions are 100% my own.*

I’m also using a milk paint I’ve used before and loved! This time I’m going with the color ‘Ballet Pink’ because it’s my signature color.☺️

I added just a touch of water to the paint to help it flow through the sprayer. The paint can suggests using a respirator if using the paint in a sprayer, so I’m going with it!

Hang Cabinets

All cabinets have a brace or piece of thicker wood at the top and underneath to drive screws through for hanging. Since most cabinets are backed by a thin piece of plywood or luan, this brace, or cleat, is really the only place to use for hanging.

I hung cabinets in a friend’s laundry room a few years ago and have a detailed post on installing wall cabinets here.

Having open stud walls like I have in my garage made it easy to know where to drive the screws! If you don’t have open walls, make sure to mark your studs above and below the cabinets before getting into position!

Doors and Hardware

After the cabinets were hung, I was able to re-install the doors with the same hinges (saving that moo-la!) and cute, white enamel knobs which I can only assume are original to the cabinets and my house!

How to Paint and Hang Old Cabinets to Reuse

If you’re desperate for new knobs, pulls or hinges, be sure to bring your old ones to the store with you to pick out new ones! It’s so much easier to line them up side-by-side then trying to measure those tiny things!

Casters for Table

When I made over this table, I originally planned to sell it locally.
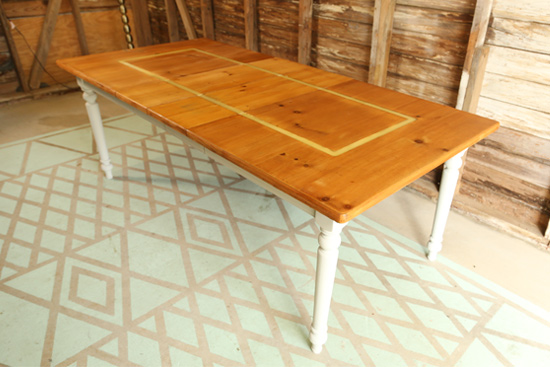
Completed Faux Inlay Table Makeover

However, I loved it too much and my hoarder tendencies took over! It’s been sitting in my garage since I updated it waiting for its calling.🙄

So when it was time to make my garage into a bonafide workshop, I knew this table would be perfect for a portable workbench. Under normal circumstances, it might be a little too fancy for a rough and tough workshop table. But since I found it on the side of the road for free, I don’t have much to lose here!

To add these casters that I ordered from Woodcraft.com*, Dad and I used a 3/4 inch paddle drill bit to create a hole for the washer attached to the casters, about 1/2 inch down. Then we used a 3.8 inch drill bit to drill a smaller, deeper hole for the bolt of the caster to go in.

Since these casters are technically made for metal table legs with pre-drilled threads, we’re adapting the process to fit wood legs! They won’t fully tighten and stay that way so we added an epoxy glue that’s suitable for wood and metal alike. Once we screwed in the casters and tightened as much as we could, we let the table sit upside down overnight to cure.

We flipped the table over in the morning and she had a new life, again!

Watch for More!

The entire transformation of my workshop, with the help of my Dad, is on this week’s episode of Today’s Homeowner! You can click here to find where and when it airs in your town and set up your DVR!

Thanks for Checking In! ~Chelsea

*Thanks to Woodcraft for sponsoring this episode! If you use the links in this post to make a purchase, I may receive a small commission without adding cost to you! Please support the brands that support me and my website!*

Subscribe for Free Updates!

Stay up-to-date on Chelsea's latest projects, tips, useful resources and more.

Previous Post
How to Dye Drop Cloths for Patio Curtains
Next Post
How to Make a Cheap 30-Minute Plant Stand

Related Content

Completed Hand Painted Pennant Flag Banner Kid BedroomDIY Pennant Banner for Kids RoomBrick Retaining Wall How to Waterproof and PaintWaterproofing Vertical Masonry WallSitting on Back Steps After Finally Sealing BricksStripping Paint from BricksCompleted Wire Shelf Pantry UpgradeWire Shelf Pantry Makeover

Comments

  1. betty murphy says

    April 30, 2020 at 11:01 am

    I love your sheshop and need one but it is hard to deal with a metal shed I have with metal studs .I love how you reuse and my favorite place is habitat for humanity > did painted rugs in my house in NJ a long time ago .I had plain concrete floors in the basement and wanted to pretty them up .So I love your pretty unreal rug

    Reply

Please Leave a Comment Cancel reply

Your email address will not be published. Required fields are marked *

Welcome!

I’m Chelsea. DIY
enthusiast who loves
sharing my victories
and mishaps!
Learn more
here.

CHECK IN WITH CHELSEA ON INSTAGRAM

What else do you use paper plates for besides eati What else do you use paper plates for besides eating?? Spray paint onto a paper plate and dab a small paint brush to do spot touch ups! Life hack when you’re working on a project but don’t need to paint the whole surface!👏🏻
.
.
#lifehack #diyhacks #spraypainting #painttips #paintprep #paintpro #shutters #craftsman #1940style
Didn’t mean for this to be #ASMR but here we are Didn’t mean for this to be #ASMR but here we are!🤷🏼‍♀️ I bought this orchid 15 months ago to use the flowers in our hair for my sister’s wedding. I’ve already repotted it once and it’s bloomed 3-4 times! Time to do it again with a pretty new pot that matches our new kitchen cabinets!🤩
.
.
Steps to repot an orchid:
1-large pot without drainage holes
2-plastic pot slightly smaller with holes
3-trim if needed so plastic pot is at or below outside pot
4-add layer of orchid specific potting mix (it looks like bark!)
5-add orchid, fill in around roots with more bark- don’t forget to add some mix under the leaves!
6-to water, soak bark and fill up outside pot, rinse the leaves too!
7-let sit for 5-10 minutes, then drain and dry the outside of your pot.
8-set in place and enjoy!🌷
New laundry, who dis? Our laundry room was a BLANK New laundry, who dis? Our laundry room was a BLANK slate after the kitchen renovation left it reconfigured too. So Dad and I tackled simple projects that make this space functional and of course visually pleasing too!👏🏻The full project airs this weekend on @todayshomeowner!
.
.
I love that the cabinets and hardware match what we have in the kitchen since the spaces are right next to each other! Synergy!
.
.
What do you love about your laundry room?
So funny the number of people who told us they loo So funny the number of people who told us they looked at our house when it was on the market but didn’t buy. Guess we’re the only suckers🤣🤣We’ve brought her a long way since closing day though! 👏🏻😍🤩
.
.
#ranchrevival #ranchreno #1950shouse #beforeandafter #housereno #pinkgirlroom #girlsbedroom #diningroomdecor #familydining
Exploring new cities is fun but there’s no place Exploring new cities is fun but there’s no place like my hometown! Come visit!💜💛
.
.
#mobilealabama #visitmobile #mardigras #travelbloggervibes #southerncharm
Lookie! It’s a shelf for your bookies! 🤣Build Lookie! It’s a shelf for your bookies! 🤣Building a shelf unit custom for ANY space in your home is so simple and can be done over and over again to add much needed storage aka sanity! The kids were running all over the house at bedtime trying to find a book to read because we had them stashed in baskets and shelves in several different rooms. So I took advantage of this space in the hall next to a closet to create a central location for their books and some of mine too! Plus it adds a little character to an otherwise blah space!🙌🏻
.
.
A full how to video is on checkinginwithchelsea.com! Book nerds can be DIY nerds too!🤓
.
.
#booknerdsunite #diyskills #beginnerdiy #bookshelfie #halldecor #storagesolutions #storageideas #bookstorage #bookstorageideas
Load More... Follow on Instagram

Indoor Projects Outdoor Projects Craft Projects
Facebook Pagelike Widget
  • Contact
  • FAQs
  • Advertise with Chelsea
  • Media
  • Today’s Homeowner

Search This Site

Receive Free Updates Via Email

Copyright © 2023 Checking in With Chelsea • All Rights Reserved