How to Use a Router and Resin to Create an Inlay
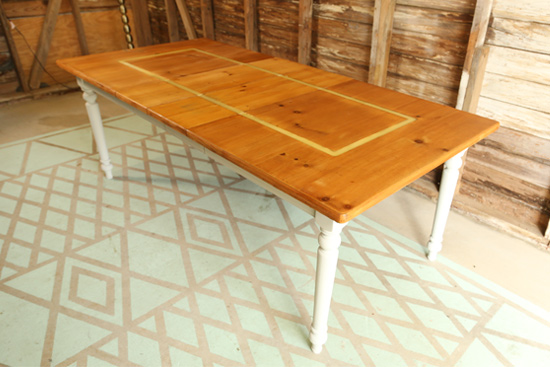
I am not kidding when I tell you that I’ve had this dining room table in my garage for over 4 years waiting for a makeover. Thinking back brings up fond memories since it was the week of my wedding when I found her in someone’s trash pile. I knew she could be brought back to life with a little love so I’ve been trying to come up with the right project. I wanted to do something neat and different from just re-staining or painting it.
I can’t even remember what inspired me but once I thought “inlay” I never looked back. I knew that would be perfect for this table. {Be sure to click the video player above to watch this month’s episode!}
**This month’s episode is sponsored by Woodcraft. They’re a fabulous resource for anything to do with working with wood. They provided some of the materials for my table project.
Materials
- router with straight bit*
- 1x8s
- clamps
- white paint*
- sander
- 2-part resin and hardener*
- disposable mixing container
- wax paper
- hair dryer and/or straws
- painter’s tape
- wood stain/polyurethane
- baby powder/glitter-optional
Measure for Inlay Channel
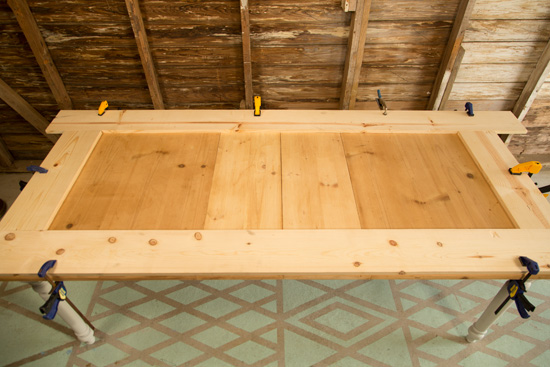
Before firing up your router, decide where you want your inlay channel to be. I knew I wanted to use stock lumber as a guide, so I figured a 1×8 would be perfect. Since it’s 7.5 inches wide and the base of my particular router is 2.5 inches from edge to bit, my inlay channel starts about 10 inches from the edge. If you want your inlay to be closer to the edge, use 1x6s instead!
I lined my 1x8s up along the edge of my table and clamped them in to place. I used a full 1×8 on each of the long edges and then cut a third 1×8 to fit between them on the short edges of my table. Of course the length may vary depending on the size of the table you’re working on.
Using a Router
Don’t let the fact that I used a router for this project deter you from doing a similar project! I used a router for the first time about 2 weeks ago in preparation for this table. As with any power tool, you want to take the proper safety precautions. Wear safety glasses and always be aware where the power cord is so you don’t cut through it. But for a project like this, it’s super easy!
I used a plunge router which means you can set it on your work surface, turn it on and then plunge the bit into the surface. It’s ideal for working in the middle of a table like this. Also of note is that I used a straight bit that was 1-1/4″ wide. That’s definitely on the larger range of bits I’ve seen, but that meant I didn’t have to reset my guides after the first pass to get my channel the width I wanted.
Speaking of guides, that’s what the 1x8s are, in case that wasn’t clear. When you’re ready to route, you can push your router tight against the clamped 1x8s and that will keep your channel uniform around the entire table.
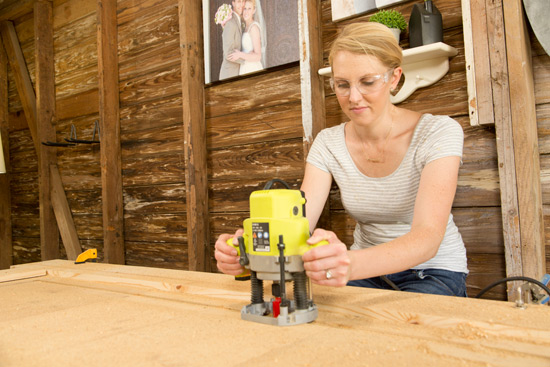
My last note on using a router is to set the depth gauge so that you only take out an eighth of an inch at a time. {Watch the video above for a good visual of adjusting the depth gauge.} Though this required me to do 2 passes along the same pattern to get the depth I wanted. The deeper it is the more resin you’ll need. Depending on the resin you use, the depth can change the saturation and color once it’s dry.
Prepping for Resin
Before prepping your resin, I’d recommend quickly painting your channel if you’re using a clear or transparent resin. It will help conceal any flaws, like particleboard, and give your resin a uniform look.
Next, spread either painter’s tape or wax paper along your channel to protect it. You’ll also want to cut some small strips of wax paper to tape between the table leaves (if you’ve got ’em!) to make a dam for the resin. Alternatively, you could tape some popsicle sticks. They’ll require a little more oomph to remove after the resin has set up, but not so much so that they can’t be removed!
Mixing Epoxy Resin
If you’ve ever been to a bar with really shiny tabletops, that’s resin for ya. But in small quantities it looks a little different. I’d recommend picking up something for mixing that you don’t mind ruining. I got a small cup with a pour spout in the lid from the dollar store. It was a little small and required me to do 2 batches of resin, but that worked out fine.
The resin I used from Woodcraft* has 3 different hardeners to choose from based on the temperature of your work area. I went with the middle temp hardener, #2*.
You’ll use 2 parts of the resin to 1 part of the hardener. But before mixing them together, I added some baby powder and some grout glitter to add a little pizazz. The baby powder can help make the resin dry harder and give it the milky the look I was wanting.
Stir it thoroughly, but try to minimize the amount of bubbles you introduce to the mix since those will show up later. It’s best to keep your stir stick on the outside edge while you slowly and methodically stir. Don’t scramble or make figure 8s like I do when I’m making eggs.
Pouring Resin for Inlay
Pour the mixed resin into your channel. Again, slowly and methodically so you don’t have overflow or drips. I like to pour a small layer throughout the whole channel and then come back and fill to the top.
Check your dams for leaks as the resin fills up. You may need to reinforce it with extra tape or popsicle sticks as more resin presses against it.
Once all of your resin is poured, you’ll need to bring any air bubbles to the top of your resin and remove them. You can try heating up the resin with a hair dryer held at a distance. A heat gun would be better if you’ve got one!
Alternatively, you can closely blow the bubbles out with a straw. You’ll appreciate a bubble-free surface once the resin dries!
Sanding and Finishing the Resin
I waited 24 hours for my resin to fully cure before getting out the sander and 150-grit sandpaper. I didn’t want the glossy, amber look of the cured resin so I sanded to remove a very thin layer off the top. It made it matte and more bone-colored. Just what I wanted for this piece. But this step is optional! To each their own, I say!
For my particular table, the final step was to apply stain and polyurethane to the wood top. After 2 coats of that, my table was complete and ready for a feast!
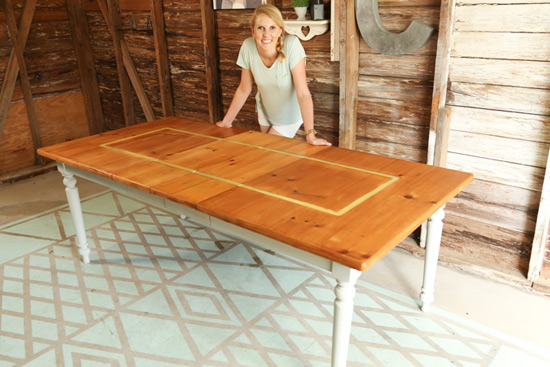
I love that I finally found a project for this 4-year old table. It’s so refreshing to breath new life into something that was sad and worn, even if it is a giant dining table! Let me know if you’re into inlay right now like I am in the comments below!
Thanks for Checking In! ~Chelsea
*This post may contain affiliate links*



When you put the boards on it reminded me of a barn door .Great way to get cheap barn door build .Find a table and if the legs are bad no big deal
Interesting idea, Sissy! Thanks for watching! ~Chelsea
Great Job You really know your stuff
Thanks, Jimmy! I try to convey as much information about each project so there isn’t any what-if scenarios! ~Chelsea
Great job Chelsea. I so admire that fact that you face each job with determination and know-how. I can also tell that details are very important.
This is the year of the woman and CHELSEA!!! You Go Girl.
Haha! Thanks so much, Kris! Sometimes I can be a little too-detail-oriented, ha! But the devil is in the details, especially when you miss them! ~Chelsea
very good job, I can’t read a tape measure that easy but have all the other tools you mentioned in the workshop
Thanks for watching, Marlene! ~Chelsea
I’ve been so hesitant to try a router but seeing how you set up this project, explained the router (plunge, setting the depth, routing a 1/4” at a time, allowing for distance from guides, etc.) and seeing you use it has inspired me to give it a go!
Aww Terri! That is awesome! I literally used a router for the first time a month ago and it was just to try it out for this project. You got this!?? ~Chelsea
Chelsea I watched the program this morning on a bathroom remodel 07/22/18. you used an airless sprayer to paint cabinet , what brand do you recommend? I have kitchen cabinets I would like to sand an paint. Love the program and all the tips.
Hi David! I love that sprayer and just used it again last week. I would totally recommend it. It’s a Finish Max by HomeRight! Thanks for watching! 🙂 ~Chelsea