Checking In With Chelsea

DIY ideas, crafts, and tips for your home

subscribe and never miss a thing!

Receive Free Email Updates

  • About
  • Videos
  • Projects
    • Indoor Projects
    • Outdoor Projects
    • Craft Projects
  • House Tour
You are here: Home / Videos / Mossy May Monogram

Mossy May Monogram

May 1, 2016 By Chelsea Lipford Wolf 4 Comments

Video Playback Not Supported

I love initials and monograms. And ever since I’ve been married, I’ve been tempted to buy every last ‘W’ I find at HomeGoods, Marshalls, or the like. Fortunately for my husband, I resist more often than not.

But I couldn’t resist making an initial with my friend, Elizabeth!
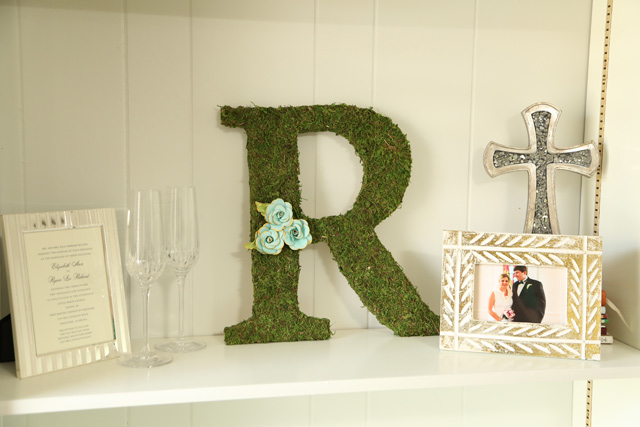
Moss Covered Initial on Bookshelf

When I first asked Elizabeth if she’d be interested in making one, she mentioned that they actually had moss-covered Rs at her wedding. (You can see them in the background in this sweet shot.)
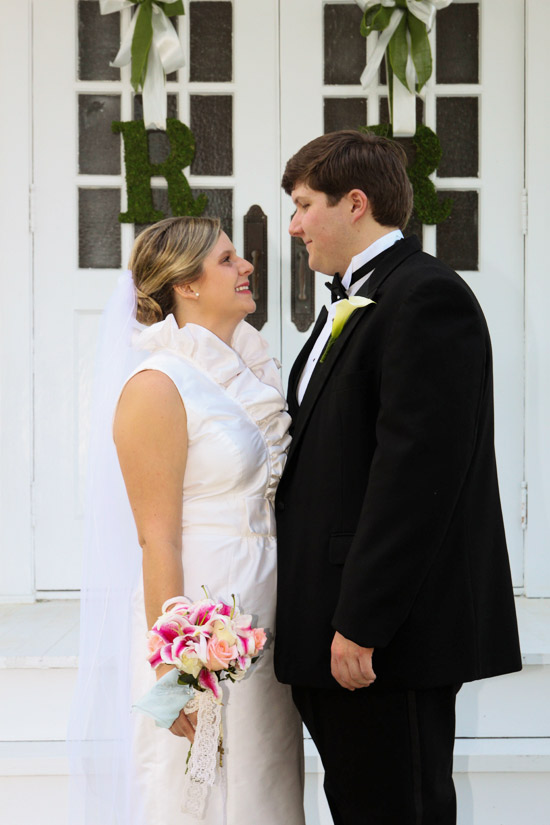
bride and groom wedding day with moss covered initial in background

And afterwards she used them to decorate her and her husband’s home.

Sadly, they lost the letters and most of their possessions in a condo fire a little over a year ago. So she was on board to recreate one and make new memories.

It’s really very easy to create your own moss-covered letter! We started by printing out a giant ‘R’.
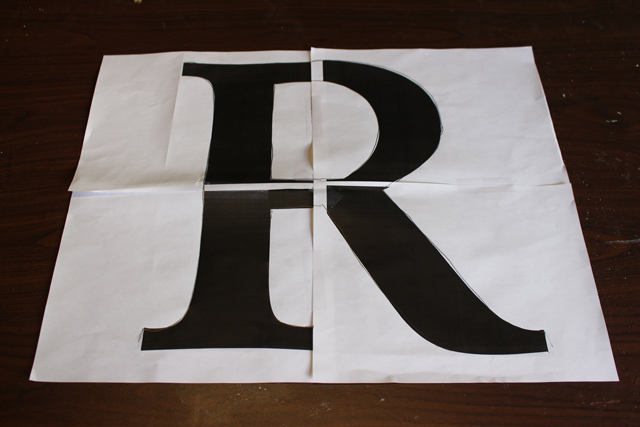
Giant R Letter Template

After finding a font with a cool ‘R’, I saved it as a PDF on my computer in about 400 point font. Then opened it in Acrobat Reader. In the print settings, I selected the option for ‘poster’.

It shows you how many sheets of paper it will cover in the preview and the approximate size. Ours ended up being about 16 inches tall. Just right.

To transfer the letter onto our plywood for cutting, we scribbled on the back of the paper with a pencil everywhere there was black ink.

Scribble on Back of Letter Template

Then we turned it over, set it on the plywood (we used 3/4″ to make our letter as big as possible), and traced the letter with slight pressure. The tracing transfers the lead of the scribble onto the plywood. So once the paper was removed, we had our ‘R’ ready to be cut!

Using a jigsaw, we slowly cut along our outline until it was complete. We quickly sanded the cuts and the face of the letter using 80-grit sandpaper. The goal was to get rid of the jagged edges and give our glue in the next step something to stick to, not make it totally smooth.

We used Titebond’s Quick and Thick Multi-Surface Glue to attach our green craft moss to the face of the letter. We let that dry before flipping it over and working our way around doing a few inches up the sides at a time. Then we cut off any excess moss and filled in any corners or other spots that were missing moss.

Unlike Elizabeth’s original ‘R’, we added some blue paper flowers (so cute from Michael’s!) on one side for a colorful accent.

blue paper flowers on moss-covered initial

I think the moss letter looks great on the bookshelf in Elizabeth and her husband’s new home!

Moss Covered Initial on Bookshelf

Now can we get some champagne in those flutes for a toast to mossy monograms?! Mmm!

Thanks for Checking In! ~ Chelsea

Subscribe for Free Updates!

Stay up-to-date on Chelsea's latest projects, tips, useful resources and more.

Previous Post
Planting a Mailbox Garden
Next Post
DIY Concrete Pendant Lights

Related Content

Completed Large Lighted Two and Zero NumbersDIY Lighted Marquee NumbersMakeover for Girl Boy Shared RoomShared Toddler Room Mood Boardspray painted moss house numbers on front porchUpdate: House NumbersCompleted Christmas Hand Towel CanvasRepurpose Dingy Hand Towel

Comments

  1. Elizabeth Cole says

    May 5, 2016 at 4:32 pm

    You make the moss letter and the file cabinet makeover very easy to follow great ideas

    Reply
    • Chelsea Lipford Wolf says

      May 6, 2016 at 9:17 am

      Thanks for saying so, Elizabeth! It’s my goal with each project to make them easy to follow! ~ Chelsea

      Reply
  2. Kendall says

    September 26, 2018 at 10:44 am

    Love this!! Where do you buy the green craft moss?

    Reply
    • Chelsea Lipford Wolf says

      September 26, 2018 at 12:49 pm

      Hey Kendall! I’m pretty sure I got this roll of moss at JoAnn! But check Hobby Lobby too! ~Chelsea

      Reply

Please Leave a Comment Cancel reply

Your email address will not be published. Required fields are marked *

Welcome!

I’m Chelsea. DIY
enthusiast who loves
sharing my victories
and mishaps!
Learn more
here.

CHECK IN WITH CHELSEA ON INSTAGRAM

Lookie! It’s a shelf for your bookies! 🤣Build Lookie! It’s a shelf for your bookies! 🤣Building a shelf unit custom for ANY space in your home is so simple and can be done over and over again to add much needed storage aka sanity! The kids were running all over the house at bedtime trying to find a book to read because we had them stashed in baskets and shelves in several different rooms. So I took advantage of this space in the hall next to a closet to create a central location for their books and some of mine too! Plus it adds a little character to an otherwise blah space!🙌🏻
.
.
A full how to video is on checkinginwithchelsea.com! Book nerds can be DIY nerds too!🤓
.
.
#booknerdsunite #diyskills #beginnerdiy #bookshelfie #halldecor #storagesolutions #storageideas #bookstorage #bookstorageideas
5 months in and she’s at the top of my favorites 5 months in and she’s at the top of my favorites list!🥰
.
.
Couldn’t resist using this audio.😅
Using my grandmother’s cookie press to make 🎄 Using my grandmother’s cookie press to make 🎄cookies I used to make as a kid in our brand new kitchen. My heart could burst!😭 I hope you are enjoying the preparation for the main event 😇and bring love and joy to your home, no matter what it looks like.❤️💚
.
.
#christmascookies #christmastrees #familytraditions #christmasbreak #newkitchen #kitchendecor #kitchendesign #madewithlove
3D art install in my girls’ girly bedroom!🦋😍Love this $13 pack of butterflies that comes with everything you need to fill a large wall! And it only takes 30 minutes!🙌🏻 Putting the link to the butterflies in my bio! (https://amzn.to/3VmfZsB)
.
.
First step is to layout the flow of your fluttering butterflies with the large and medium sizes from the pack, leaving room for the small ones. Then fill in spaces with the small size and pat yourself on the back! So easy!
The whole Wolfpack has been staying at my parents’ house on the river for the past week while our hardwood floors are being refinished. Since the kids had the whole week off of school it has really felt like a vacation! Complete with a sunny Sunday boat ride after Mass!🥰🚤☀️Enjoy the rest of your weekend! 😘
.
.
#generationalliving #3generations❤️ #4kidlife #grandparentlife #boatday #riverside #riverlifestyle #fowlriver #alabamalifestyle #alabamablogger #nofilterneeded
Dad and I got our tickets to the gun show!💥 . . Dad and I got our tickets to the gun show!💥
.
.
@todayshomeowner @visitmobileal #exploreyourhometown #hometownpride #mobilealabama #battleship #ussalabama #visitmobile
Load More... Follow on Instagram

Indoor Projects Outdoor Projects Craft Projects
Facebook Pagelike Widget
  • Contact
  • FAQs
  • Advertise with Chelsea
  • Media
  • Today’s Homeowner

Search This Site

Receive Free Updates Via Email

Copyright © 2023 Checking in With Chelsea • All Rights Reserved