How to Build a Beautiful Laundry Sorter
DIY Laundry Sorter That Looks Like a Dresser
Plans for building a laundry hamper sorter that actually looks like a dresser. Such a pretty way to dress up your laundry room while adding function at the same time!
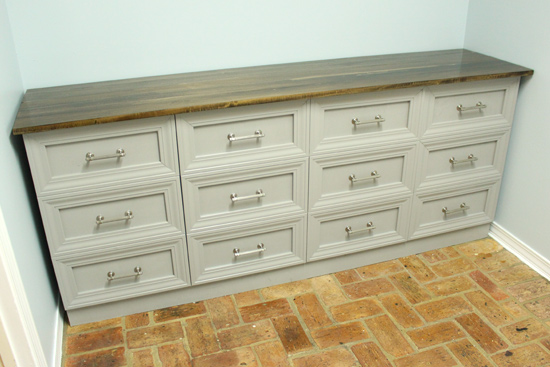
It’s finally here! The tutorial you’ve all been waiting for! Or maybe it was just me? The laundry sorter-that-looks-like-a-dresser is complete after I think a month of trying to work on it. But that was more my schedule and timing than the time it took to actually make the thing.
It looks like a dresser with 12 drawers…but it’s actually 4 pullout hampers!
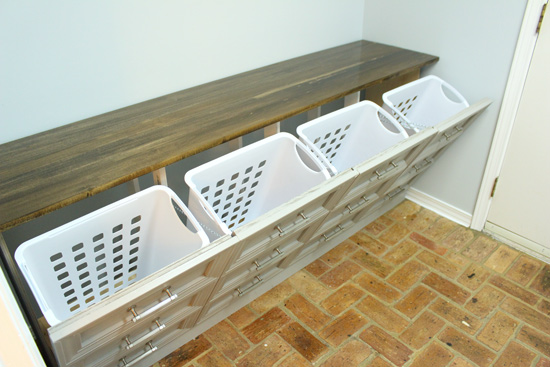
The color is Casual Gray from Behr* and the stained top is Espresso from Minwax. Save that for later, though, because you’ll need all of these other details before you get to the painting step!
I relied on the plans for this sorter from Shanty-2-Chic.com. But I heavily modified them to create 4 pullouts instead of 3.
This sorter is made to fit the space we had available, 6’3″. So at the widest (the top) it’s 74″ wide and 17.5″ deep. The cut list I used is below.
In addition to making my sorter larger than the plans I was using, I also did not include the 1×4 trim on the sides since it would never be seen in such a tight space. That also saved me an inch or so to maximize the space for the pullouts. Another difference is I went with a stained top instead of painting it the same as the rest of the cabinet. Determine which way you’ll want to go before heading to the store because what lumber you buy for the top will depend on what you’re planning.
Materials
Ok here we go. First you’ll obviously need to head to the store. Here’s what you’ll need to buy:
- (1) 1x12x6 pine or whitewood
- (2) 1x4x6 pine or whitewood
- (2) 1x4x8 pine or whitewood
- (2) 1x3x8 pine or whitewood (I could only find it pre-primed.)
- (5) 1x4x74″ poplar (You pay per foot, so it is cut to size at the store. If you’re painting the top, you can just get (5) 1x4x8 in pine or whitewood.)
- (1) 4’x8’x3/4″ sanded plywood
- (1) 2’x4’x1/2″ sanded plywood
- (8) 7′ case molding for drawer-front trim*, optional
- (1) box 1-1/4″ pocket hole screws*
- (12) drawer pulls* or knobs, optional
- (8) small hinges*
- (4) plastic hampers (I ordered this 6-pack from Amazon*.)
Other things to have on hand:
- miter saw*
- nail gun*
- pocket hole jig*
- wood screws
- finish nails
- wood glue
- paint and/or stain
Cut List
Now here’s how I cut everything:


Click the image for a full-sized version.
Drill Pocket Holes
The arrows in the picture above represent where you’ll drill pocket holes after everything is cut.
This was the first time I’d ever used a pocket hole jig. And let me tell you, it makes all the difference in creating a great-looking piece of furniture. I borrowed this one, but there are several ones in different price points at the hardware store. Look for them near the drill bits. That’s also where you’ll find the pocket hole screws I used.
I drilled all of my pocket holes before beginning any assembly. You don’t need to measure for every pocket hole. Just make sure you have enough pocket holes to keep what you’re screwing together and that they’re semi-equally spaced. I only used 100 screws for the whole piece, so there may be more pocket holes on my cut list then I actually used.


Assemble Bottom Platform
The first thing to assemble are the front and back baseboards to the bottom of the sorter (the 1×12). They are the 73″ piece (front) and the 72″ piece that only has pocket holes on the ends (back).
Attach the front baseboard to the side of the 1×12 with pocket holes already drilled using pocket hole screws.

Make sure it’s centered on the 1×12 with equal 1/2″ overhang on either side.

Then attach the back baseboard flush on the ends with the 1×12. Also make sure it’s flush with the same flat part of the 1×12 as the front baseboard. Instead of using pocket holes here, I attached it with regular wood screws straight through the baseboard into the edge of the 1×12. Since it’ll never be seen, I saved my fancy pocket holes screws for the important parts.
Assemble Sides
Turn it over once the baseboards are attached and you should have what looks like a platform! Now attach the 1/2″ plywood pieces to either side of the platform. These are the sides of the sorter and should sit flush with the front baseboard. Situate them so the pocket holes are inside and at the top. Since I already had my nail gun on standby, I used it to shoot a few nails through the front baseboard into the plywood and then through the plywood into the 1×12 and back baseboard.

This next step will make the whole structure a lot more stable. Attach the other 72″ 1×4 between the two side panels, flush with the top. Make sure the pocket holes are facing the front and towards the top.

Add Dividers
The 1x3s are used as support for the top and dividers for the pullouts. They are attached to the 1×12 on the bottom with the 2 pocket holes. I attached mine roughly 17.5″ apart, just inside the baseboards at the front and back.

Assemble Pullouts
At this point I turned my attention to the hamper pullouts. I attached the 17″ pieces of plywood flush with one end of the 18″ pieces, pocket holes down, making sure the smaller piece was centered on the 18″-wide piece.

Once the 3 pocket hole screws were attached. I used 2 of the angle-cut 1x4s per pullout to reinforce the bottom and front. To make it prettier, I turned it so the pocket holes were facing the inside of the pullout.

I attached my braces on top of the pullout bottom but flush with the edge to maximize the space on the bottom to set my plastic hamper. Speaking of plastic hamper, it should also be mentioned that the original plans, and my modified version, were created for a particular hamper from Sterilite. I could only find them on Amazon in a 6-pack*.
Can you see the light at the end of the laundry sorter tunnel? I promise we’re getting close to the finish!
Attach Pullouts
To attach the pullouts to the body of the sorter, I first attached the hinges to the top of the front baseboard, 2 per pullout. Then I set the pullouts in the openings, making sure they were evenly spaced.

Carefully lowering the pullout, I laid a few random things (like a Nerf gun!) under to keep them on level with the hinges. Coming around from the back, I attached the hinges with the provided screws to the bottom of the pullout.
It took a little fine-tuning, but they worked and tilted out! I can’t quite figure out if it would have been easier to attach the hinges to the pullouts first or not. If someone tries it out, let me know!
Installing Trim
This next part is optional, installing trim to the front of the pullouts. It really makes it look like a dresser, but it also adds a lot of expense to the project. Not to mention the time it took!
I used simple case molding that you’d find around interior doors or windows. I made it slightly wider and taller than the face of the pullout. Verify the dimensions before you cut, but I believe the shorter, vertical pieces of trim were 9″ and the horizontals were 18-1/4″. This is also a great chance to correct any slight variations in the spacing of your pullouts. You can biased the trim to one side or another to make everything look perfect once it’s nailed in place and painted!
If you don’t have one of your own, you’ll definitely want to borrow or rent a miter saw for all of the 45 degree angle cuts required for the trim! RYOBI graciously sent me one for this project and some other upcoming projects I’ve got planned. I was SOO excited to finally not have to borrow a miter saw, I’m pretty sure I petted it a few times before I actually got around to using it! 🙂
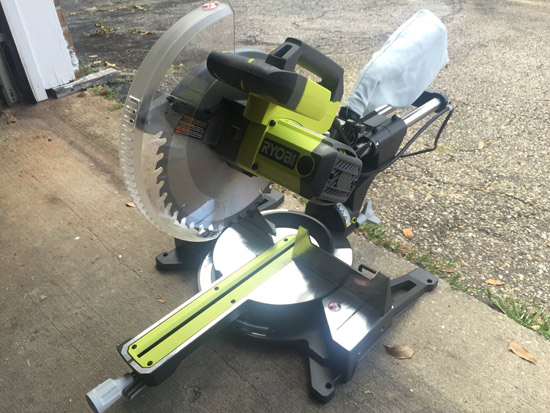
I sat at my saw and made a zillion cuts before moving my tush over to the sorter to nail the trim in place. I started at the bottom and worked my way up each pullout. I used short finish nails and wood glue to attach each and every piece.


After finishing the trim and attaching the top, the sorter was lugged outside for painting, of the spray variety. I’ll have details on those finishing touches, including installing the drawer pulls, tomorrow since this post has already gotten really long! (**Update: The details on the stained top, paint, and hardware are up on the blog! Click here to go there now.)
Thanks for Checking In! ~Chelsea
*This post contains affiliate links*



9 Comments
mark
I love it! I see using this for potato’s, onions, yams, etc. also great for kids toys.
Amanda
Thanks for posting instructions on everything & materials to use. I have been wanting something like this to organize my laundry room better. How much did all the materials for this cost?
Chelsea Lipford Wolf
Hi Amanda, I can’t give you an exact quote, but it was over $200. Not cheap, but cheaper than buying a dresser and looks nicer than a plastic laundry sorter. 🙂 ~Chelsea
Brandon Dodson
Thank you so much for this. The laundry bins are not available on amazon anymore, any suggestions? Thank you
Chelsea Lipford Wolf
Hmm! Any plastic hamper that has square or straight sides would work, you just may have to modify the dimensions of the sorter to fit! These might work: https://www.walmart.com/ip/Sterilite-Rectangular-LiftTop-Laundry-Hamper-White-Set-of-4/56013863
or these: https://amzn.to/31KM9n0
Chelsea Lipford Wolf
I think I found them at The Container Store, but for in-store purchase only, 🙁 https://www.containerstore.com/s/laundry/hampers-baskets/sterilite-sorting-hamper/12d?productId=11001622 Sorry I couldn’t be more help! ~Chelsea
Pamela Q Laucius
This is a wonderful solution, but if I were to build it, I would make the drop downs individual. That way I could open an individual bin for: Whites, Colored, Misc, etc.
Billie
Thank you so much for sharing your great ideas! I want to have the wood cut by the store. Can you please tell me what exactly needs to be cut by the store? I am afraid, I am a absolut beginner and struggle to understand those plans. I am also from Europe, can you please give me those measurements in centimetre?
Thanks you so much in advance!!
Lisa
The baskets that are used to outline this design are no longer available and the ones that replaced that model are significantly larger. I did not notice this issue until I all of the wood purchased and the base built.