
How Not to Hang Crown Molding
**Don’t let the title of this post fool you, there are plenty of tips to help you cut and hang crown molding. However my husband and I had A LOT of trouble hanging crown molding on our plaster walls. So you’ll also discover ways that might not work for you if you also have plaster walls! Live and learn and then share your knowledge!
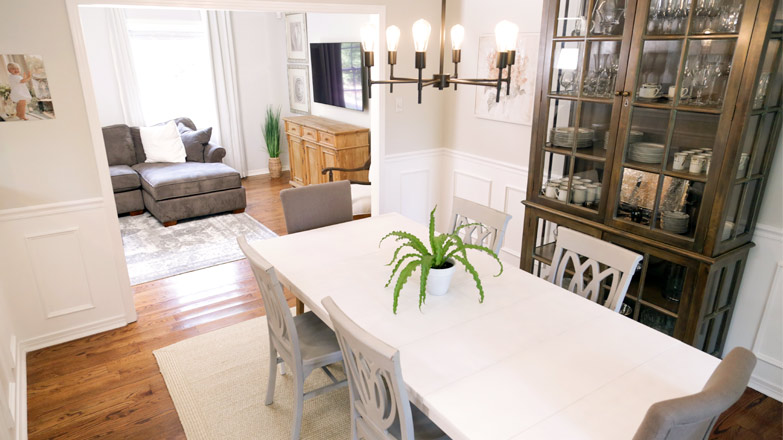
It’s always been in the plans to hang crown molding in the guest room of our house since it was the only room that didn’t have it. And when we found out we’d be having a baby, the nursery re-do was a great time to mark the crown off the list!
With the crown molding in mind, I left a few inches where the wall meets the ceiling when I painted the walls and added some pizzazz to the ceiling with gold paint. So it came time to close the gap!
To start, Brandon and I carefully measured each wall at the ceiling since some walls, especially in older homes, can vary from floor to ceiling.
We wrote down the measurements and created a key to make it easy to keep up with which piece went where once they were cut.

We used the miter saw to cut the molding to length with 45 degree miter cuts on each end. We had (4) 12-foot pieces to use so we didn’t have any joints in the middle of the wall.
To cut the mitered ends so they’ll match up with the adjoining pieces, rotate your saw to the 45 degree mark. Unlike the bed molding I cut for my window trim, these are all “inside” corners. And instead of turning the board upside down to make the cuts, you’ll want the crown to be right-side up when making cuts for inside corners.
Another thing to keep in mind if you’re trying to cut the right end of your crown, turn the saw to the 45 degree mark on the left side of the saw and vice versa. Opposite rule is in effect when dealing with mitered cuts! It seems counterintuitive and just wrong, but the top of the molding should be shorter than the bottom when it lays flat. Basically your crown will always be falling off the saw, so having a second person to hold the end is really helpful! Or you can use something else to prop it up to approximate saw height like I did with a chair when Brandon was busy.
And lastly, tilt the crown to the angle it will be hanging on the wall so only the bottom edge is up against the fence of the saw like so.

Once you’ve got one end mitered, it’s time to measure it to length. When in doubt, cut it longer than you think. You can’t add it back once it’s cut!
Run your tape measure along the bottom edge of the crown, the same edge that goes against the fence when you’re cutting. Since this edge sits flush with the wall when it’s hung, it’ll need to match your wall measurements taken earlier.

Mark at the proper length.

Then extend your mark up the crown to make it easier to see when it’s on the saw.

Lining it up on the saw is tricky. You’ll really need to know your saw. For instance, the one I’m using is older and is used my many people, so it’s not quite “calibrated” and doesn’t line up perfectly centered. I know the blade is more to the left of the gap on the bottom of the saw, so I keep my mark more to the left. Bring the blade down a few times without turning it on and without anything in the way to see where your blade hits and then line your crown up accordingly.

Also keep in the mind that you want the blade to hit your mark where the bottom edge turns, not at the end of the mark.
![]()
Hopefully that arrow helps!
We labeled our pieces on the back after they were cut, following the handy key we made earlier.

Once we slowly cut all 4 pieces, we set them out on saw horses to apply the first coat of paint. I figured this would be tons easier than trying to paint 2 coats up against a freshly painted ceiling and walls. We painted the fronts and also the newly-cut edges for funsies.

Now this is where the trouble I foreshadowed at the beginning of this post comes into play. Grr.
I had loaded up all of the gear we’d need for this project and borrowed it from the Today’s Homeowner shop, including an air compressor, nail gun, hose, and 2½-inch brad nails. This is practically the same set up I used when I installed trim around the living room windows. So it never dawned on me that it wouldn’t work!
We were both giddy to finally install the crown after waiting for the paint to dry. We had our benches set up, the compressor, hose, and gun locked and loaded. We grabbed the first piece, put it into place, and fired the first nail. The nail came out of the gun, into the crown molding, and then did a 180 against the plaster walls and came back. Well obviously that was just a misfire, so we upped the pressure in the tank and fired a few more. Same results.
I like to think I’m a fast learner, but I’m also stubborn. So I fired a few more before I acknowledged that perhaps these were the wrong nails for the job.

And then I realized I’d have to putty all of those holes once I finally got the crown molding hung. 🙁
So our next solution was to try a hardier, thicker nail. We picked up a finish nailer from the office, loaded new nails, and set up to try again. The gun fired, didn’t shoot a nail, and then the trigger was locked and couldn’t be pressed at all.
We decided to take a break and sit on it for the night. When we went back with fresh, happy thoughts, we realized we must have adjusted the knob on the compressor that controls how much pressure is actually used at some point in our frenzy the previous day. It’s hard to believe, but a nail gun will not fire when the pressure output is on 0. Huh.
All ready to go at it again, we lined up the crown and shot a nail. Now these are no small, wimpy nails. But they did the exact same thing the smaller, thinner brad nails did when they came in contact with the plaster. I have some sweet-looking twirly nails now, though.
OK, at this point, we took a step back and decided perhaps we should take a no-nail approach. There’s no way I was going to be hammering nails over my head into plaster while straining to hold the crown molding in place.
So we got out some construction adhesive and ran a small bead along the same bottom edge used to measure and mark during the cutting phase.

Brandon stood near the middle of the wall and held the molding tightly in place while I ran in circles around him pre-drilling holes using a masonry bit (1/8″) and following it up with 3″ 10d bright finish nails. We started with just 3 nails, 2 on either side near the bottom and 1 in the center at the top, to hold it while the glue dried. Then once we exhaled we tightened up any gaps with a few more nails.
What. A. Relief. to have just the one piece hung.
After a few more exhales, we got smarter and pre-drilled even more holes in the crown before we held it in place. It’s kind of difficult to use a masonry bit to drill through the wood, so this made it a little less stressful working above our heads.

We lined up the next piece, making sure it matched up with the already-hung piece in the corner. Again, Brandon held it near the middle while I did a minimum of nails on either side before he was able to take over the drilling and hammer.
With the pre-drilling, it didn’t take much force to hammer the nails into place. Since the smallest masonry bit we could find was 1/8″ and the largest finish nail we wanted to work with was 10d, the “connection” between the wall and crown isn’t as tight as it could have been. But the construction adhesive will certainly keep it from falling off the wall.

And of course what is crown molding without painter’s caulk? We were able to eliminate any obvious gaps with a bead of caulk above and below each piece of the crown. A good trick is to keep a bucket of water and a large sponge when you’re caulking. Instead of having to run your finger to smooth out the caulk, use the wet sponge. It’ll smooth the bead of caulk and help clean up any extra residue. Rinse it out often in the bucket!

And those pesky nail holes left behind from our failed and successful attempts? Those got filled with the same Painter’s Putty I used to patch holes before painting the walls. (I only just now saw that the label only recommends using it on wood, even though it seems to be doing the job on the walls…)

It really looked soo much better just after the putty and caulk.

Kind of tempted to leave it as is…

Just kidding! I waited the 24 hours recommended for the putty to dry before I whipped out the paint brush and trim paint. And once I did, the results were just what I had hoped, minus the hassle it took to get there! 🙂

Up close, it makes a bigger difference. Here’s some nail holes with putty before paint.

After painting over the holes.

You might be able to see the previous holes in certain lighting while standing on a ladder. But I can guarantee I’ll be the only person to look at our crown molding this close ever again.

And there you have it! How to cut crown molding, ways not to hang crown molding, and one way to hang crown molding. Or at least in my experience! (By the way, we used the same paint used on our living room window trim, Benjamin Moore’s Simply White. We like to have it color-matched in Behr’s semi-gloss interior paint.)

Please comment below with any specific questions or ways I can clarify anything. Chances are if you’re wondering, someone else is out there wondering the same thing!
Thanks for Checking In! ~ Chelsea

7 Comments
Marcelle Wilson
I want to do chair rails and wainscoting in a rental. I’m trying to find a way to do it where i won’t put a whole bunch of nails/holes in the wall…what would you recommend? I was thinking maybe get some light weight (very light weight) trim, have the hardware store cut it into small pieces (but i don’t want a lot of seams so maybe not) then use like the 3M command strips on it. But then how would i see the tab to take it off when it’s time to go? I’m at a loss… any suggestions?
Chelsea Lipford Wolf
Lightweight trim would definitely be best! 3M has some picture-hanging strips that are basically velcro. So you would remove the trim and then you’d be able to access the tab to remove the strip when you move out. Here’s an affiliate link to the picture strips if you go that route! http://amzn.to/2iiAxlq These medium ones hold up to 12 lbs each so maybe your trim doesn’t have to be that lightweight after all! ~Chelsea
steve
I am putting in plasterboard on the walls of my basement that had wood paneling and stained crown molding. I want to keep the crown molding that is stained wood intact if possible so I do not break the molding in removing it. . Must the crown molding be removed or can I put the plasterboard up to the bottom edge of the crown molding with out disturbing/removing the crown molding or will this look poor? How will I see the answer?
Chelsea Lipford Wolf
Hi Steve! I would not put the plasterboard on without removing the crown molding. It will just not look right. I’ve used a specialty tool called the ‘Trim Puller’ that is excellent at removing molding without breaking it. Here is an affiliate link should you wish to get one for yourself! (https://amzn.to/37TvGzp) You’ll use it all the time once you have it! ~Chelsea
Eleni
Hi! So after you predrilled the holes, did you use the 3in nails with the nail gun or did you hammer them in by hand? If you used the nail gun, what psi did you set it at? Thanks so much!
Chelsea Lipford Wolf
Hi Eleni! I hammered them in by hand! Whew! That’s a painful memory.😳 ~Chelsea
Doug Acruggs
It’s always best to make the 45 degree cuts with the molding upsidown in the miter saw. Not sure why you were able to do it differently.
As for your brad nails bending against the wall from using the nail gun, I’ve never heard of that happening either. Are those walls standad gypsum board or is actually plaster? The nails should not have bent if you were driving them into standard drywall.
Finally, why would you use a masonry bit to drill into wood?