
Painting the Nursery Walls
I did not feel the “nesting” bug that you hear women get while they’re pregnant. Until we found out we’re having a girl. Ever since then, I’ve been ITCHING to get started on our little lady’s new digs.
Of course the first, and easiest, way to transform a room is by changing the paint color. The obvious choice would be pink walls. But since our master bedroom is still sporting the pale pink look, I thought it’d be better to try something new for the new nursery.
Before I could slap paint on the walls, though, I had to move everything out of the former guest room.

The headboard Dad and I made and the mattress and boxspring are going to my old room at my parents’ house. The dresser stayed put while I had it listed on Craigslist, but everything else was relocated to our office/new guest room. Some of it temporarily, some of it permanently.

And with the room clear, it was time to prep for paint!
The first step was puttying holes from the previous wall hangings. I used some putty we had on hand.

While that was setting up, I prepped the floors. I have not painted a room in my house with finished flooring yet. When I painted last, the floors had not been redone so it was a paint free-for-all. So needless to say, I covered the floor like there was no tomorrow. I also have plans to paint the ceiling, in which case this is necessary no matter your paint skills.
I started by running painter’s tape on top of the shoe molding since I’ll be going back later and painting the baseboards.

Next I spread out some painter’s plastic that covered the entire floor and taped it to the top of the baseboard, making sure there was a clean line between the wall and tape.

And since it’s summer in the south, I couldn’t leave my AC vent covered! I cut a hole in the plastic and set the vent on top of it so I could still get some air flow!

Right before I whipped out the paint can, I noticed some peeling paint around the door frame. My house has this weird metal return around all of the doors. And I guess it wasn’t totally prepped last time it was painted, so the paint didn’t fare too well.

When I got to scraping the worst of it with a putty knife, I peeled a little off of the wall itself too…whoops!

So I whipped up a quick batch of “hot mud”, or drywall mud that dries in 90 minutes.

While my putty and drywall mud were drying, I cleaned the rest of the walls with a degreaser. Always a good idea since you never know how grimy the walls may be! I also opted to use a microfiber cloth instead of paper towels or a cotton rag. My plaster walls have texture on them that can be pointy in places, so I didn’t want to leave behind cotton fibers or paper towel residue. Plus microfiber is a great duster!

Once the walls and drywall mud were dry, I sanded the mud and I was ready to go at the walls with a roller. Speaking of which, it was time to buy a new roller frame since my old one tends to drag mid-roll. When I was browsing the paint supplies aisle, I saw this extendable roller frame from Shur-Line.

Since the walls are only 8 feet tall, I can pretty much reach everywhere with a standard roller frame without an extension pole. But I figured for only a dollar or 2 more, I could have the option of extending it a little!
One last thing before I could crack open the paint can, a respirator to protect my child in utero!

I used a low-VOC latex paint which shouldn’t be bad, but no never know and it’s better to be safe than sorry!
The overall theme for the nursery is cozy elegance. So I went with a creamy white for the walls to keep things simple (Soft Spoken by Clark+Kensington in eggshell). But there will still be plenty of pink with the help of wall decor, a crib mobile, pillows and other accents!

I had another color choice in mind, but then I remembered I had this full gallon in my shop. We didn’t end up using it for a project at work a year or so ago, so I got to keep it. Free paint!
La-te-da, about an hour later, the first coat was done and ready to dry! It actually had really good coverage for white paint. I could have gotten away with one coat I think.

For some reason it’s looking a little pink in pictures, but it looks more cream in real life.

You can see, too, that the dresser didn’t sell on Craigslist right away. I had to paint around it for the first coat. But in the middle of the second coat the following day, someone came to look at it and took it home!
Not wanting to risk the green paint underneath influencing the white paint, I decided to use up the can painting a second coat. Can’t say it was worth it or not, but it still looks great!

With the intention of installing crown molding after painting the walls and ceiling, I didn’t have to cut in along the ceiling while I was painting the walls. I rolled as close to it as I could, not worrying about touching the ceiling every now and then. Sure makes it a lot easier!

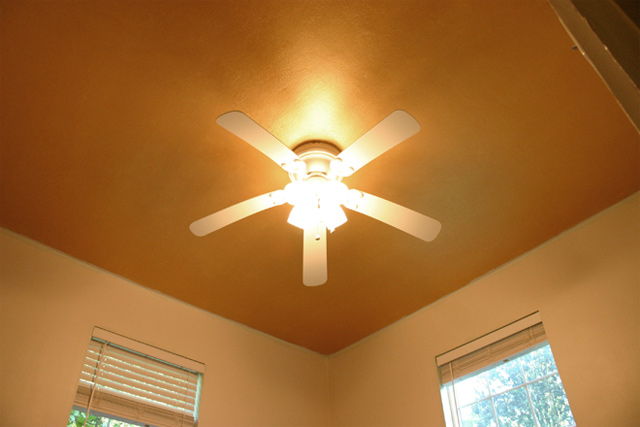
Now you might be wondering why I would paint the walls first when I am planning on painting the ceiling too. Well that’s because I’ll be painting the ceiling gold! And since the gold metallic paint can only be ordered online, I had a week before I could get started on it. I’m not getting any skinnier, so I couldn’t waste those precious days doing nothing in the nursery!
The good news, though, is I just finished the gold ceiling last night and it looks amazing. Definitely fit for a princess! I’ll have the details on that soon, but until then I’ll leave you with a sneak peek!

Thanks for Checking In! ~ Chelsea
You May Also Like
DIY Wall Sconce Installation

Dining Room To-Do List, April 2016
