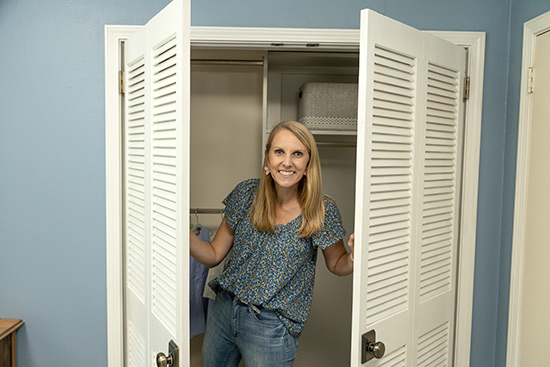
Turning, old-school bi-fold doors into a more standard French-style door is as easy as drilling a few holes and attaching new hardware! Watch this how-to video to tackle this project yourself!
Bi-fold doors serve a purpose. They’re great for compact areas or areas where a traditional door would block a hallway. We had multiple versions of bi-fold doors in this house when we moved in. One at the laundry room, two closets in the master bedroom, one leading from the living room into the hallway, and Gus’s closet doors.
Here’s how I created an accent wall using construction adhesive behind his bed!
And since one of Gus’s doors fell off the track, it seemed like a good time to convert both of them to a more standard style of closet door!
Materials
- bi-fold door
- drill
- trim puller
- pocket hole jig*
- pocket hole screws*
- water putty
- sander
- hinges*
- door knob*
- door stop molding*
- nail gun*
- ball catch*
Some people choose to change up hardware finishes in each room depending on the decor. For this house, I’m using the same hardware on all doors throughout the house to keep the consistency and flow. Along those same lines I’d love to replace these doors to match the new interior doors I’m slowly installing in the rest of the house. BUT they are about $200 each which means I’d be spending $400 on closet doors for a little boy who could care less.😆 So we’re just going to use what we have for now and make it work.
Remove Doors and Track
The first step is to remove the doors from the track and then remove the track itself and any other trim specific to the bi-fold system you’ve got. I had a little trouble removing one of the doors so I ended up removing the track and then the door fell out.
Most tracks will be installed with a few screws. So all you have to do is back those screws out with a drill or screwdriver. This particular set of doors had wood trim installed on the front of the track to conceal it. So after the track was out, I used my Trim Puller to carefully remove the trim and any nails left behind.
Drill Pocket Holes
If you’ve seen me build a vanity or this $6 plant stand, then you know I love a good pocket hole! They fasten things together but keep the screws hidden! Win-win!
Joining your bi-fold doors together with pocket hole screws is the secret to this conversion.
Layout how you want your doors to paint together, then drill pocket holes using the jib on the inside edge of one of the doors. Once you have 5-8 holes drilled, run a line of glue along the edge and push your doors together. Then attach them with the pocket hole screws.
Prep and Paint
Once you have both sets of doors attached together, it’s time to hide those screws even more and make them disappear! Mix up a small quantity of my beloved water putty and press it into the screw holes. You can also use it to fill in any other imperfections or old hardware holes.
It dries HARD so you’re able to sand it smooth with the surrounding area. I recommend using a power sander so you’re sure not to dig into one area too much. Then you’re able to paint the entire door, if needed, or just do spot touch-ups and you’ll forget there were ever screws there to begin with!
Hang Hinges and Knobs
Measure and mark where your hinges will mount on the door frame and the side of your ‘new’ door. Then attach your door stop molding to the door frame just clear of your hinge mark. This stops the door from swinging inside the closet or room, hence the name!
Now you’re ready to screw the hinges on the door and then to the frame. After they are hanging, you can mark and install your door knob. I chose the ‘dummy’ style since the doors meet in the middle and don’t have a frame for a traditional turning knob to go into. Depending on the weight of your door, you could use a large drawer pull for some fun! (I did this is in our master bathroom in our last house and it worked well!)
The last step is to drill a hole on top of your door to attach a ball catch. This will keep your door closed when it’s in the closed position. It’s adjustable so you can make it looser and easier to open or tighten it up.

Now you have 2 fully-functioning regular ole closet doors! This project cost me about $70 for the hinges, door knob, ball catch and molding. The cool part is that if we do ever decide to change out the doors to matching the rest of the house, I will reuse the hinges, door knob, and stop molding. So a cost-effective and practical upgrade to a previously sad closet! Gus approves!

Thanks for Checking In! ~Chelsea
*This post contains affiliate links.*


That was a great idea! I’m going to do that on my bedroom closet.
Thanks for sharing!
Whoop! Good luck! ~Chelsea
Okay! I did this 4 yrs ago for 2 sets of 12″ louvered bi-folds only I additionally used 2 long piano hinges to distribute the doors’ load that I mounted to the inside so no hinge butts to show on room side. Because it’s closet door in kid’s bedroom (in a rental home besides) and considering how louvers tend to pull away & separate from the door’s stile frame when the doors get frequent usage, I figured to get ahead of that problem by fastening a 1/8″ x 1-1/2″ x 24″aluminum strip drilled for attaching with 4 screws (lightweight reinforcement) to top and bottom edge on closet facing side across each pair doors, then primed & painted them It was an extra step to apply the 4 reinforcement strips, but those doors can be a little agravating to re-order, paint and hang. But louvers give great ventilation and look so nice! BTW, luv the show, watch every week & on-line. You’ve got some serious skills, girl! And the banter with your dad is so clever!
Thanks for your kind words, Nancy! Sounds like you’re pretty clever yourself. 🙂 ~Chelsea
I’ve wondered if we could change bifold doors. THANK YOU 😍
Thank you Chelsea, very informative video. I always enjoy your videos,as well as your Dad’s. I had never seen a pocket hole jig, and think one day I might need one. Again thank you, your house looks great!
Yes! You’ll find plenty of uses for a pocket hole jig once you have one in hand! ~Chelsea
Where did you get the ball catch for the closet doors in your sons room.
Here’s what I used*
And here’s another version*
Great video! What depth did you drill to and what length screws did you use?
Hi Patrick, the pocket hole jig does all of the work! Just set to the thickness of your material. I used 1-1/4″ and 2″ screws. ~Chelsea