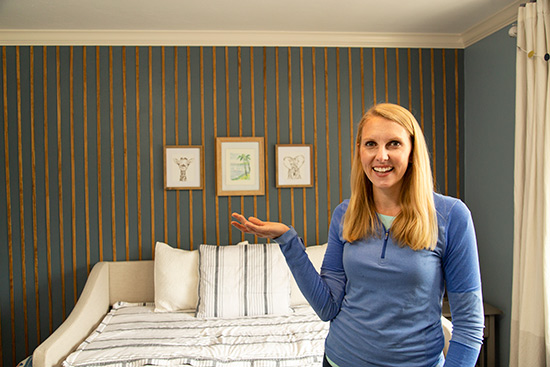
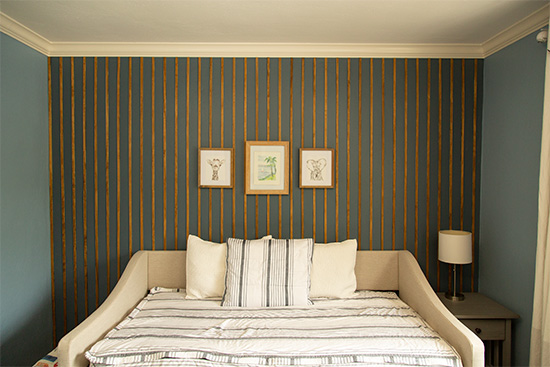
Create a fun and easy pinstripe accent wall for any room in your house! No nails required and it can be DIYed in less than a day.
*I’m so excited to partner with Titebond to share another fun, attainable DIY project! All opinions on their products are 100% my own.*
Materials for Accent Wall
Before you can build it, you have to buy what you need! Some links are affiliate links, so I’ll receive a small commission without increasing the cost for you!
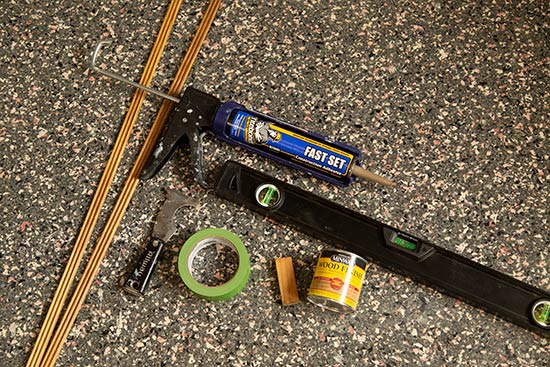
- pine screen molding
- wood stain
- Titebond Fast Set Construction Adhesive*
- caulk gun
- painter’s or masking tape
- level (2′ or 4′)
- putty knife
- miter saw
- tape measure
You’ll also want a piece of scrap wood to use as a spacer. More on that in the video above…don’t forget to hit that play button!😉
Decide on Paint or Stain
If you’re going to stain your molding, it’s much easier to do it prior to attaching to the wall! So I stained mine first thing. But it would also look pretty cool to install them on the wall and then paint them to match the wall behind. It would give the wall some texture and depth with subtlety.
We’ve used these StakRacks* before to paint a lot of cabinet doors, but they also come in handy for small projects like this to give your molding space to dry without a bunch of sawhorses and 2x4s!
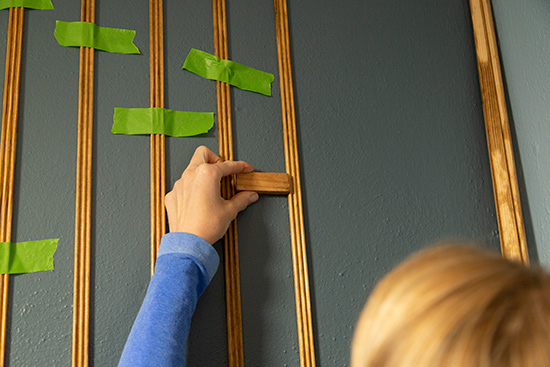
Measure Wall for Pinstripes
You’ll want to figure out the spacing for each board/piece of molding before you get started on your pinstripe accent wall. Since this varies greatly by the space you’re actually working in, here’s what I did. I knew I wanted my pieces to be fairly close together to create a pinstripe effect. So I took my 11′ wall and divided by 3.5 inches. That meant I’d have a piece every 2.75 inches since the molding itself is .75 inches wide. Therefore, I cut my spacer block to 2.75 inches.
Apply Adhesive
Now, I didn’t want to use a nail gun for this project. Yes it would have been just as easy and I have a battery-powered nailer. But you can never fully conceal nail holes in stained wood. And I didn’t want to fill endless holes in all the pieces. So enter Titebond’s Fast Set Construction Adhesive*!
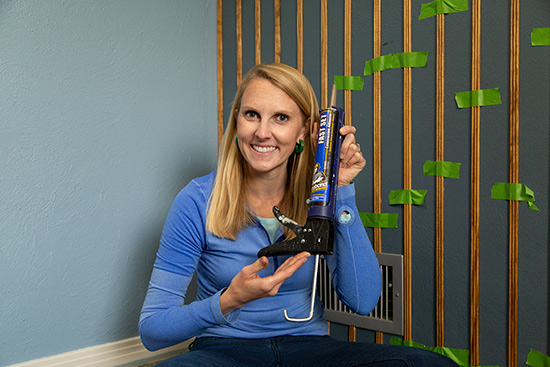
Just like the name implies, it sets up fast! So for this project with the lightweight molding, I didn’t need any nails to hold the pieces in place while the adhesive dried. A few pieces of painter’s tape held it in the right spot while the glue did its job and STUCK!
I found it helped the process go faster and smoother to apply adhesive on several pieces at a time and then attach all of them to the wall in quick succession instead of gluing and applying each one individually.
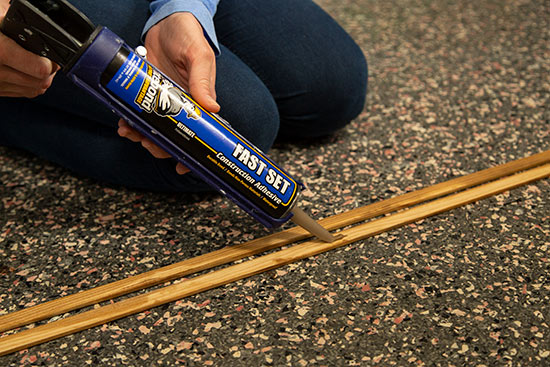
Also one more note about applying adhesive…you don’t need a ton! You don’t want it oozing out when you press it the wall since it’s not water-soluble, aka you can’t just wipe it off with a wet rag. A dot of glue every few inches will work or if you have some wonky boards like I did, you may want to create a thin, continuous bead down the entire length.
Were you here when I installed a split brick backsplash using this same stuff? I just love it!
Attach to Wall
To attach to the wall, I started at the top and butted the end against my crown molding. That way if there are any discrepancies in the length of your molding (ahem, maybe a little short?) nobody will notice it at the bottom.😬
Press the top onto the wall, move your spacer block down a foot or so, press molding onto the wall and add a piece of painter’s tape. Continue doing that every foot or so until you reach the bottom. Then press and smooth the entire length to make sure the adhesive has good contact with the wall.
Then move on to the next piece! And again. And again. I ended up using about 38 pieces instead of the 44 I purchased and thought I needed. I kind of wished I would have put them closer together now to make them look even more like pinstripes. But I also didn’t want this project to take several days.😆
Remove Tape and Admire
By the time you get to the end of your pinstripe accent wall, the first pieces of molding you attached will be ready to remove the tape! How fun!
I’d say it took about an hour for the adhesive to be set up enough for me to remove the tape on my last few pieces. But hey! I’ll take that dry time any day! Otherwise I’d forget and the green tape would just be part of the decor.

I love the way this wood accent wall turned out. Such a fun little pop of warmth in my little man’s room. Not pictured here but it matches his dresser on the other side of the room. I always like to have a few elements in each space that match or coordinate for cohesiveness.

Thanks for Checking In! ~Chelsea
*This post may contain affiliate links.*

Nice project. I’ve been toying with the idea to do a similar feature but not pinstripes. I need visuals so I taped up paper the same length/width/height of wood to get an idea of how the design would look when installed. Don’t need to do the entire wall in paper just enough to see how the project could turn out. It’s easy for me to adjust the tape and paper and have a pattern to follow.
Great idea Judith! Thanks for sharing, Chelsea