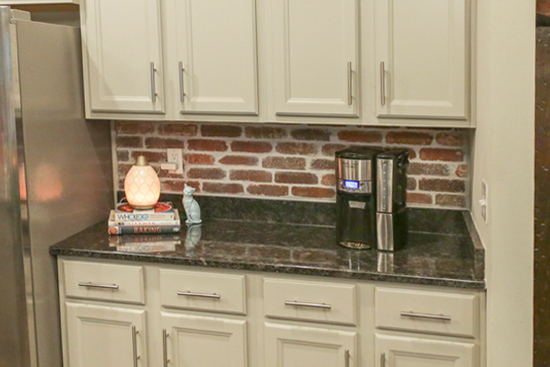
Install a Brick Backsplash in One Day

Watch the video above to see everything you need to know to add split brick tiles to the backsplash in your kitchen to warm up grey cabinets!
Tools and Materials
- pre-split bricks*
- Titebond TiteGrab* construction adhesive
- caulk gun
- 1/4 inch tile spacers*
- angle grinder* or other tile-cutting saw
- diamond blade*
- grey grout*
- grout float*
- grout sponge*
- 2-foot level
- grout and tile sealer*
You’ll also need a few other things like a tape measure, pencil, dust mask, and safety glasses, but hopefully you already have those around your house anyway!
Layout Bricks and Measure
With any tile project, it’s smart to layout your tiles, or bricks in this case, to make sure you aren’t going to end up with a tiny piece in the corner or along the top! For one it’s hard to cut tiny tile pieces with accuracy, but also it’ll just look better!
I laid my bricks out but also added a 1/4 inch to each brick for the tile spacers I would be using. I decided to start with a full brick on one end, and install until I needed to cut a brick. it worked out that way for this project!
Considering the vertical height of this backsplash area, I was going to have to make cuts for the top row regardless of how I started, so I decided to start with spacers on the granite backsplash so I could have a grout joint on the bottom to help tie the bricks into the granite. If I could have set the bricks directly on the granite AND had full pieces on the top row, I would have done that instead!
Adhesive Choice
A typical tile installation would include thinset to hold the tiles in place on the wall. Then you have to wait a day (usually) for it to setup before you can move on to sealing the bricks and adding grout.
But I’m always looking for ways to save time! Especially when I’m working in an area like the kitchen where you don’t want to be without it for several days!
So for this project I decided to use a quick-curing adhesive from Titebond! I’ve been obsessed with their TiteGrab construction adhesive* ever since I saw it in action a few years ago at an industry show. It was literally made to decrease installation time for vertical applications. Umm…hello backsplash!

What I liked about using it for this project was that it is THICK so it wasn’t dripping down the wall and once I stuck the brick to the wall, I was done!
**This video was sponsored by Titebond. Regardless, my nerdy-ness about their adhesives is 100% my own opinion.**
Cutting Split Bricks
Anytime you’re working with tiles, bricks (whether full or split), or any other masonry product, you want to use a saw fitted with a diamond blade for cutting. These can get expensive depending on the type of saw you’re using! But just think of it as part of the expense of your project.
I decided to use an angle grinder since it has a small blade and I was working with small tiles! It worked perfectly to slice through the bricks like a hot knife through butter! Anyway you cut it, be sure to use a dust mask! Bricks are essentially dried dirt (🤣) so it gets really dusty!
Seal and Grout
Because bricks are SO porous, you’ll definitely want to seal your bricks before applying your grout. I used a simple, inexpensive sealer that you just spray on! It soaks in fast so you can move on to grouting sooner. I used this same stuff when I tiled my hearth a few years ago and still love it!
Once the sealer looks dry, about 10 minutes, you can get your grout float and bucket of grout ready! Spread it into the joints between the bricks. Use the float to push the grout into place by holding the float at a 45 degree angle to the bricks.
Then use a grout sponge and warm water to wipe the excess off the face of the bricks until you’re satisfied. A treatment called German schmear is where you leave the excess grout as a sort of whitewashed look. So feel free to leave it too! (I did this on a fireplace in this episode of Today’s Homeowner!)
Let it cure a few days and then you can come back with the same sealer to give the bricks another coat and protect the grout from food and grease stains that are sure to be splashed on it in an active kitchen!
Thanks for Checking In! ~Chelsea
*This post may contain affiliate links*


I’m sorry, but I would NEVER recommend this backsplash. I bought a house where one of the previous owners “upgraded” the kitchen. One of their upgrades was glueing Z-Brick to plaster walls. They did not grout between the brick as painted them ivory. The other walls aren’t bad (yes, it’s on all four walls!), but over the cooktop, it’s a mess to try and clean. Now, when I sell the house, someone will need to take the 1 i/2 inch thick plaster down to the studs to get rid of the brick.
What brand of brick sealer did you use?