Checking In With Chelsea

DIY ideas, crafts, and tips for your home

subscribe and never miss a thing!

Receive Free Email Updates

  • About
  • Videos
  • Projects
    • Indoor Projects
    • Outdoor Projects
    • Craft Projects
  • House Tour
You are here: Home / Videos / 3 Ways to Update Fireplace with Paint

3 Ways to Update Fireplace with Paint

November 1, 2019 By Chelsea Lipford Wolf 6 Comments

Video Playback Not Supported

Dramatic Fireplace Update with Paint
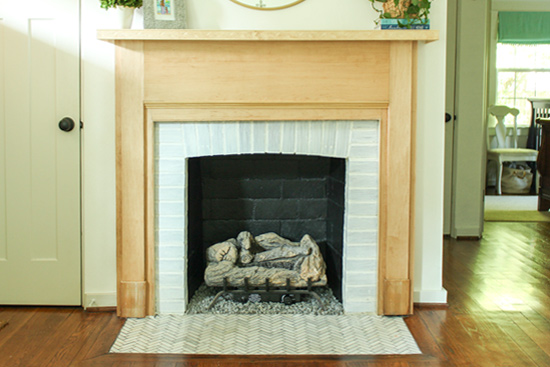
Painted Fireplace Updated with Stained Wood Veneer
Without spending a lot of money, you can change the look of your fireplace and hearth in just a few hours!

Black Firebox

I had never thought about painting the inside of our firebox until Dad and I helped update this dark, dated den and fireplace. And after updating the fireplace mantel with wood veneer, the rest of the fireplace looked shabby.
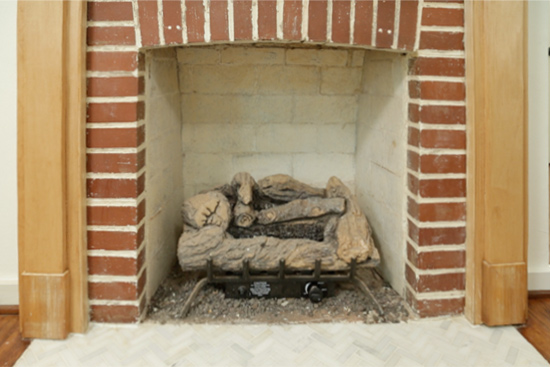
Fireplace with Red Bricks and Dingy White Firebox Before Painting

So black, high heat paint* to the rescue! Using a 6 inch roller*, I easily applied the paint in one coat to cover our grungy, used-to-be-white firebox.
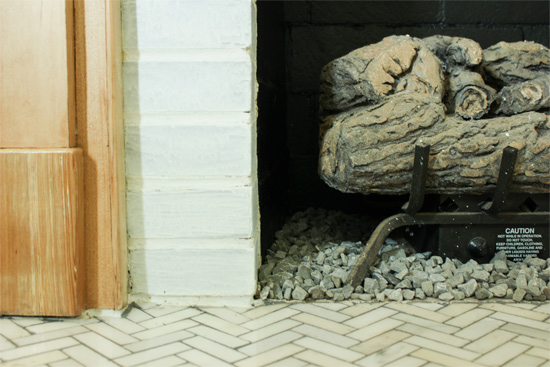
white brick fireplace surround with black painted firebox firebricks

Instantly cleaner look that will look that way for a long time since you won’t be able to see the dirt grime that may be emitted from the fireplace over time!

Whitewash Brick Surround

This project was also inspired by previous Today’s Homeowner projects! At the dated den mentioned above, I applied a limewash to the fireplace bricks. At another house, I used a German Schmear technique with white mortar.

But I wanted to show you the least expensive and quickest way, so I used a 50/50 ratio of water and white latex paint. I used flat paint because I had it on hand, but any latex paint works!

Stir well and apply with a rag for a washed look or brush it on for more opaque coverage. My bricks were previously painted solid, completely opaque. (See how I removed the paint at the beginning of my other fireplace makeover video here.) But using the watered down paint gave it slightly less coverage for a more washed look like I wanted. It ended up between the rag application/wiped off look and the completely opaque look I had previously.
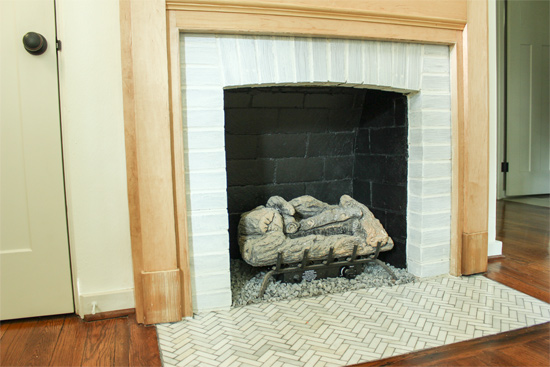
Whitewash Red Brick Fireplace Surround with Paint

The nice thing about this technique is that you can adjust it to your preference! Apply more as you’re working or wipe it off if it goes on too thick!

Change Grout Color

Lastly, as I mentioned in my last video, I was inspired by a fireplace I saw on Instagram from another Chelsea. (I don’t know her personally, but I’m sure she’s lovely.☺️) Besides the stained wood mantel, the contrast between the white tiles and gray grout really appealed to me!

But since I already installed tile a few years ago with white grout, the best way for me to achieve that look was by staining the grout in place.

What I used is a grout colorant called Polyblend*, but you pretty much just paint it onto your grout and wipe off any excess from the face of the tiles. (Make sure your tiles are sealed before coloring the grout!) This was the most tedious of my 3 projects because small tiles=lots of grout joints. But even so it didn’t take that long and made a big difference!😍

Marble Herringbone Tile with Painted Grout Upgrade

And there you have it! 3 ways to update your fireplace with paint! And once your fireplace is updated, you can start a fire, drink some hot tea, and put your feet up while you admire your handiwork!

Thanks for Checking In! ~Chelsea

*This post may contain affiliate links*

Subscribe for Free Updates!

Stay up-to-date on Chelsea's latest projects, tips, useful resources and more.

Previous Post
Glam Pumpkin Projects on HLN
Next Post
DIY Split Brick Backsplash

Related Content

Completed Hand Painted Pennant Flag Banner Kid BedroomDIY Pennant Banner for Kids RoomCompleted Large Lighted Two and Zero NumbersDIY Lighted Marquee NumbersBrick Retaining Wall How to Waterproof and PaintWaterproofing Vertical Masonry WallSitting on Back Steps After Finally Sealing BricksStripping Paint from Bricks

Comments

  1. Linda says

    November 24, 2019 at 2:25 pm

    What do I use to clean the firebox and brick before painting?

    Reply
    • Chelsea Lipford Wolf says

      November 30, 2019 at 1:26 pm

      A degreaser will help with fireplace soot, or just hot water and dish soap will work! ~Chelsea

      Reply
  2. Colleen says

    June 2, 2020 at 6:38 pm

    Will this work on the faux brick I have around my fireplace too? Thank you!

    Reply
    • Chelsea Lipford Wolf says

      June 3, 2020 at 10:21 am

      Hi Colleen! I don’t see why not! ~Chelsea

      Reply
  3. Barb says

    August 2, 2022 at 3:06 pm

    Were the gray rocks that are on the floor of the fireplace there originally? If not, where did you get the new ones? Thanks.

    Reply
    • Chelsea Lipford Wolf says

      September 8, 2022 at 11:45 am

      There were some rocks there already but I added a scoop from our gravel driveway.

      Reply

Please Leave a Comment Cancel reply

Your email address will not be published. Required fields are marked *

Welcome!

I’m Chelsea. DIY
enthusiast who loves
sharing my victories
and mishaps!
Learn more
here.

CHECK IN WITH CHELSEA ON INSTAGRAM

Lookie! It’s a shelf for your bookies! 🤣Build Lookie! It’s a shelf for your bookies! 🤣Building a shelf unit custom for ANY space in your home is so simple and can be done over and over again to add much needed storage aka sanity! The kids were running all over the house at bedtime trying to find a book to read because we had them stashed in baskets and shelves in several different rooms. So I took advantage of this space in the hall next to a closet to create a central location for their books and some of mine too! Plus it adds a little character to an otherwise blah space!🙌🏻
.
.
A full how to video is on checkinginwithchelsea.com! Book nerds can be DIY nerds too!🤓
.
.
#booknerdsunite #diyskills #beginnerdiy #bookshelfie #halldecor #storagesolutions #storageideas #bookstorage #bookstorageideas
5 months in and she’s at the top of my favorites 5 months in and she’s at the top of my favorites list!🥰
.
.
Couldn’t resist using this audio.😅
Using my grandmother’s cookie press to make 🎄 Using my grandmother’s cookie press to make 🎄cookies I used to make as a kid in our brand new kitchen. My heart could burst!😭 I hope you are enjoying the preparation for the main event 😇and bring love and joy to your home, no matter what it looks like.❤️💚
.
.
#christmascookies #christmastrees #familytraditions #christmasbreak #newkitchen #kitchendecor #kitchendesign #madewithlove
3D art install in my girls’ girly bedroom!🦋😍Love this $13 pack of butterflies that comes with everything you need to fill a large wall! And it only takes 30 minutes!🙌🏻 Putting the link to the butterflies in my bio! (https://amzn.to/3VmfZsB)
.
.
First step is to layout the flow of your fluttering butterflies with the large and medium sizes from the pack, leaving room for the small ones. Then fill in spaces with the small size and pat yourself on the back! So easy!
The whole Wolfpack has been staying at my parents’ house on the river for the past week while our hardwood floors are being refinished. Since the kids had the whole week off of school it has really felt like a vacation! Complete with a sunny Sunday boat ride after Mass!🥰🚤☀️Enjoy the rest of your weekend! 😘
.
.
#generationalliving #3generations❤️ #4kidlife #grandparentlife #boatday #riverside #riverlifestyle #fowlriver #alabamalifestyle #alabamablogger #nofilterneeded
Dad and I got our tickets to the gun show!💥 . . Dad and I got our tickets to the gun show!💥
.
.
@todayshomeowner @visitmobileal #exploreyourhometown #hometownpride #mobilealabama #battleship #ussalabama #visitmobile
Load More... Follow on Instagram

Indoor Projects Outdoor Projects Craft Projects
Facebook Pagelike Widget
  • Contact
  • FAQs
  • Advertise with Chelsea
  • Media
  • Today’s Homeowner

Search This Site

Receive Free Updates Via Email

Copyright © 2023 Checking in With Chelsea • All Rights Reserved