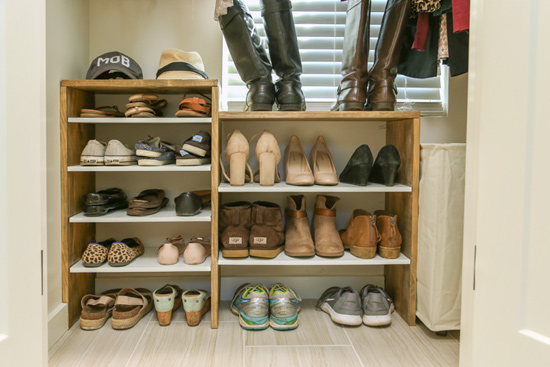
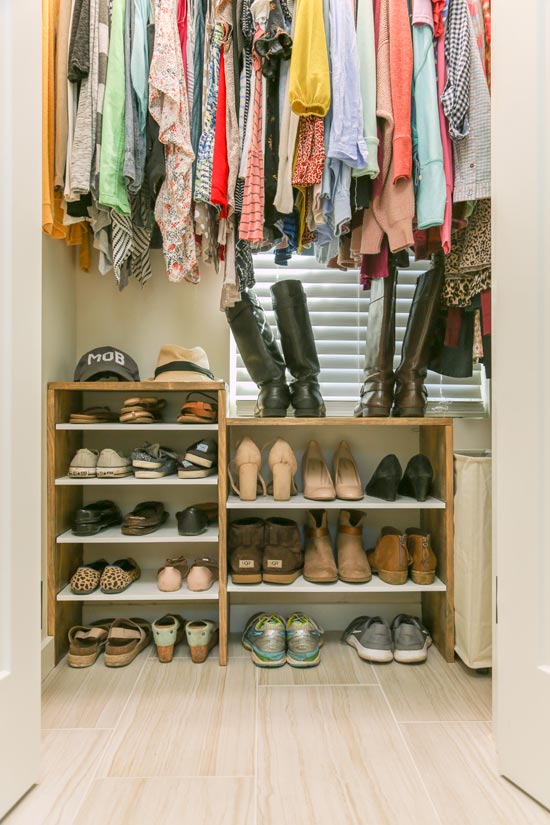
Make Your Own Custom Shoe Rack
This video shows you how to build a shoe rack custom to the size of your closet and shoes!
Give it a built-in look by removing the baseboard before installation.

Materials
- 4’x8’x1/2″ sheet of MDF
- oil-based primer*
- 1″x12″x12′
- wood stain
- satin polyurethane*
- nail gun* and nails
- circular saw*
- level*
- paint and stain supplies
- oscillating tool with blade*
Of course, the measurements all depend on the size of the shoe rack you want to build! I use use my actual dimensions for these how-to purposes!
Design and Layout
To optimize the space in my closet and really enhance the built-in look of my new shoe rack, I wanted to ‘wrap’ it around the window. The left side is higher and the right side dips down to the bottom of the window.
The dimensions I was working within are 42-1/2″ overall left to right. From wall to window is 18-1/2″ and then 24″ from the center vertical divide to the right side of the unit. Our rolling hamper* fills up the remaining space under the window! The right side is 25-1/4″ tall while the left side is 29-1/4″.
After determining the dimensions, I also had to come up with the materials! Using my previous store-bought unit as inspiration, I knew I wanted thin dividers so that they wouldn’t eat up the space available! But to help it match my baseboards, I wanted to use a 3/4″ material on the outside. So that’s why there’s MDF and a 1″x12″.
All About MDF
I wanted to use MDF (MDF=medium density fiberboard) on this project for many reasons. One reason I chose MDF over sanded plywood is that I would not have to add an edge band on the front edge after cutting. With plywood, you would see all of the layers that are put together to make it. But since MDF is composed of fibers instead of layers, you don’t have that worry!
Another reason I chose MDF is that it is free of defects and SMOOTH! Even plywood labeled as ‘sanded’ in the store still requires sanding before priming and can have knots or defects in the middle of it.
Lastly, I went with MDF because it’s less expensive than plywood! For the same size sheet, MDF was $10 cheaper!
The one drawback, at least for this particular project, is that you really need to use an oil-based primer. Because the MDF is made of wood fibers and resins, it can swell if it comes in contact with water or water-based paints before it’s been sealed. Using the oil-based primer seals it off and then it’s good to go!
Prime and Cut
Applying the primer first was my biggest priority so that it would be sealed and safe. But also unlike wood, it doesn’t splinter when making cuts. So I wouldn’t have anything more to sand or prime after making my cuts. It didn’t take long at all!
To cut it, I measured and marked 11-1/4″ in from the short side of the MDF sheet. Then connected the marks with my level to draw a long, straight line. Then I was able to line up my saw blade and clamp the level in place to use as a guide. This makes it so much easier to get a good cut when cutting a longer distance.
(Watch video above for reference!)
I did this several more times until I had what I needed. Then it was time to cut the 1″x12″ to size.
Cut List 1″x12″:
- 29-1/4″ (2x)
- 25-1/4″
- 24
- 18.5
I cut my MDF shelf boards to size, too. You’ll need to subtract the width of the vertical pieces which is 3/4″ in this case.
Cut List MDF:
- 23-1/4″ (2x)
- 17″ (4x)
Assemble and Install
Layout your 1″x12″ vertical pieces so you can mark where each shelf board will go. Then you can turn them on their side and nail the shelves into place from the outside using long nails and a nail gun. Of course you can also use finish nails and hammer if that’s what you’ve got!
Depending on whether you paint or stain your shoe rack, you won’t even see most of the nail holes. Feel free to get carried away!
Keep installing one shelf at a time until they’re all attached! At this point, your unit may be a little wobbly and cumbersome to carry. BUT installing it in the closet stabilizes it!
Speaking of installation…to get it flush with the wall, you’ll first need to cut and remove part of the baseboard. To do that, I used a multi tool with a flush-cut blade attachment. A little strong-arming was required and some touch up paint after, but getting the baseboard out is key to the built-in look!
Sliding the new shoe rack into place, I nailed it into the wall on the left. Then a few nails through the top into the back wall to keep it stable and level. Pow Pow!
I went back and cut the removed baseboard to fit between the vertical divides and re-installed it. This stabilizes it even more!

And that’s how I built a built-in shoe rack to outfit my new closet!

To see more pictures of our completed bathroom, click here to see that post!
And to see more tools and household items we use all the time in the Wolf household, you can click here to go to my Amazon storefront* where I’ve compiled lists of all things home improvement!
Thanks for Checking In! ~Chelsea
*This post may contain affiliate links*


Hi I watched your video making the shoe rack and I was concerned you weren’t wearing a protective mouth and nose covering. MDF is potentially carcinogenic.
https://www.theguardian.com/uk/1997/sep/21/antonybarnett.theobserver
I had the same comment regarding sawing mdf and wearing a dust mask.