Checking In With Chelsea

DIY ideas, crafts, and tips for your home

subscribe and never miss a thing!

Receive Free Email Updates

  • About
  • Videos
  • Projects
    • Indoor Projects
    • Outdoor Projects
    • Craft Projects
  • House Tour
You are here: Home / Craft Projects / Summertime Flower Power

Summertime Flower Power

June 27, 2016 By Chelsea Lipford Wolf 9 Comments

When I was a little kid, I loved looking through the circular from Big Lots and picking out all kinds of seasonal decorative items. I’d save up my allowance and buy a few items to decorate my bedroom and bedroom door for various holidays and seasons. (And I still have some of those gems!) Although to a lesser extent, I still enjoy doing that. You know, there are so many other home projects I want to spend my money on these days!

Well I saved up my pennies once again to create a wreath for our front door to usher in the hottest of seasons, and my favorite, summer!
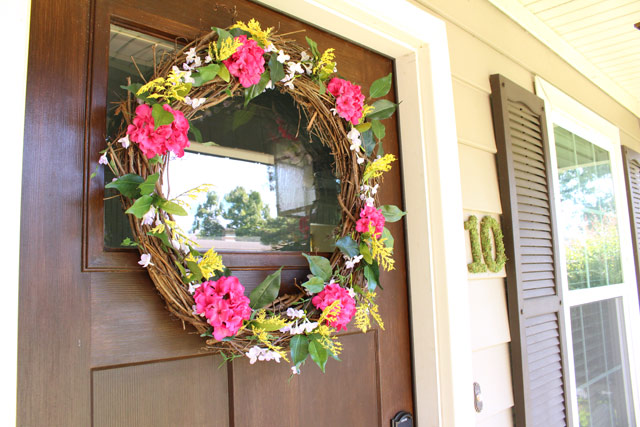
Floral Summer Wreath Hanging on Door

Summer really is my favorite season because my favorite temperature is hot car. And I get to experience that every day over the next few months!

A few years ago I made a DIY fall wreath that I still have and still love. It has an accent, if you will, on one side.

DIY Fall Monogram Wreath

So I wanted to make my summer wreath a little different and have all of the color and fun evenly distributed. Here’s what I did.
Fake Flower Stems from Craft Store

I hit up the local craft supplies store and picked out a bunch of random flowers in various summery colors and sizes. I also got a large 25″ grapevine wreath and used a hot glue gun and wire cutters I had on hand.

Craft Materials for Making Summer Wreath

I first took these wispy flowers and cut each stem off with my wire cutters.

Purple Flower Stems Before Cutting

Then I tucked them into the grapevine wreath randomly, making it look like it was a vine. I did the same thing with some ficus branches.

Ficus Leaves Spread Out on Grapevine Wreath

The pink geraniums and yellow sprigs were also separated into individual pieces. The way the geraniums were made only required me to pluck the bud off of the stem. Easy peasy.

Geranium Buds Plucked from Stems

I placed the geraniums on the wreath and worked with the spacing before I covered the bottom in hot glue and stuck them in place. I did the same for the yellow sprigs (Sorry, I don’t know what they are actually called!) until everything was just the way I liked it and adequately covering up the brown-ness of the grapevine wreath.

Flower Detail on the Wreath

If you noticed in my picture of the materials I bought from the craft store, I had some white hydrangeas. I ultimately decided not to use those although it was hard because I get weak in the knees over hydrangeas! They didn’t fit in with my “color-all-over” vibe I was going for.

Wreath Hanging on Front Door

The pop of color on the front door is noticeable from the street and I love it! I see it as I’m pulling into the driveway in the afternoons and it makes coming home even sweeter. Plus it looks pretty good with my moss-covered house numbers too!

Floral Summer Wreath Hanging on Door

If this has inspired you to take on a summertime craft, check out these other bloggers I’ve partnered with this month to bring you some fresh, summery ideas!

9 Creative Summer Craft Ideas

Summer Matching Game – Free Printable // Wellies and Lemonade
Simple Summer Farmhouse Centerpiece // Making Joy and Pretty Things
Summer Mantel Inspiration // Sunshine and Munchkins
Summer Coffee Table Styling // Flourishing at Home
Front Porch Summer Decor // Restyle It Wright
Farmhouse Style Summer Tablescape // Craftivity Designs
Summer Tray Makeover // North Country Nest
Summer Entertaining Tablescape // W. Collective

Thanks for Checking In! ~ Chelsea

Subscribe for Free Updates!

Stay up-to-date on Chelsea's latest projects, tips, useful resources and more.

Previous Post
DIY Marble End Table Makeover
Next Post
DIY Burlap Roman Shades

Related Content

Completed Large Lighted Two and Zero NumbersDIY Lighted Marquee NumbersChelsea Edging Front Sidewalk in SpringHow to Clean Up Your Yard for Summer Now!Makeover for Girl Boy Shared RoomShared Toddler Room Mood BoardHanging Herb Garden How ToHanging Herb Garden How To

Comments

  1. zan says

    June 27, 2016 at 7:59 am

    Your wreath is beautiful Chelsea! I love all the beautiful colors you chose. It really adds a beautiful accent to your front door. I too love Big Lots but I think your experience is different ..ha ha! How fun, though!!

    Reply
  2. Lora says

    June 27, 2016 at 10:17 am

    Your wreath looks great and I am totally smitten by your house numbers and the fall wreath, too. Heading over to check out those projects!

    Reply
    • Chelsea Lipford Wolf says

      June 28, 2016 at 12:45 pm

      Thanks for checking in, Lora!

      Reply
  3. Colette @ restyle it wright says

    June 27, 2016 at 7:59 pm

    It turned out great! I love how the colors really stand out against the beautiful wood door! And those moss numbers are fab.

    Reply
  4. Kelly says

    June 28, 2016 at 7:16 am

    I love the bright colors on this wreath. It is so fun and festive!
    Best,
    Kelly

    Reply
  5. Sarah @ Making Joy and Pretty Things says

    June 28, 2016 at 8:01 am

    I absolutely love this wreath, Chelsea! It’s the perfect pop of bright summer color. And, I agree it looks amazing next to your moss-colored house numbers!

    Reply
  6. alina says

    June 28, 2016 at 4:05 pm

    I was always wondering how are all those branches looking so neat in those wreaths, now I know! Turned out so nice and the colours are really vibrant

    Reply
  7. Stephanie says

    June 29, 2016 at 8:43 am

    I’m totally feeling your vibe on coming home to something pretty each day! It’s like a little hug to welcome you home. Great job – looking forward to seeing your next creation!

    Reply
  8. Shani | Sunshine & Munchkins says

    June 30, 2016 at 12:37 am

    I love using wreaths to decorate for holidays and seasons and I’ve been having the hardest time figuring out what to do for my front door. Problem solved! I think I’ll be taking a page out of your book, or blog rather. 😉 Thanks for the inspiration!

    Reply

Please Leave a Comment Cancel reply

Your email address will not be published. Required fields are marked *

Welcome!

I’m Chelsea. DIY
enthusiast who loves
sharing my victories
and mishaps!
Learn more
here.

CHECK IN WITH CHELSEA ON INSTAGRAM

What else do you use paper plates for besides eati What else do you use paper plates for besides eating?? Spray paint onto a paper plate and dab a small paint brush to do spot touch ups! Life hack when you’re working on a project but don’t need to paint the whole surface!👏🏻
.
.
#lifehack #diyhacks #spraypainting #painttips #paintprep #paintpro #shutters #craftsman #1940style
Didn’t mean for this to be #ASMR but here we are Didn’t mean for this to be #ASMR but here we are!🤷🏼‍♀️ I bought this orchid 15 months ago to use the flowers in our hair for my sister’s wedding. I’ve already repotted it once and it’s bloomed 3-4 times! Time to do it again with a pretty new pot that matches our new kitchen cabinets!🤩
.
.
Steps to repot an orchid:
1-large pot without drainage holes
2-plastic pot slightly smaller with holes
3-trim if needed so plastic pot is at or below outside pot
4-add layer of orchid specific potting mix (it looks like bark!)
5-add orchid, fill in around roots with more bark- don’t forget to add some mix under the leaves!
6-to water, soak bark and fill up outside pot, rinse the leaves too!
7-let sit for 5-10 minutes, then drain and dry the outside of your pot.
8-set in place and enjoy!🌷
New laundry, who dis? Our laundry room was a BLANK New laundry, who dis? Our laundry room was a BLANK slate after the kitchen renovation left it reconfigured too. So Dad and I tackled simple projects that make this space functional and of course visually pleasing too!👏🏻The full project airs this weekend on @todayshomeowner!
.
.
I love that the cabinets and hardware match what we have in the kitchen since the spaces are right next to each other! Synergy!
.
.
What do you love about your laundry room?
So funny the number of people who told us they loo So funny the number of people who told us they looked at our house when it was on the market but didn’t buy. Guess we’re the only suckers🤣🤣We’ve brought her a long way since closing day though! 👏🏻😍🤩
.
.
#ranchrevival #ranchreno #1950shouse #beforeandafter #housereno #pinkgirlroom #girlsbedroom #diningroomdecor #familydining
Exploring new cities is fun but there’s no place Exploring new cities is fun but there’s no place like my hometown! Come visit!💜💛
.
.
#mobilealabama #visitmobile #mardigras #travelbloggervibes #southerncharm
Lookie! It’s a shelf for your bookies! 🤣Build Lookie! It’s a shelf for your bookies! 🤣Building a shelf unit custom for ANY space in your home is so simple and can be done over and over again to add much needed storage aka sanity! The kids were running all over the house at bedtime trying to find a book to read because we had them stashed in baskets and shelves in several different rooms. So I took advantage of this space in the hall next to a closet to create a central location for their books and some of mine too! Plus it adds a little character to an otherwise blah space!🙌🏻
.
.
A full how to video is on checkinginwithchelsea.com! Book nerds can be DIY nerds too!🤓
.
.
#booknerdsunite #diyskills #beginnerdiy #bookshelfie #halldecor #storagesolutions #storageideas #bookstorage #bookstorageideas
Load More... Follow on Instagram

Indoor Projects Outdoor Projects Craft Projects
Facebook Pagelike Widget
  • Contact
  • FAQs
  • Advertise with Chelsea
  • Media
  • Today’s Homeowner

Search This Site

Receive Free Updates Via Email

Copyright © 2023 Checking in With Chelsea • All Rights Reserved