Checking In With Chelsea

DIY ideas, crafts, and tips for your home

subscribe and never miss a thing!

Receive Free Email Updates

  • About
  • Videos
  • Projects
    • Indoor Projects
    • Outdoor Projects
    • Craft Projects
  • House Tour

Staining Wood Handrails Part Deux

Outdoor Projects •  November 26, 2014

After recapping my week-long adventure in Utah, I got inspired to tackle one of my own curb appeal projects.

And this is one of those maintenance projects you have to do as a homeowner, but you’d rather not. Especially not twice in 2.5 years!

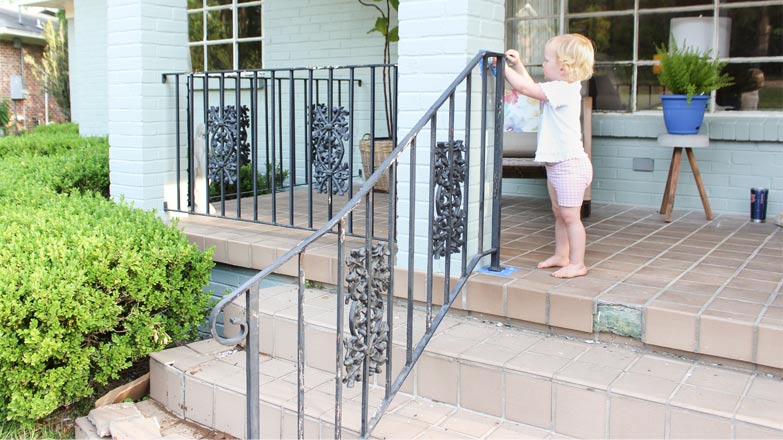
When we remodeled my house in 2012, the handrails were brand new and stained to match my new front door.

vinyl siding house with white handrail spindles and stained handrail tops on front porch

But I guess with the direction my house is facing, the sun was too much and the handrails needed to be re-stained and varnished about a year later. So I sanded, stained, and resealed them.

And here I am again 1.5 years later with the same problem!

Peeling stained wood handrails

Something’s got to give! So as soon as the weather cooled down here (since you shouldn’t stain when it’s really hot so the stain doesn’t dry too fast), I set out to correct this problem again!

pumpkin in foreground with peeling, crackling stained handrails behind

They say the definition of insanity is doing something over and over and expecting different results. So in order to prevent myself from going insane and repeating the same process a year down the road, I mixed up my strategy in repairing the handrails this time around.

stained handrails peeling next to brick steps and hibiscus plant

Before I could apply a fresh coat of stain, I had to sand all of the peeling pieces off.

sander sitting on top of stained wood handrails

Once the peeling was gone and I wiped everything down, everywhere that met a painted surface or vinyl siding got some painter’s tape.

frog tape green painter's tape on white wood columns next to wood stained handrails

Then I was ready for the stain, a gel stain that was used for the original application.

Minwax gel stain in container with paint brush sitting on wood handrails

We used this stain in 2012 since I had a fiberglass front entry door. And since I wanted the door and handrails to match (and I’ve never gotten to the bottom of a stain quart), we used the same stuff on the handrails too.

You can really tell the difference where the old meets the fresh stain!

wood stained handrails half stained

Hard to believe it’s the same color!

one handrail stained one wood handrail stained and sanded

I left the stain to dry overnight before moving on to the “top coat”. And this is where I changed it up so as not to go insane. I bought marine-grade varnish, aka the stuff used on wooden boats.

rust-oleum spar varnish being held in hand with paint brush

You have to think that boats get a lot of exposure to the sun, so a product made for boats must be able to stand up to the sun on my front porch…I’ll have to let you know in a year how it’s holding up!

It calls for a natural bristle brush. So I found the only one I had.

paint brush with 100% natural brush stamped on handle

Unfortunately it was in my craft closet and didn’t look like it was in the best shape. But that just meant I wouldn’t have to clean up after I was done and I could just throw it away!

paint brush with blue stain near ferrule

I applied it evenly over all surfaces, including the narrow sides that weren’t peeling to begin with so everything would match the new varnish’s shininess.

This is what it looked like after the first coat of varnish, a little shinier than the stain.

dark wood stained handrails with green painter's tape and one coat of varnish

If you’re using a varnish like this, make sure to follow the directions closely! Unlike a polyurethane, you don’t have to sand between coats unless it’s been more than 12 hours. In fact, it’s preferred to do a second coat after 4 hours with 3 coats MINIMUM!

So I did my first coat, waited 4 hours and then came back for the second coat. Again veering from the last time I did this project, I applied a third coat of varnish instead of stopping at two. An extra layer of protection I guess!

And I’m loving the results! Perhaps a little shinier after 3 coats than I would have originally wanted, at least it looks fresh and new and not worn and old!

wood handrails after three coats of spar varnish

Corner of porch with freshly stained and varnished handrails

Every time I walk past the handrails to get the mail, I still feel a sense of relief like, “Whew glad I fixed that!”

Right wooden handrail after stain application and three coats of varnish

Hello Shiny!

smooth and shiny stained wood handrails

Now I can enjoy some front-porch-sitting without the constant reminder that I need to re-stain the handrails! Ahhhh!

wood handrails after 3 coats of varnish with retro chair on front porch

What projects are you working on now that the weather has cooled down across the country? I’d love to hear from you! Thanks for Checking In! ~Chelsea

Subscribe for Free Updates!

Stay up-to-date on Chelsea's latest projects, tips, useful resources and more.

Previous Post
Crown Molding in the Closet?!
Next Post
Spicy Family Vacation

Related Content

Rear View of Tan Vinyl House and Wood DeckHow to Refresh Your Wood Deck for a New LookBuild a Cheap Planter Stand from CedarHow to Make a Cheap 30-Minute Plant Stand2x6 White Painted Handrail on Front Porch with Pink Flowers in Planter BoxHow I Made My Porch Happier with PaintHow to Create Workshop in Garage on a BudgetHow to Create Workshop on a Budget

Comments

  1. Aundrea says

    November 26, 2014 at 4:54 pm

    Love it! Question I have the same problem with my deck. Will doing what you did on your rails work on my deck?

    Reply
  2. Ed says

    August 14, 2015 at 12:13 pm

    Looks great, getting ready to do the same thing. I would love to know how this has held up, at least so far, if you have a moment?

    Reply
    • Chelsea Lipford Wolf says

      August 14, 2015 at 12:43 pm

      Funny you should ask! I was just inspecting/admiring it a few days ago. It’s held up really well for the past 9 months! The stain certainly isn’t peeling like it was before and it’s lasted longer than the last time I did it with a different varnish. But it isn’t quite as shiny as when it was first applied and dried either. I’m considering lightly sanding it and applying 1 coat of the varnish sometime next spring to give it a longer life. Hope that helps! ~ Chelsea

      Reply
  3. Lisa says

    November 28, 2017 at 2:55 pm

    That was a beautiful transformation. Have you had to re-varnish annually?

    Reply
    • Chelsea Lipford Wolf says

      November 30, 2017 at 11:56 am

      Unfortunately, yes. It looks like the stain is not actually soaking down into the wood. I don’t know if it’s because it’s a gel stain or maybe we stained it too soon the first time? But I’m pretty sure it’s not the varnish’s fault. (If the stain soaked in well then the varnish would soak in too and last longer.) ~Chelsea

      Reply
  4. Gary Nickels says

    July 5, 2020 at 10:45 am

    Well hows your varnish holding up now was the boat varnish the answer to the problem top railing?

    Reply
    • Chelsea Lipford Wolf says

      July 7, 2020 at 8:43 am

      It held up better than anything else before it but still couldn’t hold up to the sun. Not sure why?? I decided to paint the handrails white a few months ago instead of maintaining the stain. ~Chelsea

      Reply

Please Leave a Comment Cancel reply

Your email address will not be published. Required fields are marked *

Welcome!

I’m Chelsea. DIY
enthusiast who loves
sharing my victories
and mishaps!
Learn more
here.

CHECK IN WITH CHELSEA ON INSTAGRAM

Something I never thought I’d do? Measure shoes Something I never thought I’d do? Measure shoes on TV.🤷🏼‍♀️Yet here we are...a quick behind the scenes of the shoe rack I built for an episode of @todayshomeowner is in my stories if you want to check it out! You can see the TV circus in action.🎪🤪
.
.
#reallifeandstyle #behindthescenes🎬 #behindthescene #shoerackdesign #dayjobproblems #rollcamera #ladybuilder #diy #customclosets
Merry 5th Day of Christmas from my sweet and wild Merry 5th Day of Christmas from my sweet and wild Wolfpack!🎄🥰 I hope your Christmas Day was filled with your favorite people and things.
We had the best weekend getting in the Christmas s We had the best weekend getting in the Christmas spirit!🎄Hope you’re feeling the magic of Christmas at least a little bit too!✨
Thanks, Josh, for helping me build a column today! Thanks, Josh, for helping me build a column today!😍We’re on day 3 in my dad’s hometown helping to #buildlafayettelanding, a community service project he dreamed up to build up the community after Hurricane Michael devastated the area in 2018.
.
.
A lot more work to do before we wrap Thursday afternoon!🛠
Have you ever used spackling in a unique way? A ho Have you ever used spackling in a unique way? A homeowner I worked with recently used a stencil and spackling on her foyer wall to add some subtle interest! It was so fun! I love this neat contest that sparks creativity. Tag a friend who you think could win this contest with their ideas! It closes Feb 1st!
The cutest little elf that crinkles the Christmas The cutest little elf that crinkles the Christmas cards and takes down all of the ornaments on the bottom 2 feet of the tree.🤪🎄
Load More... Follow on Instagram
Indoor Projects Outdoor Projects Craft Projects

Popular Posts

Frosted Windows in Blue Tiled Bathroom

How To Install Beautiful Privacy Window Film

posted in Indoor Projects

Completed Lattice Trellis to Cover HVAC Unit

Hide Your AC Unit with a Trellis

posted in Outdoor Projects

Dining Room View from Living Room Ready to Sell

How to Sell Your House Fast and Cheap

posted in Indoor Projects, Outdoor Projects

1950s Ranch Brick Home on Corner Lot Pristine Condition

Our Ranch Revival Introduction and Before Tour

posted in Indoor Projects, Outdoor Projects

Chelsea Lipford Wolf on Deck with Small Bug-Repellent Container Garden

Easy Way to Keep Mosquitos Away

posted in Outdoor Projects

Facebook Pagelike Widget
  • Contact
  • FAQs
  • Advertise with Chelsea
  • Media
  • Today’s Homeowner

Search This Site

Receive Free Updates Via Email

Copyright © 2021 Checking in With Chelsea • All Rights Reserved • Site Design by Archer Creative