Putting the Molding to Bed
How to Cut Bed Molding and Crown Molding
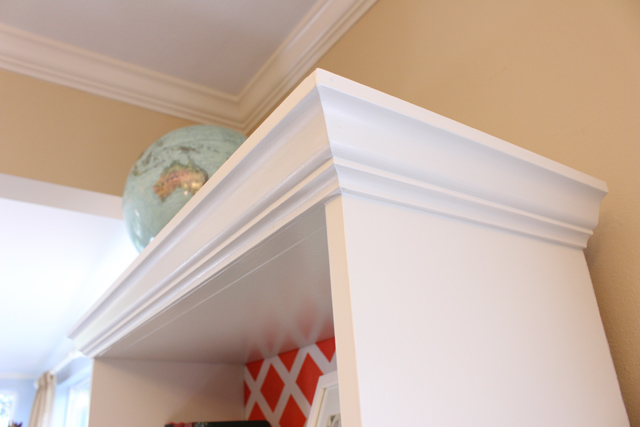
I left off my last post on adding trim to my windows saying I’d be back with a more detailed post on cutting bed molding (or crown molding) for the top of my new window trim.
I got so wrapped up in figuring out and installing my bed molding that I did not take any real-time pictures of the process. But, ever-striving to be a woman of my word, I recreated some pictures of how to cut bed molding for outside corners. It’s really easy if you take your time and turn it upside down!
Set Molding Upside Down
To start, determine what is the “top” of your molding. For the bed molding I used, the bump out was the top and bump in, if you will, was the bottom.

Ok, any time you make a cut, always make sure the top is down and the bottom is up. Always.
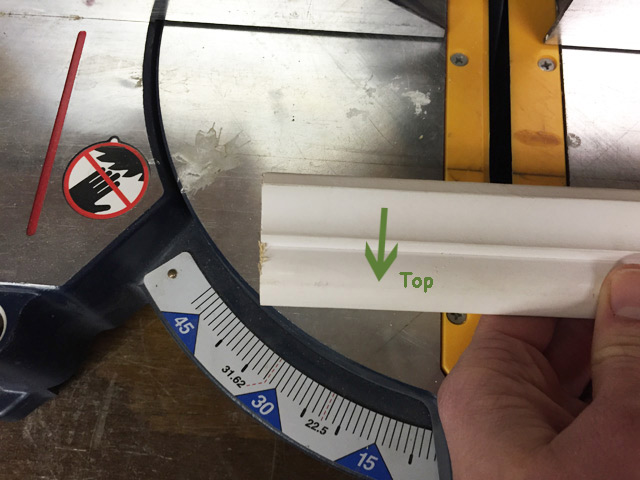
Start by creating an angle at one end. You’ll want to turn your miter saw all the way to the 45° on the left or right. You can see I started on the left.
Keep Molding On Angle
But this is the trick, to hold the molding up against the saw fence as if the bottom surface of the saw was the wall and the fence was the ceiling. Basically, make sure the 2 turned edges of the molding are flush against the bottom and fence of the saw, and also that the molding is upside down.
Then carefully hold your molding tight against the fence in that position while you let ‘er rip. Once the cut is complete you’ll be able to see the slight bevel you made!
Measure From The Bottom
Now to me the next part is the trickiest—measuring and cutting to size. You’ll want to measure and mark using the bottom edge, starting from the shortest corner of your new angle. My thumb is trying to illustrate the start point below.
Since I was cutting the bed molding to install on a 1×6 as part of my window trim, I measured the face of the 1×6 from end to end to get the length I needed from the bed molding.
Cut The Opposite End
Before you make the next cut, adjust your saw to the opposite 45°. If your first cut was with the 45 marker on the left, rotate to the right and vice versa.
Your pencil mark should be at the top if you have the molding lined up correctly. Match it up where the back of the saw blade will hit your mark and go out from there, so that the mark is the shorter point of your cut. Hold the molding tight against the fence on the angle, the same as the first cut.
Create End Caps
To wrap the molding around the 1×6 (to use my window trim header as an example) you’ll want to use the same technique to cut a small end cap. Cut an angle to match up with each end. And then cut a straight edge on the opposite side at the right length. My end pieces were 3/4 inches wide at the bottom.
Then you can glue the end cap to the main strip of molding before attaching to the wall and window trim.
Attach to Wall
To attach it to my window trim, I used a nail gun with 1 1/2 inch finish nails. Flush the angled part of the bottom of the bed molding against the wall before nailing in place. My finger is pointing out what part of the back gets nailed in place in the picture below.
I really hope this helps any one tackling outside corners of crown molding or bed molding or really any kind of molding! Once you figure it out, it’s so easy! Just remember always cut it upside down!
Caulk And Paint
I’m moving pretty slowly on finishing up this project, but I’m currently painting after caulking all of the joints and puttying the holes. I’ll follow up when it’s done with some more tips and beauty shots! I’ll leave you with a quick sneak peek of the trim with bed molding in place!
Here’s the link to the finished window trim and how the finishing touches make all the difference! As always, please comment below with any questions or comments! I read every one! And I love to hear what you’re up to around your casa.
Thanks for Checking In! ~Chelsea


11 Comments
Jonathan D. Wynn
Just a quick/easy tip. If cutting several pcs of crown, it is hard to get the exact placement of your piece of stock the same each time using this method. The easier method that is exact each time is to use the “compound” method which allows you to lay your crown stock flat on the saw. Set the miter at 31.62 degrees and the compound (bevel) at 33.85 degrees. This makes an exact 45 degree cut allowing you to lay the crown flat on the saw. (These two settings are independently marked on your saw) Enjoying your site!
Chelsea Lipford Wolf
Thanks for the tip, Jonathan! I saw that in my research, but couldn’t for the life of me figure it out! Perhaps it was a blonde moment? Thanks for reading! ~Chelsea
Bob Durst
Like Chelsea, I tried it and couldn’t get it to work until I discovered the piece needed to be flat against the FENCE, not the SAW.
Chelsea’s article also had me confused for a second when I read “as if the bottom surface of the saw was the wall and the fence was the ceiling”. The wording should be reversed since we need to hold the wood’s top edge (the ceiling side) against the bottom side of the saw, and the bottom of the wood (the wall side) against the fence of the saw.
Just sayin.
Pat Kelly
Love your blog & all the great ideas, and thank you for making your directions so easy to understand. Keep up the good work, I love trying your projects!!
Chelsea Lipford Wolf
Thanks for following along, Pat! I’m glad you enjoy my projects as much as I love creating them! ~ Chelsea
Kathina
Hi Chelsea,
New to your site and after reading this blog, have a suggestion for a very soon video. Would you and your dad consider making a video on angle cuts on the miter saw? I really want to learn, there are so many projects waiting.
KWade
Thanks for your tutorial! I finally made some decent crown molding corners! To alleviate the problem of positioning the stock the same way every time I marked a line on my table bed. I would have clamped a guide to it but my saw doesn’t have places for clamps. I’m sure it isn’t as accurate as doing the compound settings, but it was reasonable.
Chelsea Lipford Wolf
Thanks! I’m glad it worked out for you! ~Chelsea
Kandie Wood
After hours and hours of searching the web I just found your site. Thank you thank you for posting this. I was absolutely lost as to how to make the inside corners for the crown molding I am using above my shower/tub to dress it up. I could get one side cut perfectly but could not figure out the other side to match up in the corner.. Why must this be so annoyingly difficult.. Thanks..
Chelsea Lipford Wolf
Yes! I’m a fairly intelligent person, but dang it if hanging crown molding isn’t the most perplexing thing ever! Glad I could help another homeowner out! 🙂 ~Chelsea
Michael Martino
This is a great help. The instructions were very clear and easy to apply.