Checking In With Chelsea

DIY ideas, crafts, and tips for your home

subscribe and never miss a thing!

Receive Free Email Updates

  • About
  • Videos
  • Projects
    • Indoor Projects
    • Outdoor Projects
    • Craft Projects
  • House Tour
You are here: Home / Indoor Projects / Dresser Rehab

Dresser Rehab

January 7, 2015 By Chelsea Lipford Wolf 7 Comments

A few months ago, I was waiting around on my front porch for my dad to pick me up for work. (Can’t remember, but I guess my car was in the shop.) And I heard this horrendous noise coming from across the street. After a little while, I saw my middle-aged neighbor dragging a dresser across her broken-up driveway.

So I hopped up to help her bring it to the street. She was setting it on the curb for anyone to pick up. After a quick glance, I noticed it was in really good shape. She saw my interest and asked if I wanted it. And then proceeded to help me bring it across the street to my yard!

Holla! I was able to bring it inside by myself…all while I was still waiting on Dad…

stained wood dresser before resealing with polyurethane

All of the drawers worked and the legs and body of the dresser looked nice and seemed well kept. The two main eyesores were these paint spots right on top…

stained wood dresser top with two paint spills

…and the dusty glaze that couldn’t be wiped away right next to the spots.

top of stained wood dresser with paint splotch and dust sitting in grass

Lesser of an eyesore were the worn-out drawer pulls.

dingy, dirty drawer pulls hardware on stained wood dresser

Since it was in pretty good overall shape, I didn’t care to change the stain or do anything drastic. There’s always later for that! My plan was to lightly sand everything to get grime and grit off, then apply a few fresh coats of polyurethane.

And that’s what I did!

shiny surface of stained wood dresser with polyurethane in yellow room

It all started with some 120-grit sandpaper.

120 grit sandpaper being held over stained wood dresser

I hand-sanded every side and surface. When I got to the top, I noticed the sanding wasn’t doing much for the paint spots. So I used a putty knife to gently scrape the paint off, trying not to make any scratches or grooves in the process!

hand holding putty knife scraping paint stains off of wood stained dresser

I did a good job scraping, but the paint must have been on there for a while because it pulled the stain off that was under it. On the plus side, the bare wood is less obvious than white paint!

bare wood spots on wood furniture dresser

But I didn’t stop there. I sanded the bare wood spots a little more before I whipped out a cotton swab and some nearby wood stain.

hand holding cotton swab in front of can of minwax wood stain

I picked the closest stain color from my leftover supply to match the furniture’s existing stain and dabbed it on the spots with the swab. It’s still not perfect, but it’s much better than when I started!

bare wood spot on stained wood furniture covered with a dab of wood stain

Finally I was ready to apply the first new coat of polyurethane. Again I used some leftover poly I hand leftover from another project, possibly when Dad and I refinished an old desk?

hand holding can of clear satin polyurethane in front of wood dresser furniture in workshop

I slowly worked my way around the dresser applying the polyurethane. Once the first coat was complete, I moved on to fixing up the hardware while it dried.

It was hard to tell whether the pulls were real brass or not. So in the off-chance they were brass, I picked up some Brasso to clean them up. I followed the instructions on the bottle and they came out looking like this…

rusty drawer pulls sitting on paper towel and quartz countertop

Clearly they aren’t brass…but they looked really cool! They didn’t stay that way for long, though. I cleaned them up as best I could and then took to some gold spray paint.

hand holding can of gold spray paint over drawer hardware pulls laying on newspaper in grass

They sat drying while I applied the second and final coat of polyurethane to the dresser. Then I came back and second-coated the hardware. I left both to dry overnight before I started putting everything back together.

Half of Drawer Hardware Installed

Putting the second part of the hardware got a little tricky. Guess it was a little thicker after two coats of spray paint! But it’s nothing a hammer couldn’t fix!

half of drawer pull hardware stuck in place

So I didn’t scuff up the fresh paint, I placed a rag on top of the hardware before hammering. It worked like a charm!

Hammering Hardware with Rag

I moved the dresser back in place where it had been before I refinished it, in my dining room. Now it can act as a small buffet to my small dining room! Plus the added storage ain’t bad!

stained wood dresser in yellow room with hardwood floors after refinishing with satin polyurethane

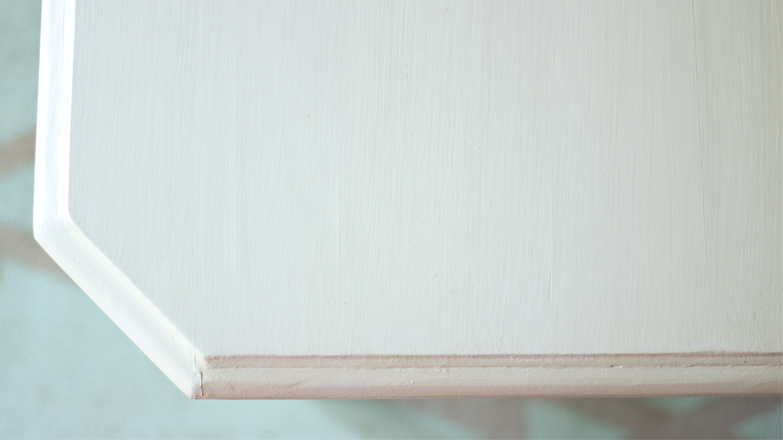
The sanding and polyurethane did exactly what I wanted it to do, get rid of that dusty glaze on the top!

shiny surface of stained wood dresser with polyurethane in yellow room

And I think the paint spots-turned-bare wood ended up looking decent after the stain touchup and the poly.

spots on top of wood stained dresser furniture

But from a wider angle it practically disappears.

wide shot of top of wood dresser furniture

And it totally vanishes when you put a mirrored tray on top of it! Ha!

mirrored tray sitting on top of stained wood dresser

Before I called this project done, I removed the old adhesive shelf liner that was in the drawers and replaced it with fabric. I’ll be sharing how I did that in another post. But here’s a sneak peek of the inside of the drawer…before!

flower print shelf liner in old wood dresser drawer

Update: I’ve completed the overhaul of the inside of the dresser drawers with fabric!

What’s the best “treasure” you’ve claimed from the side of the street? Or have you been the one discarding “trash”? Comment below to let me know!

Thanks for Checking In! ~Chelsea

Subscribe for Free Updates!

Stay up-to-date on Chelsea's latest projects, tips, useful resources and more.

Previous Post
Transparent Plastic Box
Next Post
Living Room To-Do List, January 2015

Related Content

Completed Hand Painted Pennant Flag Banner Kid BedroomDIY Pennant Banner for Kids RoomCompleted Girls Bedroom Makeover Pink PanelingPink Girls’ Shared Bedroom EvolutionCompleted Large Lighted Two and Zero NumbersDIY Lighted Marquee NumbersBrick Retaining Wall How to Waterproof and PaintWaterproofing Vertical Masonry Wall

Comments

  1. Joan Kasaras says

    January 7, 2015 at 5:51 pm

    Looks great Chelsea!

    Reply
    • Chelsea Lipford Wolf says

      January 7, 2015 at 8:57 pm

      Thanks Joan! 🙂

      Reply
  2. Sue says

    January 7, 2015 at 7:28 pm

    Good job on a beautiful chest! Can’t have too many drawers, I always say. You scored a real deal on this one!

    Reply
    • Chelsea Lipford Wolf says

      January 7, 2015 at 8:57 pm

      Thanks Sue! I’m glad it was in such good shape!

      Reply
  3. penny says

    January 7, 2015 at 9:35 pm

    What a beautiful dresser. Nice job!

    Reply
    • Chelsea Lipford Wolf says

      January 8, 2015 at 10:05 am

      Thanks, Penny!

      Reply
  4. Bonnie Gordon says

    August 18, 2015 at 9:53 am

    Love your show & your Dad’s. Question: How can I get paint out of very small grooves & holes in furniture?

    Reply

Please Leave a Comment Cancel reply

Your email address will not be published. Required fields are marked *

Welcome!

I’m Chelsea. DIY
enthusiast who loves
sharing my victories
and mishaps!
Learn more
here.

CHECK IN WITH CHELSEA ON INSTAGRAM

Lookie! It’s a shelf for your bookies! 🤣Build Lookie! It’s a shelf for your bookies! 🤣Building a shelf unit custom for ANY space in your home is so simple and can be done over and over again to add much needed storage aka sanity! The kids were running all over the house at bedtime trying to find a book to read because we had them stashed in baskets and shelves in several different rooms. So I took advantage of this space in the hall next to a closet to create a central location for their books and some of mine too! Plus it adds a little character to an otherwise blah space!🙌🏻
.
.
A full how to video is on checkinginwithchelsea.com! Book nerds can be DIY nerds too!🤓
.
.
#booknerdsunite #diyskills #beginnerdiy #bookshelfie #halldecor #storagesolutions #storageideas #bookstorage #bookstorageideas
5 months in and she’s at the top of my favorites 5 months in and she’s at the top of my favorites list!🥰
.
.
Couldn’t resist using this audio.😅
Using my grandmother’s cookie press to make 🎄 Using my grandmother’s cookie press to make 🎄cookies I used to make as a kid in our brand new kitchen. My heart could burst!😭 I hope you are enjoying the preparation for the main event 😇and bring love and joy to your home, no matter what it looks like.❤️💚
.
.
#christmascookies #christmastrees #familytraditions #christmasbreak #newkitchen #kitchendecor #kitchendesign #madewithlove
3D art install in my girls’ girly bedroom!🦋😍Love this $13 pack of butterflies that comes with everything you need to fill a large wall! And it only takes 30 minutes!🙌🏻 Putting the link to the butterflies in my bio! (https://amzn.to/3VmfZsB)
.
.
First step is to layout the flow of your fluttering butterflies with the large and medium sizes from the pack, leaving room for the small ones. Then fill in spaces with the small size and pat yourself on the back! So easy!
The whole Wolfpack has been staying at my parents’ house on the river for the past week while our hardwood floors are being refinished. Since the kids had the whole week off of school it has really felt like a vacation! Complete with a sunny Sunday boat ride after Mass!🥰🚤☀️Enjoy the rest of your weekend! 😘
.
.
#generationalliving #3generations❤️ #4kidlife #grandparentlife #boatday #riverside #riverlifestyle #fowlriver #alabamalifestyle #alabamablogger #nofilterneeded
Dad and I got our tickets to the gun show!💥 . . Dad and I got our tickets to the gun show!💥
.
.
@todayshomeowner @visitmobileal #exploreyourhometown #hometownpride #mobilealabama #battleship #ussalabama #visitmobile
Load More... Follow on Instagram

Indoor Projects Outdoor Projects Craft Projects
Facebook Pagelike Widget
  • Contact
  • FAQs
  • Advertise with Chelsea
  • Media
  • Today’s Homeowner

Search This Site

Receive Free Updates Via Email

Copyright © 2023 Checking in With Chelsea • All Rights Reserved