Checking In With Chelsea

DIY ideas, crafts, and tips for your home

subscribe and never miss a thing!

Receive Free Email Updates

  • About
  • Videos
  • Projects
    • Indoor Projects
    • Outdoor Projects
    • Craft Projects
  • House Tour
You are here: Home / Indoor Projects / How To Hang A Cube Organizer

How To Hang A Cube Organizer

November 4, 2016 By Chelsea Lipford Wolf 4 Comments

How to Hang a Cube Organizer on the Wall
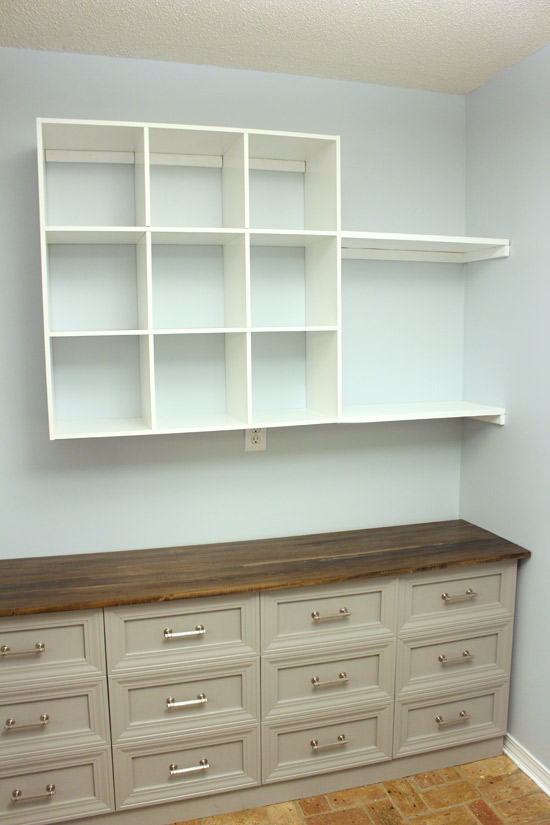
Cube Storage Hanging Above Laundry Sorter
When it came to storage and organization in my laundry room project, I wanted to think outside the (cabinet) box. The plan is to put cabinets on the wall above the washer and dryer, so I thought it’d be fun to use something different on the opposite wall above the laundry sorter.

And I think that’s what I got. It’d be great in a bedroom or family room too!

Create Cleats

Since the organizer itself doesn’t have any ‘meat’ to use to attach it to the wall (It’s made for sitting on the floor.), I had to make some cleats to attach to the wall and then attach the organizer to the cleats.
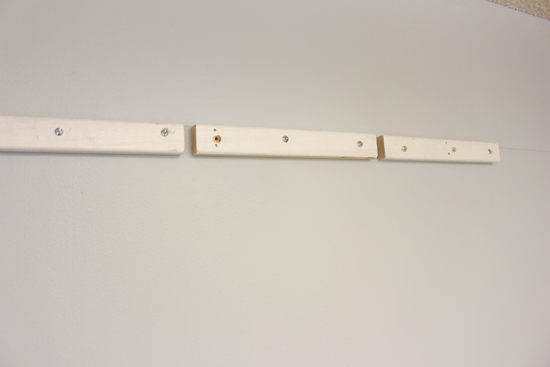
Cleats Attached to Wall for Cube Storage

I used 1x2s cut to the width of the inside of the top 3 cubes. I primed and painted them before they were installed so I wouldn’t have to paint them in place against the new blue walls! At the same time I was also hanging cleats for 2 shelves that would fill the wall between the cubes and the right wall.

When you’re hanging the cleats for the cube organizer, make sure to leave a space between them for the vertical separator of the cube. My particular one was 1/2 inch thick, so my cleats are 1/2 inch apart from each other.

The cleats for the cubes were only 11 inches wide, which meant at most I’d be able to attach them to one stud each. So I picked up some toggle bolts* in the hardware aisle.

Install Toggle Bolts

First I held the cleat in place and checked that it was level. Then I used a countersink bit to drill a hole through the cleat and into the drywall enough to make a mark, if not more.
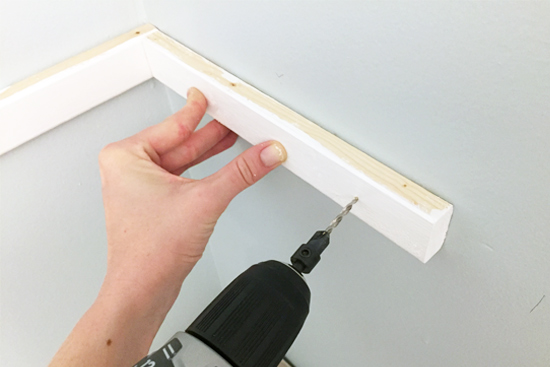
Predrilling Hole in Cleat with Countersink Bit

Then I set the cleat aside and used a 3/8 inch drill bit (which was called for on the box of my toggle bolts) to drill a hole in that spot on the drywall.

Drilling Hole for Toggle Bolt Into Drywall

Next I put the bolt through the cleat and lightly tightened the spring-loaded anchor on the bolt on the back side of the cleat.
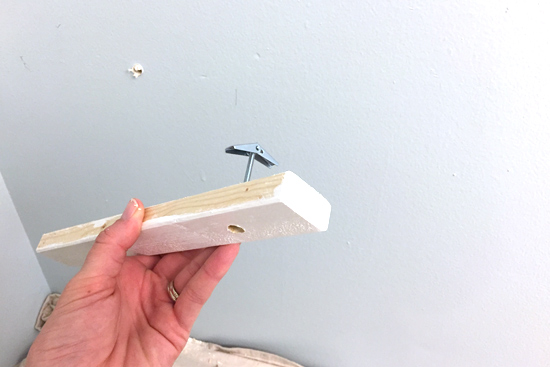
Toggle Bolt Inserted Through Cleat

To insert it into the hole I drilled, I pinched the anchor together and used a little force to squeeze it past the drywall. I checked for level again with the bolt in place, but not tightened.
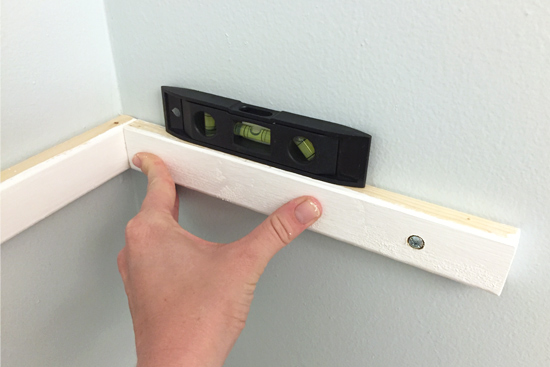
Leveling Cleat After Inserting Toggle Bolt

Then I was able to use my nail gun to shoot a nail or two into the studs which I had previously marked using a stud sensor. And I also tightened the toggle bolt.

Shelf Cleat Installed with Toggle Bolt and Nails in Studs

Hang Organizer

Once my 3 cleats were secure, I held the cube organizer in place on top of them and nailed some 2 inch nails down through the top of the organizer into my cleats. That held it in place enough for me to take another cleat the entire length of the whole organizer and attach it below the bottom to keep the unit from drooping and coming disassembled over time. Then I was able to nail down through the bottom cubes into that cleat and call it hung!

Putty and Paint

Of course the work wasn’t over with that! I had to cover up those large holes and screw heads. Since I used the countersink bit, the screw heads were recessed making it easy to cover them with putty. I also used some putty to cover the small heads of the nails. Then everything got a quick paint touch up.
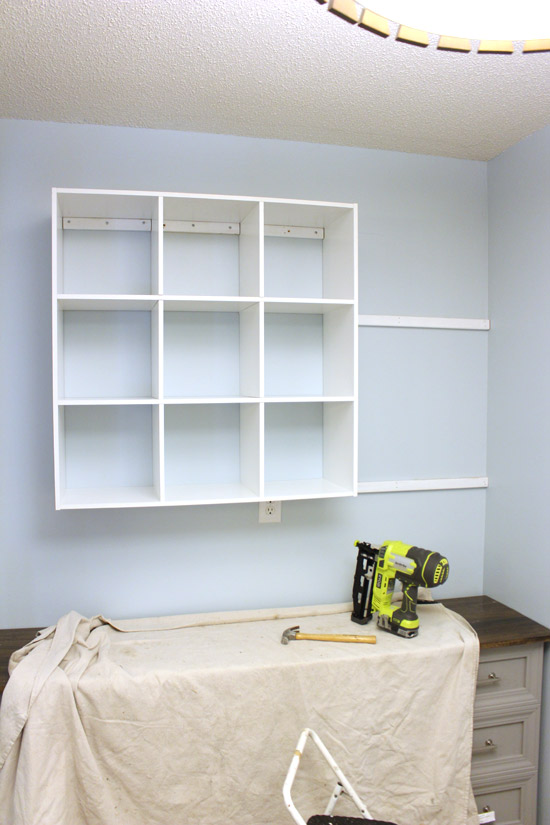
Cube Organizer Hanging on Cleats on Wall

I attached the 1×12 shelves the same as the organizer by nailing down from the top into the cleats hung in the corner. The shelf boards are a little thicker than the shelves in the organizer, but for the most part they line up together and look like one unit now!
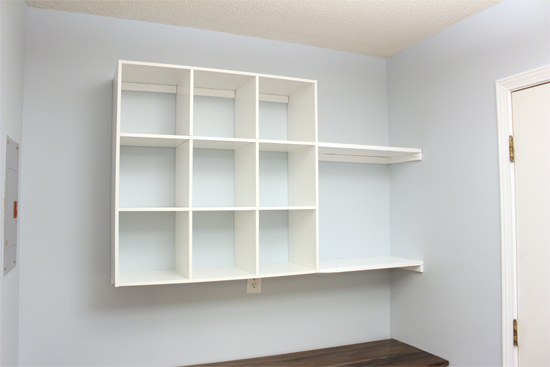
9 Cube Storage Organizer Mounted on Wall

A few small nails from underneath can attach the front left side of the shelves to the cube organizer to keep them nice and tight.

Now it’s up to the family to fill the cubes and shelves with stuff! I’m thinking a few fabric boxes or baskets will look great in all of that white. What would you put in your cubes if you had storage like this? What other storage ideas have you used for a laundry room? Share in the comments below!

Thanks for Checking In! ~Chelsea

*This post contains affiliate links*

Subscribe for Free Updates!

Stay up-to-date on Chelsea's latest projects, tips, useful resources and more.

Previous Post
Cleaning Up Yard for Winter
Next Post
Ditching the Fluorescent

Related Content

Completed Hand Painted Pennant Flag Banner Kid BedroomDIY Pennant Banner for Kids RoomCompleted Large Lighted Two and Zero NumbersDIY Lighted Marquee NumbersBrick Retaining Wall How to Waterproof and PaintWaterproofing Vertical Masonry WallSitting on Back Steps After Finally Sealing BricksStripping Paint from Bricks

Comments

  1. Stephanie Greenwood says

    November 4, 2016 at 12:38 pm

    So creative! I never thought about hanging a cube organizer on the wall, but it works – definitely more interesting than plain shelves. Can’t wait to see what’s next. Can I have this laundry room?

    Reply
  2. Tracey Kooros says

    February 14, 2019 at 6:22 pm

    Those cubes are pretty heavy. I was wondering how they have they held up over time?

    Reply
    • katie brown says

      April 13, 2019 at 9:25 pm

      I don’t think they weigh more than loaded kitchen cabinets. I’m going to try this.

      Reply
    • Chelsea Lipford Wolf says

      April 17, 2019 at 12:15 pm

      Hi Tracey! The cubes were heavy. But I checked with the homeowner-the cubes are still hanging and have held up great! ~Chelsea

      Reply

Please Leave a Comment Cancel reply

Your email address will not be published. Required fields are marked *

Welcome!

I’m Chelsea. DIY
enthusiast who loves
sharing my victories
and mishaps!
Learn more
here.

CHECK IN WITH CHELSEA ON INSTAGRAM

Lookie! It’s a shelf for your bookies! 🤣Build Lookie! It’s a shelf for your bookies! 🤣Building a shelf unit custom for ANY space in your home is so simple and can be done over and over again to add much needed storage aka sanity! The kids were running all over the house at bedtime trying to find a book to read because we had them stashed in baskets and shelves in several different rooms. So I took advantage of this space in the hall next to a closet to create a central location for their books and some of mine too! Plus it adds a little character to an otherwise blah space!🙌🏻
.
.
A full how to video is on checkinginwithchelsea.com! Book nerds can be DIY nerds too!🤓
.
.
#booknerdsunite #diyskills #beginnerdiy #bookshelfie #halldecor #storagesolutions #storageideas #bookstorage #bookstorageideas
5 months in and she’s at the top of my favorites 5 months in and she’s at the top of my favorites list!🥰
.
.
Couldn’t resist using this audio.😅
Using my grandmother’s cookie press to make 🎄 Using my grandmother’s cookie press to make 🎄cookies I used to make as a kid in our brand new kitchen. My heart could burst!😭 I hope you are enjoying the preparation for the main event 😇and bring love and joy to your home, no matter what it looks like.❤️💚
.
.
#christmascookies #christmastrees #familytraditions #christmasbreak #newkitchen #kitchendecor #kitchendesign #madewithlove
3D art install in my girls’ girly bedroom!🦋😍Love this $13 pack of butterflies that comes with everything you need to fill a large wall! And it only takes 30 minutes!🙌🏻 Putting the link to the butterflies in my bio! (https://amzn.to/3VmfZsB)
.
.
First step is to layout the flow of your fluttering butterflies with the large and medium sizes from the pack, leaving room for the small ones. Then fill in spaces with the small size and pat yourself on the back! So easy!
The whole Wolfpack has been staying at my parents’ house on the river for the past week while our hardwood floors are being refinished. Since the kids had the whole week off of school it has really felt like a vacation! Complete with a sunny Sunday boat ride after Mass!🥰🚤☀️Enjoy the rest of your weekend! 😘
.
.
#generationalliving #3generations❤️ #4kidlife #grandparentlife #boatday #riverside #riverlifestyle #fowlriver #alabamalifestyle #alabamablogger #nofilterneeded
Dad and I got our tickets to the gun show!💥 . . Dad and I got our tickets to the gun show!💥
.
.
@todayshomeowner @visitmobileal #exploreyourhometown #hometownpride #mobilealabama #battleship #ussalabama #visitmobile
Load More... Follow on Instagram

Indoor Projects Outdoor Projects Craft Projects
Facebook Pagelike Widget
  • Contact
  • FAQs
  • Advertise with Chelsea
  • Media
  • Today’s Homeowner

Search This Site

Receive Free Updates Via Email

Copyright © 2023 Checking in With Chelsea • All Rights Reserved