
DIY Tray for Shoes and Boots
For a while now I’ve been wanting a place to keep shoes near our front door. Partly inspired by magazines and catalogs that feature pretty boots in cute trays. But also inspired by articles that show how much dirt and grime is brought into a home from the bottoms of our shoes.
It’s the first step in a lifestyle change to take shoes off when we get home. Of course you can’t do that without a cool place to put them, right?

I knew I wanted to make it out of stock molding to make it easy. So I walked the molding aisle at the home center and only liked one option, crown molding. Everything else I needed I already had on hand.
Here’s what you’ll need to create your own shoe tray:
- crown molding (8 feet)
- plywood cut to size
- tape measure
- pencil
- circular saw
- miter saw
- sandpaper
- locking pliers
- nail gun/compressor or hammer/nails
- wood stain
- stain rags
- polyurethane (spray or brush-on)
- wine corks (a lot)
- hot glue gun
- shoes and boots
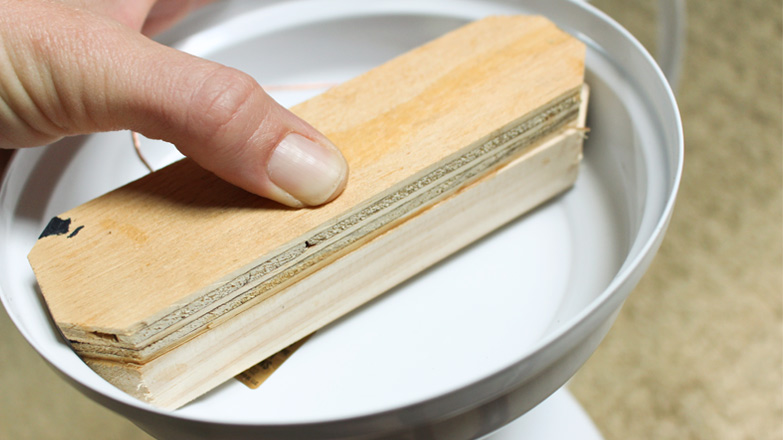
Just like I did for my window trim, I wanted to shave some of the width from the crown molding to give it a more custom look. Instead of borrowing a table saw for one piece of molding, I used a cool trick using locking pliers and a circular saw to get a straight rip.

I cut just enough to make a difference but not so much that it didn’t have a little curve left.

Once that was done I finalized the dimensions of my shoe tray. I thought in front of the fireplace would be a fun place to keep it. Living in southern Alabama, we don’t use our fireplace for most of the year. So I measured the opening of the fireplace for the overall length of my shoe tray. And I measured my longest pair of shoes to get the minimum width I’d need. The final dimensions are 29″ x 12″. I have big feet and I cannot lie!
With the measurements figured out, I used the miter saw to cut 4 pieces of crown molding. I used the same technique I used to cut the bed molding for my window trim.

Then I was ready to measure and cut the base of my tray. Instead of using plywood (which I would have used if I didn’t have something on hand), I decided to use this unique contraption leftover from when my husband, Brandon, and I turned a table into a bench for our bed.

I used one of the longer pieces of crown to measure the plywood. Since it’s tricky to measure crown molding precisely, I laid it on top of the plywood at the angle it’ll be installed to get a precise mark for cutting.

Then I carried the mark the whole width of the board with a speed square.

After cutting it with the circular saw, I measured and marked the width the same way with one of the shorter pieces of crown molding. Essentially it was also a rip cut, so I used the same locking pliers rip guide technique that I used for the crown molding with an addition. I also attached a piece of scrap wood since my cut mark was further away from the edge of the saw’s shoe. The locking pliers weren’t long enough to clamp the spot I needed. The wood block extends to what the pliers couldn’t reach.

*If you’re buying plywood specifically for this project, don’t forget you can have an associate at the home center cut it to size for you at the store when you buy it. First 2 cuts are free!
Once the plywood was cut and ready, I sanded all of the cut edges on the molding and plywood/table scraps. I also sanded the surface of the crown. I didn’t need to sand the surface of my board since it will later be covered with wine corks.
Then I was ready to assemble everything. I started with one corner, gluing and nailing the crown molding to each other and to the plywood. Then I did another corner, continuing the nails down the length of each piece of crown into the plywood edge. It’s like a big ole picture frame and the plywood is the picture. Get the picture?
Even using a nail gun, I needed a second pair of hands to help hold everything in place while nailing the first few nails. After that I was good on my own. I’d imagine using the old fashioned method of a hammer and nails would also require a 3rd and 4th hand.
With all the nails in place, I used a stain rag to apply the same stain that was used on our hardwood floors, Minwax in English Chestnut. It actually ended up looking pretty good with the existing color on the bottom board!

I let that dry for several hours before coming back with spray polyurethane to coat the stained crown.

After 2 coats of polyurethane, it was ready to bring inside for the finishing touch-wine corks!

This is a culmination of years worth of wine cork collecting. Mostly scavenged from my parents’ house since I can’t drink more than one glass of wine without getting violently tired.
Since wine corks come in different sizes, I tried to use one size of cork on each row. I laid a complete row out before going back and using hot glue to glue them down.

I slowly worked my way through the corks. There was more than once I got nervous I’d run out before finishing.

All-in-all, I used 217 wine corks to line the bottom of my tray.

The tray fits perfectly in front of the fireplace. And it works well since it’s right by the front door.

And since it’s portable, we can always move it to the left of the door should we want to light a fire once a year.

Just a small little upgrade for my living room. Too bad it wasn’t on my living room to-do list so I could cross it off now!
Anyone else been itching for a boot/shoe tray? Think you have 200+ wine corks laying around? Comment below! I love to hear from you.
Thanks for Checking In! ~ Chelsea


2 Comments
Francine Dittrich
Chelsea, I did not understand the vise grip on the saw tip. If you use this trick again, can you explain it in more depth and provide additional pics?
Thanks.
p.s. I have a faux fireplace in my home and would love a hearth to go under it. Then maybe I’d have a place for my shoe tray. Any thoughts?
Chelsea Lipford Wolf
Hi Francine, I had a link to a video that should help explain it better in the post. Here it is for easy reference: http://www.todayshomeowner.com/video/fast-and-easy-circular-saw-ripping-tip/
Adding a hearth to your faux fireplace sounds neat! But you can also put a shoe tray next to your front door or just on the floor in front of the fireplace. Although, since I don’t know what your fireplace looks like, not sure how it would look. Hope this helps! ~Chelsea