Checking In With Chelsea

DIY ideas, crafts, and tips for your home

subscribe and never miss a thing!

Receive Free Email Updates

  • About
  • Videos
  • Projects
    • Indoor Projects
    • Outdoor Projects
    • Craft Projects
  • House Tour
You are here: Home / Indoor Projects / Master Bathroom with Hotel Style

Master Bathroom with Hotel Style

August 6, 2018 By Chelsea Lipford Wolf 5 Comments

How To Add Style to a Bathroom
With Paint And Ingenuity
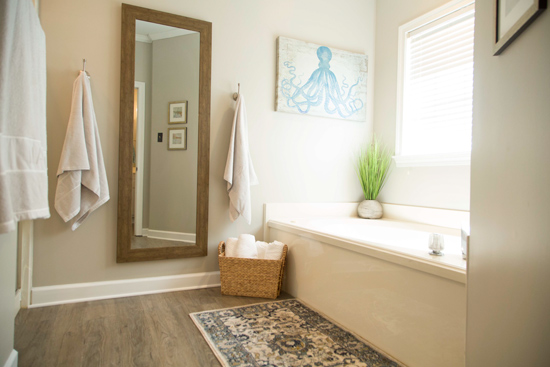
Bathtub and Shower Area of Master Bathroom with Gray Vinyl Plank Floors

You don’t need an entire remodel or a construction company to make your master bathroom feel fresh, new, or like you walked into a high-end hotel. We recently featured this bathroom facelift on an episode of Today’s Homeowner. The homeowners, Ryan and Chloe, lived with a concrete subfloor for over a year after their son flooded and ruined the carpet. They just didn’t know where to start!
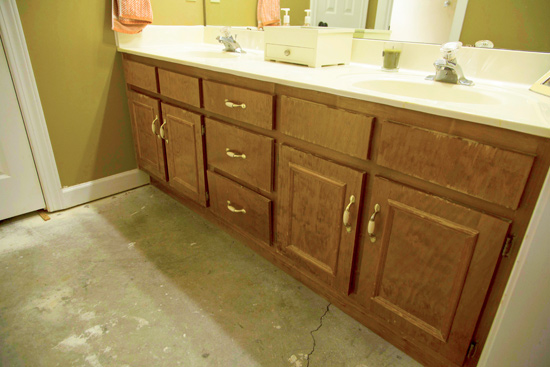
Stained Wood Bathroom Vanity with Concrete Floors

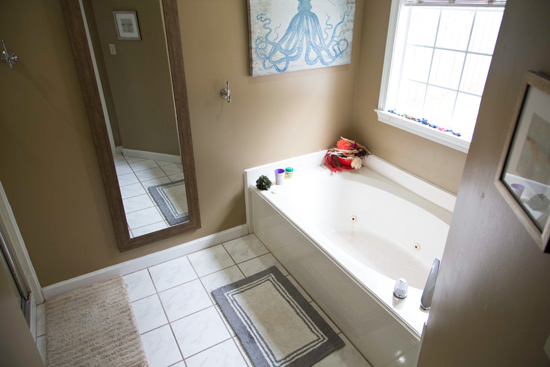
90s Garden Tub in Master Bathroom Before Update

Replace Flooring

While we could have put down tile on the concrete to match the existing nearby tile, they were really looking for something new and different. So we started by removing the old tile with what we call a chipping hammer. It easily removed the white tiles in fairly whole pieces, so the process didn’t take very long.

In its place, after some subfloor prep, we put down vinyl plank flooring in a brownish-gray stain. I’m really starting to love vinyl tile floors. Easy to install, easy to clean!

Vanity Area with Gray Vinyl Plank Floor and Sisal Rug

Update Vanity

The original wood-stained vanity had been there since the house was built in the early 90s and had some obvious wear on it. Plus the male homeowner is tall and was really hoping to make it taller. So what we did was remove the vanity top, add 2×4 bracing along the back on top of the existing vanity and then we ran a smooth piece of 1×4 flush with the front. To cover the transition from existing vanity to new add-on, we used a thin piece of trim, like screen mold. (Watch this how-to video for the step-by-step.)

Then I went to work with my paint sprayer* to cover up the old wood stain, make it look current and fresh with white paint (Behr Irish Mist), and conceal the new wood.

Chelsea Painting Bathroom Vanity with HomeRight Sprayer

Stylish, Hotel Vanity in Master Bathroom

Ahh so refreshing!

Change Hardware

As you may have noticed in the above picture, we also changed out the hardware on the vanity after painting. I know I’d said it before, but changing cabinet hardware in your bathroom or kitchen can be so inexpensive, but pack a big punch in the overall look of your room. Especially true when the predecessors were scratched up polished brass with ceramic accents!

Here the homeowners went with a subtle aged bronze drawer pull that ties in nicely with the warm floors. We also added hardware to the false drawer fronts at the top where there were none before.
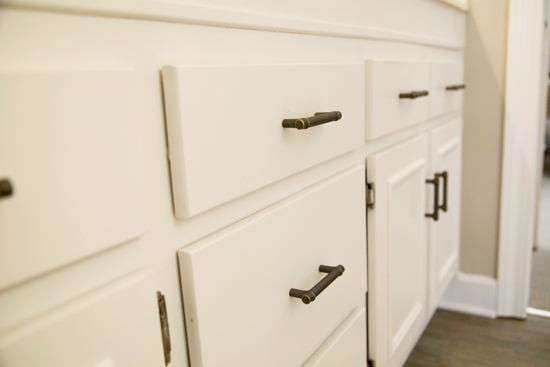
New Drawers Pulls for Bathroom Vanity

Timeless Faucets

After adjusting the height and look of the vanity, we replaced the original faucets with new, timeless brushed nickel faucets. This is total opinion not founded in any research, but I feel like brushed nickel is classic and always will be. Sure I’m obsessed with the current brushed brass/gold look, but brushed nickel plumbing fixtures will always be in style!

Normally I’m a supporter of ‘If it ain’t broke, don’t replace it.’ But in this case, if you know what decade your fixtures came from just by looking at them (and you don’t want that look) it’s a quick process to change them out and update the look, feel, and maybe even function of your bathroom sinks. And that’s a huge win when it comes to quality of life in my book!
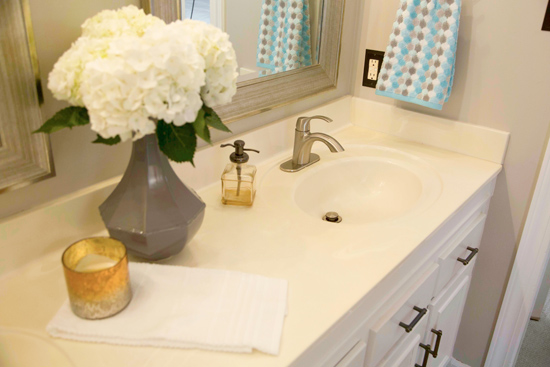
Bathroom Vanity Countertop After Polish and New Faucets

Wall Color

If you’ve ever been to a swanky hotel, they always have great neutral colors on the walls. Usually in the tan or gray family. They’re calming and relaxing, just what you want in a room you spend a good deal of time in! So while we were working to update so many other elements in this bathroom, the homeowners decided to change the walls from a blah orange-brown to a light, greige called Revere Pewter.

Bathtub and Shower Area of Master Bathroom with Gray Vinyl Plank Floors

And that concludes another episode of “do one, do them all” room updates. Ha! Really though I feel like I say it a lot, but projects like this bathroom update can be done over a year-taking on one aspect of the makeover at a time as your time and budget allow. Basically any change is better than no change! And I hope this inspires you to make a change in your home today!

(For all of the details on how we completed this project, watch the full Today’s Homeowner episode here!)

Thanks for Checking In! ~Chelsea

*This post may contain affiliate links*

Subscribe for Free Updates!

Stay up-to-date on Chelsea's latest projects, tips, useful resources and more.

Previous Post
“Treeing-Up” Bushes
Next Post
Does Homax Porcelain Chip Fix Work?

Related Content

Completed Girls Bedroom Makeover Pink PanelingPink Girls’ Shared Bedroom EvolutionCompleted Updates in Modern Master BathroomHow to Make a Pink Tub Look Cool1950s Ranch Kitchen Before Renovation1950s Kitchen Renovation IdeasMinty Green Bathroom Vanity with White CountertopUpdating Our 1950s Bathroom with Style

Comments

  1. Pam says

    August 6, 2018 at 11:04 pm

    Can you provide more detail or show photos of how you jacked up the cabinets? Maybe one from the inside after they were done. Did you just put all the extra height at the bottom? Did you take them completely out and then reinstall them? I might try this in two bathrooms of my own. Thank you.

    Reply
    • Chelsea Lipford Wolf says

      August 7, 2018 at 8:43 am

      Hi Pam, I meant to include a link to a how-to video in my post. Here it is for you! https://www.todayshomeowner.com/video/do-it-raise-a-vanity-countertop/ Thanks! ~Chelsea

      Reply
  2. Tony says

    August 7, 2018 at 4:43 pm

    Do you have any tips on swapping out a bath tub.

    Reply
  3. Dori says

    March 24, 2022 at 10:11 am

    Nice update! Can you tell me what the countertop is? I like the integrated sinks

    Reply
    • Chelsea Lipford Wolf says

      April 1, 2022 at 11:04 am

      I believe it is cultured marble, but we did not install it. It was already there. Hope that helps, Chelsea

      Reply

Please Leave a Comment Cancel reply

Your email address will not be published. Required fields are marked *

Welcome!

I’m Chelsea. DIY
enthusiast who loves
sharing my victories
and mishaps!
Learn more
here.

CHECK IN WITH CHELSEA ON INSTAGRAM

Lookie! It’s a shelf for your bookies! 🤣Build Lookie! It’s a shelf for your bookies! 🤣Building a shelf unit custom for ANY space in your home is so simple and can be done over and over again to add much needed storage aka sanity! The kids were running all over the house at bedtime trying to find a book to read because we had them stashed in baskets and shelves in several different rooms. So I took advantage of this space in the hall next to a closet to create a central location for their books and some of mine too! Plus it adds a little character to an otherwise blah space!🙌🏻
.
.
A full how to video is on checkinginwithchelsea.com! Book nerds can be DIY nerds too!🤓
.
.
#booknerdsunite #diyskills #beginnerdiy #bookshelfie #halldecor #storagesolutions #storageideas #bookstorage #bookstorageideas
5 months in and she’s at the top of my favorites 5 months in and she’s at the top of my favorites list!🥰
.
.
Couldn’t resist using this audio.😅
Using my grandmother’s cookie press to make 🎄 Using my grandmother’s cookie press to make 🎄cookies I used to make as a kid in our brand new kitchen. My heart could burst!😭 I hope you are enjoying the preparation for the main event 😇and bring love and joy to your home, no matter what it looks like.❤️💚
.
.
#christmascookies #christmastrees #familytraditions #christmasbreak #newkitchen #kitchendecor #kitchendesign #madewithlove
3D art install in my girls’ girly bedroom!🦋😍Love this $13 pack of butterflies that comes with everything you need to fill a large wall! And it only takes 30 minutes!🙌🏻 Putting the link to the butterflies in my bio! (https://amzn.to/3VmfZsB)
.
.
First step is to layout the flow of your fluttering butterflies with the large and medium sizes from the pack, leaving room for the small ones. Then fill in spaces with the small size and pat yourself on the back! So easy!
The whole Wolfpack has been staying at my parents’ house on the river for the past week while our hardwood floors are being refinished. Since the kids had the whole week off of school it has really felt like a vacation! Complete with a sunny Sunday boat ride after Mass!🥰🚤☀️Enjoy the rest of your weekend! 😘
.
.
#generationalliving #3generations❤️ #4kidlife #grandparentlife #boatday #riverside #riverlifestyle #fowlriver #alabamalifestyle #alabamablogger #nofilterneeded
Dad and I got our tickets to the gun show!💥 . . Dad and I got our tickets to the gun show!💥
.
.
@todayshomeowner @visitmobileal #exploreyourhometown #hometownpride #mobilealabama #battleship #ussalabama #visitmobile
Load More... Follow on Instagram

Indoor Projects Outdoor Projects Craft Projects
Facebook Pagelike Widget
  • Contact
  • FAQs
  • Advertise with Chelsea
  • Media
  • Today’s Homeowner

Search This Site

Receive Free Updates Via Email

Copyright © 2023 Checking in With Chelsea • All Rights Reserved