When Everything Has A Place
How to Add Storage & Organize the Garage
 When it comes to organizing ANY space in your house, it’s essential for everything you need stored to have a designated spot. The garage Dad and I recently helped overhaul on Today’s Homeowner was a great example!
Remove All The Things
The first step to getting a more organized garage is to take everything out of the space, in this case the garage. The emptiness might inspire to throw out a little more than you might otherwise have!

Put things into piles-trash, donate, camping, yard, tools, etc. This way you can see and know exactly what’s left to be accommodated in your new and organized space.
The homeowners we worked with for this project, Katie and Stephen, were pretty relentless in their disposal of unwanted items. A big plus to creating an organized space-keeping just the things you will actually use!
Build It Up
Once we had an inventory of what was going back in the garage, we were able to develop a locker-style system that could serve as a staging area for each family member’s individual hobby accessories.

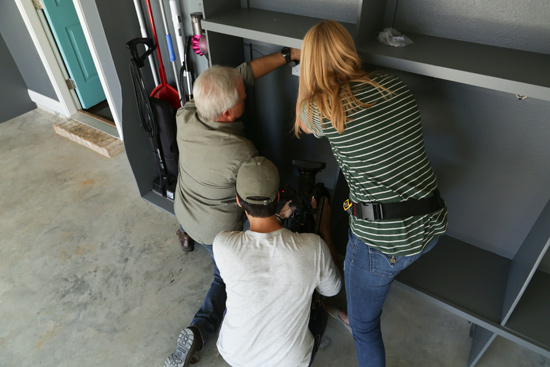
(A quick glance into what it’s like to install things in a tight space…with a camera following you.?)

If you have to build something to store your stuff, it might as well be something nice to look at too, right?! You can watch the video on How To Build Locker-Style Storage by clicking here. You can see we also ran a shelf board along the top of the lockers to add some more long-term storage. Think seasonal clothes, seasonal decor, party gear, etc.
Drop It Down
To complement the lockers on the right, we build something similar on the left of the entry door for Katie and Stephen to use as a drop zone for shoes, coats and backpacks. It was the perfect-sized space for something like this. And now that Katie is able to start parking her car in the garage, they’ll actually be using this entry door a lot more!
We painted the drop zone, the lockers, and the wall in between the same color so it all looks like one cohesive unit!
Near the drop zone, we repurposed a baker’s rack they previously had in their garage to store smaller items that are used frequently when summer rolls around-beach gear, pool toys, gardening supplies, etc.

Since these items didn’t previously have an assigned home, they often ended up in piles along the small path carved out on the garage floor. Not only did it make the space look junky, it was easy for them to get lost!
Use the Walls
An obvious spot to store stuff is on the walls along either side of the garage. It keeps your stuff visible, but doesn’t prevent you from accessing the middle of the garage or parking your car there. Always think vertical!
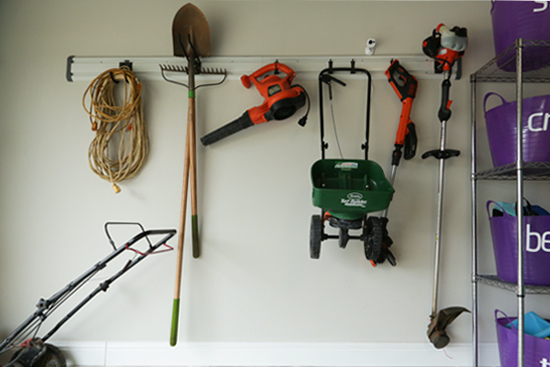
We used a simple track system to hang the few yard tools Katie and Stephen needed. Depending on the length of what you’re storing, you could even install one track high and another below it. Get more bang for your vertical buck!

On the opposite wall, we used off-the-shelf hooks from the home improvement store to hang a stroller and beach chairs. Way up high we hung their wreaths for various seasons. Just make sure you install the hooks in a stud for maximum strength and support.

Corner Storage
Continuing the tour around the garage…in the small area on the left of the garage door, we were just able to fit Stephen’s truck rack he uses often during hunting season. It’s a beast to haul, so it needed to stay near the door. It slipped right in and we were even able to hang his tree climber on the wall above it too.
On the right side of the garage door, there was enough space to build a custom shelf to optimize every last ounce of space in this garage!

We built it on the ground before slipping it into its spot, attaching it to the wall, and painting it to match the lockers and drop zone. It just happened to work out that the lawn mower slipped right under the bottom shelf. Score! Though I wish I could say we planned it that way…?
Clutter and Fancy-Free
One thing I noticed is that there were a few things we found as we were cleaning out that were intended for various projects inside their house. They got dumped in the garage, and then ‘out of sight, out of mind’ they were never tackled. Been there. Done that.
But now a clutter-free space will help stop that from happening next time.

It’s not fancy. It’s not hard. Yes, it will take some time. Yes, it will get worse before it gets better. Like all of your personal possessions in your front yard. BUT having a space that’s organized helps you keep it that way because everything has a place! You know where to find things. You know where to put things. Things don’t get lost and then duplicates purchased because you couldn’t find the first one.
I’m not a professional organizer, but I know I personally thrive on tidy and organized spaces and know some of you probably do too! And maybe you don’t even realize your cluttered spaces are bringing you down! Either way I hope this breaks down a massive project into bite-sized pieces you can concur in your own home, especially at the beginning of a new year!
Looking for other garage ideas? Check out this post on creating zones in a garage for a young family.
What’s your favorite organizational or storage hack? I’d love to know and I’m sure others would too! Please share in the comments below.
Thanks for Checking In! ~Chelsea


One Comment
L Franco
Thanks for all the good info. That was going to be my project for this weekend. Never thought to use space on right side of garage door for storage.
Thanks again.