DIY Wood Vanity Stain and Installation

How I saved money on our master bathroom by purchasing, staining, and finishing an unfinished cabinet base from a discount retailer.
Drill for Hardware
This particular vanity has indentations on the bottom of the drawers to pull them out, so hardware is not necessary. But like a good pair of earrings, hardware can really polish off a vanity or piece of furniture.
So I purchased these brushed brass pulls* to install on the drawers and the false-fronts above each bank of drawers too. To drill the holes, I first found the center of the drawer and then measured 2.5 inches from center since my pulls were 5 inches. (I did the same to find the vertical center.)
If you’re using standard cabinet pulls or knobs, you’ll want to use a 3/16 inch drill bit centered on your marks. It’s also a good idea to dry fit your hardware or at least measure from the center of each hole to the other hole on the same drawer to make sure you made the mark because the next step is sanding! And you can sand off any pencil marks and drilling giblets all at once!
Stain Preparation
As with any paint or stain project, the preparation is key to a great finished project! Staining a piece of furniture, like my vanity, starting with a good sanding will help with even stain coverage and keep the wood smooth.
I’ve found that 220-grit is adequate for this step. But I would recommend a power sander to make it go faster and help keep it even. Whether you’re sanding by hand or with a sander, always go in the same direction as the wood grain!
To apply the wood stain, you can use a rag/cloth or a brush. I enjoy using a rag because either way you apply it, you’ll need to wipe off the excess stain with a rag after a few minutes.
(I used this stain in Driftwood and Provincial.*)
Seal and Protect
After the wood stain has had time to dry (I never wait as long as the label says…because who has time for that!), it’s time to seal it! As I mentioned in the video above, I’m using a spar urethane* since this vanity is going in a ‘wet location’ with lots of moisture and humidity.
Since the urethane is not cleaned up with soap and water, I like to use cheap ‘chip brushes’ so I can toss them and don’t have to clean them with mineral spirits. If you have a Harbor Freight in your area, they are super cheap there!
You’ll want to apply at least 2 coats, but 3 would be better. The urethane makes the grain of the wood rise so you’ll want to sand with 400-grit paper in between coats to smooth it back out. For this type of sanding, I like to do it by hand so I don’t sand too much.
Prep for Installation
My particular cabinet had a solid back whereas some cabinets have a hole for plumbing or not back at all. So in order to accommodate the plumbing for our sink, I add to drill holes for the pipes. I measured the location for all 3 pipes from the same wall and their height. Then transferred those measurements onto the back of my cabinet. Using hole saws in 2 different sizes (1-1/2″ and 2-1/4″), I drilled the holes in the right spots. I did this before bringing the cabinet inside since our bathroom is so tiny!
Install on the Wall
To attach your vanity to the wall, you’ll want to first locate and mark the studs. Slide the cabinet into place, making sure your plumbing pipes slide into the proper hole. Then using a 2 foot level, check that the vanity is level left to right as well as front to back. If it’s just a little off front to back, you can hold it level while driving the screws in. But if it’s off by much you’ll want to get some wood shims* or create some from scraps. You can find shims in the door aisle at the home center.
I used 3″ drywall screws through the back of the vanity along the top into 2 studs along the wall and 1 in each corner. It’s not going anywhere! 🙂
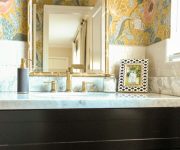
Finishing Touches
Since this vanity was being installed in a new room, I installed it after the cement backboard but before the floor tiles were laid. That way any gaps at the bottom from making it level would be covered up by the tile and grout. After the cabinet was installed the countertop guys came out to measure the space so they could fabricate the countertop to fit perfectly. 2 days later they were able to install the countertop!
And once the plumber installed the faucet, I re-installed the drawers and this vanity was d-o-n-e!
Countertop Options
Since we didn’t need a lot of countertop for our bathroom, we were able to ‘splurge’ on quartz countertops. I went to the ‘boneyard’ at the countertop shop who does most of the work for my dad’s construction company and selected a piece of quartz scraps leftover from another client’s project. The scraps are discounted so this was another small way we saved money by DIY-ing (kind of) this vanity. It was around $350 for the countertop and 2 pieces of the same material for our shower. So not the cheapest but still cheaper than buying a pre-finished vanity from the home store that comes with a countertop. Bonus is that they also installed the sink!
I’m a little behind on sharing projects with you all, but I’ll eventually share more pictures from our finished bathroom! It’s been so nice having this space right off our bedroom. But the nicest part is having 2(!!) bathrooms in our house!
Thanks for Checking In! ~Chelsea
*This post contains affiliate links*


Chelsea you are my hero, you make everything look so easy and give great instructions. Congrats ? on your new baby, God Bless your family.
Wow! Thanks, Gladys! I really strive to make instructions clear and not leave any questions unanswered! Easier for some projects than others. ~Chelsea