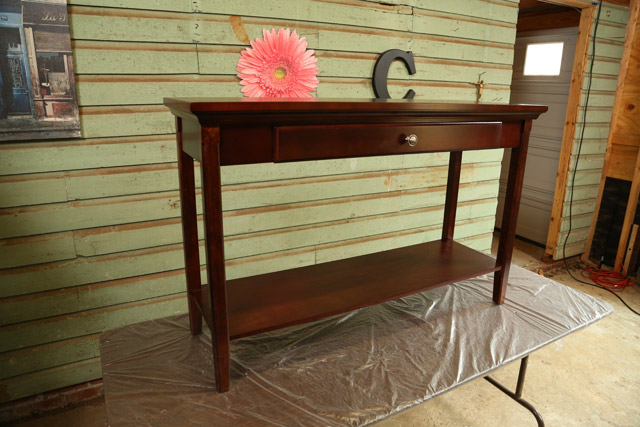
The project in this month’s webisode is something I’ve wanted for a long time! I always thought my bedroom was too small for a bench at the foot of the bed. But after my husband moved in and we put his particle board bookshelf at the end of the bed, I knew a few more inches in the form of a bench was possible. So I set out to buy a sofa table that could be converted to a just-the-right-height bench. I hit up a local discount closeout store called Dirt Cheap and found the perfect candidate. The only trick was getting it to my car without any help. But being a DIY-er/Figure-It-Out-Yourselfer, this is what I came up with:

No doubt I could have gotten it in the back of my SUV all by myself, but fortunately I didn’t have to since a nice stranger walked by at the right time and offered to help! Back in the shop, I recruited my loving husband, Brandon, to help transform this baby into my dream bed bench!

Here are the materials we used:
- 3 inch foam
- 1/2 inch plywood (cut to size at the home center)
- circular saw
- speed square*
- safety glasses
- marker
- pencil
- tape measure
- drill/driver
- wood screws
- glue
- 120- & 400-grit sandpaper
- milk paint (We used General Finishes in Coastal Blue found at Woodcraft*)
- paint brush or foam brush
- felt furniture pads*
- bread knife
- staple gun*
- fabric
- scissors
Before we could start painting, we measured and cut all 4 legs to our desired height. We cut the legs to 20 inches each which would bring us to right about the desired finish height of 22 inches after adding the plywood and foam on top.
Then we sanded our cut edges and the entire surface of the table with the coarser (120-grit) sandpaper. You don’t need to sand it down to bare wood, just a little to knock off the sheen of the varnish will be sufficient if you’re using milk paint.
Finally it was ready for my favorite part, paint! It’s always my favorite part of any project because it usually means I’ve turned the corner and am almost done! But this time was extra fun because I was using milk paint! If you haven’t used it or heard of it before, it’s ideal for painting furniture with its durability and low luster sheen. Unless, of course, you like it shiny! Then I’d suggest adding a clear top coat with high gloss!
It goes on much like the DIY chalk paint I’ve made before-fairly thick, but may still require 2 coats. If you want a more translucent finish, 1 coat will be just fine. We went with 2 coats for a solid, opaque blue finish.
While it was drying, we moved on to preparing the cushion to go on top! Since I had the 1/2 inch plywood cut to the size of the top of the table when I bought it, we were able to move on to cutting the foam to size. The foam I bought from the craft store was cut to length, so it’d be good to know the size of your surface before you pick it up so you’re not paying for extra inches you don’t need.
We placed the plywood on top of the foam and used a marker to mark it. Then we put the plywood underneath the foam, making sure it was under the cutting line to protect our table. Next we were able to cut it pretty smoothly with the bread knife. Pick off any loose foam bits before moving on to the next step.
I didn’t want the foam shifting around while we were pulling the fabric tight to staple it. So we applied some household glue to the foam before setting the plywood on top. This will temporarily hold it in place. After the glue was dry, we put the fabric face down on our work surface and centered the foam on top with the plywood side up. With stapler in hand we slowly worked our way around the cushion, pulling and stapling it in place. Our fabric had a nice, straight pattern that we were able to line up with the edge of the plywood as we went down stapling to ensure it would have a nice finish when we flipped it over. I like to do the 2 long stretches of fabric before doing the 2 small sides.
Once all 4 sides and all 4 corners were stapled in place, we left the cushion where it was and set the dried table-turned-bench upside down on top of the plywood. So we were able to attach them together through the bottom of the bench with 1 1/2 inch screws. You can use drywall or wood screws for this part. But make sure the screws are the right length for your project! You don’t want any screws poking you in the booty when it’s all said and done!
And now my real favorite part of the project (I guess painting is really my second favorite part), flipping it over to reveal the finished product!

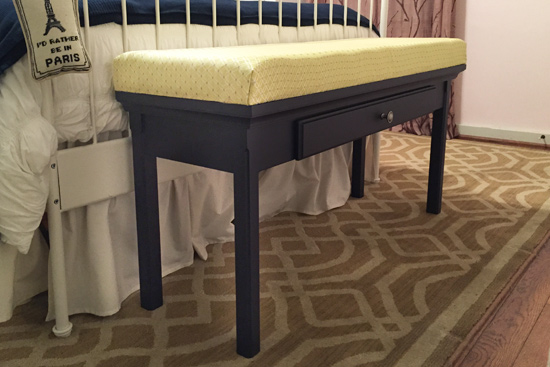
We carried it to its new home at the foot of our bed and tested it out. It’s the perfect height for putting on shoes and we love the small drawer that Brandon is able to put his car keys, wallet, rosary, etc in at night when he empties his very-full pants pockets.
Hope you enjoyed this month’s project and are able to use it in your house! Just don’t forget to have a little fun along the way!

Thanks for Checking In! ~ Chelsea
*This post contains affiliate links*


Love your idea for turning a table into a bench. Esp. the drawer for added organizing. This will be my next project after the crown molding. Never thought I would attempt these projects but here goes. My Dad was the woodworker and I thought this talent had skipped a generation but I might be wrong. Wish me luck!
Way to go Lynn! You got this!?? ~Chelsea
Silly question but ,Where do you purchase foam?
Hi Sean! You can get it at most any craft store. I got this at Jo-Ann. If it’s not on sale, be sure to use a coupon you can easily pull up on their website on your phone while you’re there! Same goes for Hobby Lobby too! ~Chelsea