Checking In With Chelsea

DIY ideas, crafts, and tips for your home

subscribe and never miss a thing!

Receive Free Email Updates

  • About
  • Videos
  • Projects
    • Indoor Projects
    • Outdoor Projects
    • Craft Projects
  • House Tour

How to Build a Wooden Step Stool

Indoor Projects •  March 7, 2015

Video Playback Not Supported

It’s March! And still chilly in many parts of the country, unfortunately. I’m ready for spring already!

But this month’s project is something that can be tackled inside, rain or shine! It’s an adorable and perfect way to give your little helpers a boost in the kitchen, bathroom or playroom!

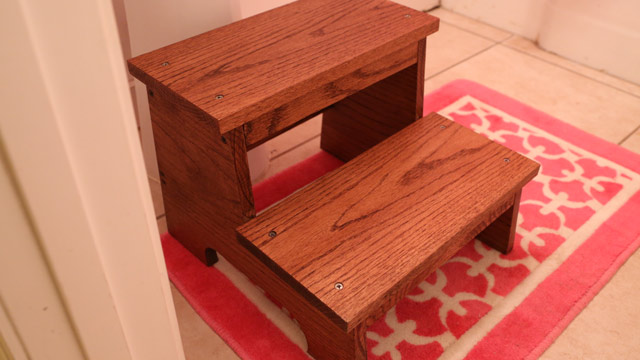
Stained oak step stool on workbench in shop.

I built it for a certain little girl named Kennedy with the help of her mom, Kyndall. It came together easily enough and the results are great!

Here’s what you’ll need to make your own:

  • 1×12 at 32 inches
  • 1×8 at 30 inches
  • 1×2 at 50 inches
  • pencil
  • speed square
  • tape measure
  • straight edge/level
  • wood glue
  • countersink pilot bit*
  • 2-inch wood screws
  • disposable gloves
  • wood stain*
  • clean rag
  • polyurethane*
  • paintbrush
  • safety glasses
  • drill
  • jigsaw
  • circular saw
  • sander
  • 220-grit sandpaper

For the lumber, we used oak that’s sold by the foot. So they’ll cut it to size for you at the store. We also used Minwax Red Oak wood stain should you want to replicate the same look.

Before we cut anything, we sanded our 3 wood pieces and stained them using disposable gloves to protect our hands and the rag. Dip the rag in the stain and rub it in the direction of the wood grain. Then go back over it with a dry part of the rag to wipe up the excess. Use long strokes to help get the most even stain application.

We stained before we cut and assembled the stool since it’s easier than trying to stain in tight corners once it is assembled. It also gave it more time to dry so we could apply the polyurethane soon after it was put together. Of course, doing it this way you will still have a few spots to touch up later on. So keep the stain can handy!

Once the stain was dry to the touch, only a few minutes, we used our circular saw to cut our lumber to length. Here’s what you’ll need:

  • (2) 1x12x16
  • (2) 1x8x15
  • (4) 1x2x12½

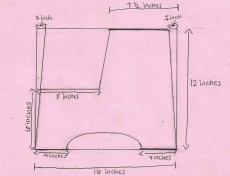
Then you’ll take one of the 1x12s and trace out this lovely design (watch the video for close up of how we traced the circular cut-out on the bottom using the stain can):

drawing with dimensions of where to cut step stool

Use your circular saw and jigsaw to cut it out. Then set on top of the other 1×12 and trace the cuts you just made. And cut again!

With your 1x12s cut to shape and your other material cut to length, sand the cuts and apply stain to the raw edges. Now you’re ready for assembly!

We marked where the screws for the braces would go so they’d all look the same. Hold each brace in place while you use the countersink pilot bit to drill at each mark. After applying wood glue on the end of each brace, you can drive in your total of 16 wood screws.

Now set your 1x8x15 treads on top of each step and follow the same steps to pre-drill, glue, and screw the 2 treads using one screw in each corner.

The stain should be dry enough at this point to lightly sand every surface using 220-grit sandpaper since the stain raises the grain of the wood. Then we’re ready to seal it off with polyurethane. I found this new stuff that applies a triple-thick layer with just one coat, reducing the amount of drying time and number of applications. It’s available in the paint department of your favorite home center from Varathane.

We applied it on the underside first before flipping it over to paint it on the sides and treads. And once it dried, little Kennedy was more than willing to test it out while brushing her teeth!

And that’s a wrap! This project is very easy and would be a fun thing to build with your child to make memories along the way!

Thanks for Checking In! ~ Chelsea

*This post contains affiliate links*
Subscribe for Free Updates!

Stay up-to-date on Chelsea's latest projects, tips, useful resources and more.

Previous Post
DIY Magnet Board and Chalkboard
Next Post
Upcycling A Table Into A Bench

Related Content

DIY Concrete Christmas Tree Stand VideoDIY Concrete Christmas Tree StandDIY Clothes Rack for Dress UpHow to Build Simple Rack for Dress Up ClothesFrosted Windows in Blue Tiled BathroomHow To Install Beautiful Privacy Window FilmHow-To Video Creating Easy DIY Gravel Walkway or DrivewayEasy DIY Walkway with Gravel

Comments

  1. Terri Clifton says

    April 1, 2015 at 1:20 pm

    My husband made a step stool for our grandchildren to use when we remodeled our bathroom. I insisted that he pad the back face pieces to prevent marking up the new vanity & it worked very well. I highly suggest it.

    Reply
    • Chelsea Lipford Wolf says

      April 1, 2015 at 3:12 pm

      Great idea. Thanks for the suggestion, Terri! ~ Chelsea

      Reply
  2. Rick says

    April 1, 2015 at 3:11 pm

    Thanks for a great idea! I think I will build one for my daughter who has one year old triplets (all girls) and another for my other daughter who is about to give birth to a baby girl. They may not be able to use them immediately, but I might as well get them done so they have the when they need them. Thanks again and I really love the show!

    Reply
    • Chelsea Lipford Wolf says

      April 1, 2015 at 3:12 pm

      I’m sure both of your daughters will appreciate and cherish them! And thanks for watching the show! 🙂 ~ Chelsea

      Reply
  3. Shirley says

    April 2, 2015 at 6:18 am

    Would love to see a print button link on your site. I hate having to copy/paste. There are things I would like to do, but have to do that in order to have directions later. (If I missed the link, could you let me know where it is please)

    Thanks

    Shirley

    Reply
    • Chelsea Lipford Wolf says

      April 8, 2015 at 1:09 pm

      Hi Shirley, thanks for the suggestion. We are currently working on re-designing the whole site, so we’ll include that in the newer, better version! ~ Chelsea

      Reply

Please Leave a Comment Cancel reply

Your email address will not be published. Required fields are marked *

Welcome!

I’m Chelsea. DIY
enthusiast who loves
sharing my victories
and mishaps!
Learn more
here.

CHECK IN WITH CHELSEA ON INSTAGRAM

While daddy’s away, the kiddos and mommy will pl While daddy’s away, the kiddos and mommy will play! My husband is a CPA and now works every waking moment until April 15th. So I’m planning lots of fun ‘adventure days’ for us 4. Today was our first adventure exploring Dauphin Island and going to the @disealab! I hope they remember these special times like I will!🥰
.
.
#happyweekendeveryone #livelaughlove #taxseasonwidow #taxseason2021 #dauphinisland #coastalalabama #lovewhereyoulive❤️ #momof3 #adventuredays
Successfully transformed our birthday cake wagon f Successfully transformed our birthday cake wagon float from last year into a tractor for this years’ preschool Mardi Gras parade.🎉SO happy our sweet school found a safe way to keep this cute tradition alive for the kiddos!
.
.
The theme was Storybook Characters, so Mary Helen and Gus chose their favorite character, Tractor Mac by @billysteersauthor. Check them out next time you’re in the market for illustrated books with a good storyline.🥰
.
.
Happy Covid Mardi Gras! #partyanyway 💜💛
I’m crazy excited to be diving into my first who I’m crazy excited to be diving into my first whole room makeover in our new house, the dining room!! And it all starts with these boxes from @armstrongceilings. Some of you guessed flooring in my stories but it’s actually planks that clip together to form a floating ceiling. I’m sharing more of the process in stories!
I’ve never done a decorative ceiling before so I’m so stoked to share it with you.🤩
.
.
Watch my stories today and then let me know what questions you have! I can answer in my video that will be coming out March 1st!
.
.
#doitherself #armstrong #armstrongceilings #decorativeceiling #5thwall #diningroomdecor #diningroominspiration #sponsoredpost #inspiredtodomore #diyyoutuber #youtubevideocomingsoon
I feel like I’ve been keeping a secret!🤫My te I feel like I’ve been keeping a secret!🤫My team and I have been working on an ALL NEW STYLE for my videos and the first one just got posted to my website! (Click that link in my bio to watch it!) It is so fun to watch even if you don’t need to know how to remove wallpaper. (Trust me!🤣)And it is so much more me! A little bit silly but still got you covered with the goods (how-to info that is😉).
.
.
Let me know what you think!! We’re starting on the next video tomorrow and it’s a dream project for me, so can’t wait to show you details in stories on Tuesday!
HAPPY BIRTHDAY🎉to my beautiful little boy who c HAPPY BIRTHDAY🎉to my beautiful little boy who could wear pajamas, eat, and run around in circles all day long if we let him. And today we let him because he’s 4 years old!😱We love you buddy!💙🎈
I’ve been busy making plans for our exterior ren I’ve been busy making plans for our exterior renovation...windows, doors, shutters, PAINT colors...can’t wait to install a front door with 3/4 glass. It’ll make this little spot shine bright all year long.🤩
.
.
Would you want me to share the process in stories of planning and getting things all lined up for our curb appeal makeover? Let me know!👊🏻
.
.
#foyerdesign #welcomehome #workinprogress💪 #tipsandtricks #tipsandtrick #helpalongtheway #makingahouseahome #diyupdate #diyhomemakeover #homemakeovers #renothishouse
Load More... Follow on Instagram
Indoor Projects Outdoor Projects Craft Projects

Popular Posts

Moodboard for Calm and Cozy Family Room Den

Creating a Calm and Cozy Family Room

posted in Indoor Projects

Frosted Windows in Blue Tiled Bathroom

How To Install Beautiful Privacy Window Film

posted in Indoor Projects

Completed Lattice Trellis to Cover HVAC Unit

Hide Your AC Unit with a Trellis

posted in Outdoor Projects

Dining Room View from Living Room Ready to Sell

How to Sell Your House Fast and Cheap

posted in Indoor Projects, Outdoor Projects

1950s Ranch Brick Home on Corner Lot Pristine Condition

Our Ranch Revival Introduction and Before Tour

posted in Indoor Projects, Outdoor Projects

Facebook Pagelike Widget
  • Contact
  • FAQs
  • Advertise with Chelsea
  • Media
  • Today’s Homeowner

Search This Site

Receive Free Updates Via Email

Copyright © 2021 Checking in With Chelsea • All Rights Reserved • Site Design by Archer Creative