How to Add Privacy to Patio with Lattice

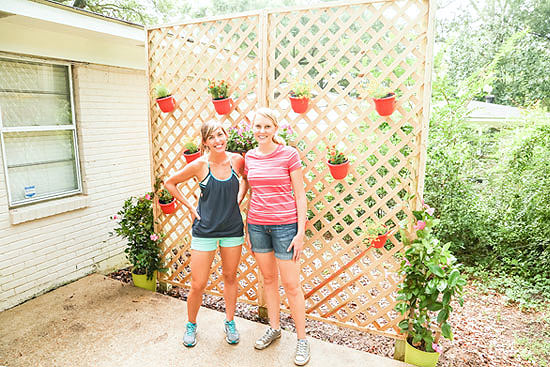
I’ll admit this is the most intensive project I’ve done to date. But I LOVE the result! And it wasn’t too hard with Laura’s help and energy! You may recognize her from the Welcome to Home Ownership episode of our Today’s Homeowner TV show.
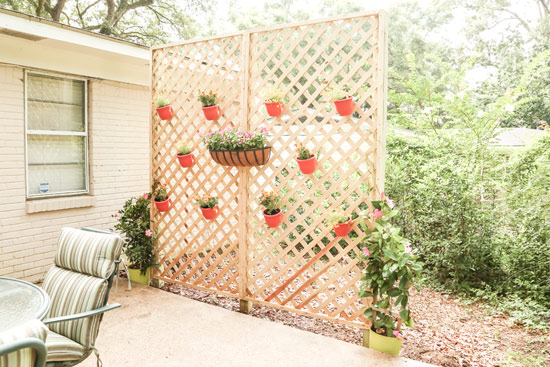
She really did not like her boring and uninspiring patio area. And she wasn’t crazy about how open it was to her neighbor’s yard either. So we came up with a way to “decorate” her outdoor living space AND give her a little more privacy with 2 panels of lattice and some flower pots.
Materials
- (2) 4×8 wood lattice panels*
- (3) 4x4x10 pressure-treated posts*
- (6) 8′ wood lattice caps
- (2) bags fast-setting concrete
- post hole diggers*
- circular saw (similar*)
- 4′ level
- drill
- 3″ and 1″ exterior screws
- potting mix, pots, flowers, etc
- hanging planter*
- scrap lumber for stakes
Assembly
Since the finished product would be 8+ feet above the ground, we built everything on the ground first. That way we wouldn’t be working over our heads, both literally and figuratively. We used 10-foot 4x4s since we’d need about 2 feet in the ground and 8 above. So keep that in mind if you’re building a smaller version for your yard.
We cut 45-degree angles on both ends of 4 lattice cap pieces. And then cut the remaining 2 lattice caps in half before also cutting the 45s on them. Make sure the angles on a single piece go in opposite directions for this type of assembly.
With the three 4x4s laid out, it was time to screw the lattice cap molding in place! We attached 1 piece on the outer edge of the 2 outside 4x4s making sure it was flush with the top. Then we marked the center of the middle 4×4 and butted the other 2 vertical caps to that, also making sure it was flush with the top.
Be sure you’re going through the “meat” of the cap molding so the screw won’t interfere down the road when it’s time to insert the lattice panel. We used deck screws since they come in a tan color that helps them blend in with the natural-colored wood. And it also helped that our drill has AutoSense technology* that screws in the screw to the perfect depth. It doesn’t stop short or sink in too deep and split the wood. (**This video was sponsored by BLACK+DECKER. However, all opinions are honest and 100% my own. I only work with brands I use and love.)
Before we could cut the lattice to size, we also attached 2 of the 4 shorter, horizontal pieces to the top, making sure they matched up well with the vertical caps already in place. Since the panels and the caps both come from the store 8 feet long and we cut the 45 diagonals in the caps (therefore making them shorter), we’ll have to trim a little off 2 sides of the panel. We measured from the inside of one vertical cap to the inside of the other to get the final width before cutting them to size with a circular saw. Of course we did this twice, once for each lattice panel.
We slid, maneuvered, and shook the panels into place and then screwed in the bottom horizontal cap pieces. We added extra screws since they would be bearing most of the weight of the lattice panels.
Install Posts
With the whole thing assembled, we dug 3 holes about 10 inches off of the patio. The centers of each hole were 4 feet apart, matching the distance between each 4×4. Then we shimmied the lattice wall to the very edge of the patio and lifted it up and into the holes. While one of us held it upright, the other attached a few temporary supports to the 4x4s. This ensures it will stay level and plumb while our next step dries.
If you’ve never used fast-setting concrete before, this and fence posts are perfect applications. We used about half of a bag in each hole by pouring it in and then adding water. Add a little water at a time so you don’t add too much. Then use a stick to poke around so the water can get to the concrete mix at the bottom.
Recheck the plumb-ness of the 4x4s after all of your concrete is in and adjust the supports as needed. It’s best to wait at least an hour before removing the supports and adding decoration to the lattice.
Add Plants
We used some plastic 6-8 inch pots from the home center and spaced them randomly. Again we used deck screws (this time shorter ones) for this. It’s much easier to put the screw through the edge of the pot before trying to attach it to the lattice.
Once we had the pots where we liked them, we added some beautiful flowers and our masterpiece was done! Like I said before, I love how it turned out! It takes a standard lattice trellis a step further. Plus you can plant different flowers to change it up or to suit the season!

Speaking of season, fall is upon us! So I’ll be watching a lot of my favorite football teams. Go Irish and War Eagle! Happy Fall Y’all! What’s your favorite part of this season? What other ideas do you have to decorate or spruce up a barren patio area? Feel free to share in the comments below!
Thanks for Checking In! ~Chelsea
*This post contains affiliate links*


This looks great and something that I would be interested in trying. It would help me tremendously if there were step by step pictures! I am a visual type learner, reading instructions is kind of Greek to me! Love your projects
Oops, did not realize there was a video, please disregard previous post!
Awesome job girls! That looks so terrific! I did a similar thing on the west end of my trailer house, the hot West Texas sun was so brutal in the that window. I placed an 8′ high lattice in front of the window, and planted honeysuckle, it took only a couple of years to grow the plant large enough to fill in, and it has dropped the temperature of the room about 15°! Love your ideas girl! Keep up the great work!
Love this! I am wondering if it would survive MN winter, snow and wind etc? Is it year-round or do you remove and store in the fall?
The lattice fence will last a good long time standing just where it is. The flowers will not in MN winters. UNLESS, you decide to try and winter them in your house. I personally think that in spring the plants are very reasonably priced and I’d probably just buy new ones. This way too, you can change the décor each year.
Love the idea! I have been trying to decide on what to do for this same problem . Karen
This is a great idea. I love the lattice. I wonder how I could get the same look but not permanent. I live in an apartment with two dividing fences on either side of the back patio but a wide open back. I would like to have a more private, closed in feel. Could this be made movable?
Hi Marilyn! That’s a good question! Let me think about it and get back to you! ~ Chelsea
I would use screws to attach all wood together. Also, concrete the 4x4s into 5 gallon buckets. Depends on amount of concrete used, you could plants some flowers in the top of buckets. Then, maybe brace your section to the other two sections you have for stability or frame a open bench to help stable your section. Doing this would make it movable.
Wonderful job, looks beautiful.
What are the dimensions of the lattice caps though?