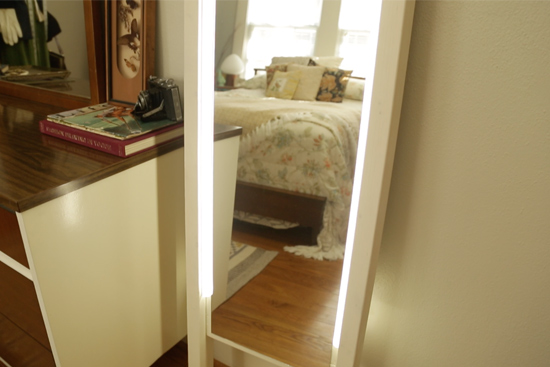
How To Make A Cute Leaning Mirror With Lights
DIY Lighted Mirror How-To Video
If you love how you look in a department store dressing room like I do, this rustic leaning mirror with ample lighting gives you the same look at home!
Materials
Here’s what I used to build it:
- (3) 2’x3′ studs
- miter saw
- medium-grit sandpaper
- Titebond multi-surface glue*
- finish nailer*/2.5″ nails
- paint
- (2) LED channels with diffusers*
- drill/driver* with drill bits (3/32 and 7/16)
- 12″x48″ mirror
- 6′ of LED light strips*
A few notes on the things I purchased for this project before we get started building. The LED lights and accessories were the biggest investment for this project. BUT it’s because they came in larger quantities than I needed. So that means I have extra channels/diffusers and some of the LED strip lights themselves I can use for other projects. The way I rigged my lights required a separate power cord, so I ordered this one* from the same company as the LEDs. Behind the mirror, each strip is plugged into the outlet separately. An alternative way would be to have the light strip run from one side of the mirror to the other across the back of the mirror and have one continuous length that would only require one power cord. But I didn’t want the lights to be illuminating the wall behind the mirror. More on this later…
Cut and Sand
OK, now to build it!
Cut the 2x3s:
- (2) 44-1/4 inches
- (2) 13-3/8 inches
- (2) 6 feet
Give everything a good sanding with 220-grit sandpaper. Then lay it out. The 6 foot pieces are the ‘legs’ and go on the outside. Then create a frame between the legs with the other pieces. The 13-3/8 inch pieces go on top and bottom, horizontally. The remaining pieces go between the horizontal pieces up against the legs. See photo below.

Glue and Assemble
Measure to make sure the legs are centered on the frame. You should have about 12 inches above the frame and 12 inches below the frame on both sides. Then apply glue to every joint. Here I used Titebond’s Quick & Thick multi-purpose glue. It’s a great glue to have around your house for all sorts of projects. It’s especially handy when you’re assembling something on a worktop like this because it’s thick enough that the glue isn’t going to run down any vertical surfaces.
**This video was sponsored by Titebond though all opinions are honest and 100% my own! And it’s still a really cool project!
Next I nailed everything together with a nail gun using 2.5 inch nails. You can hand-drive nails with a hammer if you prefer!
This is the point when you’d want to paint your frame! I used this spray paint*. But brushing on your paint would work too! While it’s drying you can drill holes in the LED channels near the bottom to hide the cords. I first used a small bit (3/32″) and then stepped up to a bit large enough for the cord to fit through (7/16″). (Watch the video above for more details!)
Install Channels and Mirror
Set the channels in the corners of the frame, centering them top to bottom and make a mark. Pick up the channels and apply the same Titebond glue on the side and back where the channel will go. Then set the channel in place. After the glue has had time to set up, use the 7/16″ drill bit again to drill through the wood where the hole was already drilled through the metal channel.

Now it’s time for the mirror! Dry fit it and mark the top and bottom when it’s centered. Then apply the same glue on every surface you can underneath it. Set it back in place! If you want to set some heavy books on the mirror to hold it in tact while the glue dries, that should be fine. But I wouldn’t not recommend clamping it since the mirror is fragile!
Add the Lights
Roll out the LED lights and peel the paper backing to reveal the adhesive. Stick it on the channel. Route the plug through the holes you drilled and attach the adaptor behind the frame. After you cut one LED strip to length (there are notations on the strip itself that indicate where to cut), you’ll need to snap on the included connector for the other side of lights. This is where you’ll want the second adaptor I mentioned purchasing earlier. The included plug will power one side, the second adaptor will power the other side. Snap the diffuser on and you’re ready for a fashion show! 🙂

Thanks for Checking In! ~Chelsea
*This post contains affiliate links*

6 Comments
Irene
that was an awesome project something I would definitely do . Love your show.
Satish Chandra
Hi Chelsea, Good one! Thanks for sharing.
To have a single power cord, can we not use the LED connector strip to avoid LED’s running across the mirror at the back?
SARA
The mirror is beautiful, got my wood today. But could not find the led channel with diffuser where did you get yours
Chelsea Lipford Wolf
Hi Sara, I linked it in the materials list at the top, but here it is again-> http://amzn.to/2FxLokz (It’s an affiliate link, so if you purchase from this link I receive a small commission without adding any cost to you.) Share a picture when you’re done! info@checkinginwithchelsea.com ~Chelsea
Janet Hobbs Skipper
How to install wood bifold doors on closets. How to drill something. What drill bits to use for each project.
I love your ideas that I would have never thought!
Thanks
Chelsea Lipford Wolf
Ooo! Love the idea about drills and drill bits. I just learned how to properly use a drill maybe a year ago!?And it’s much less frustrating when you know which settings to use for different situations! ~Chelsea