Checking In With Chelsea

DIY ideas, crafts, and tips for your home

subscribe and never miss a thing!

Receive Free Email Updates

  • About
  • Videos
  • Projects
    • Indoor Projects
    • Outdoor Projects
    • Craft Projects
  • House Tour
You are here: Home / Videos / DIY Acrylic Coffee Table

DIY Acrylic Coffee Table

January 1, 2018 By Chelsea Lipford Wolf 8 Comments

Video Playback Not Supported

How To Build a Coffee Table with Acrylic and Wood
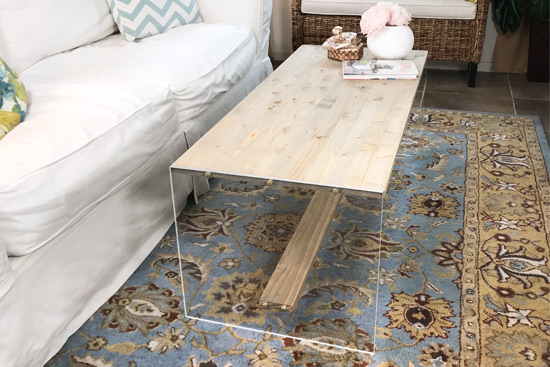
How To DIY Wood and Acrylic Table

Tips on cutting and drilling through acrylic panels to create an airy coffee table topped off with stained wood!

Materials

You really don’t need that much to build a table like this, assuming you have a drill, drill bits and sandpaper already. Heck if you’re like me you probably already have spray paint and wood stain laying around to save even more!

Here’s what I used:

  • stain-grade spruce 20in x 4ft*
  • 1/2″ acrylic-details below
  • wood conditioner*
  • wood stain*(I used Weathered Oak)
  • satin polyurethane*
  • drill/driver
  • drill bits-1/8″ and 1/4″
  • 2-1/2″ wood screws
  • (10) hinged screw caps*
  • spray paint(satin bronze)*
  • 1″x4″x4′ pine (Have it cut to length when you buy it!)

OK, the acrylic was the biggest unknown in this project for me. I needed a decent thickness to support the wood top. So the best price I could find for 1/2″ thick acrylic was online at freckleface.com. (This isn’t an ad but I love the name since I always had freckles growing up!) Now I could have ordered two separate pieces to get the two legs of my coffee table. But it was a little more cost-effective to get a large sheet and then cut it to size on my own.

Cutting Acrylic

To cut acrylic, you can use a wood blade on a table saw or circular saw. BUT you want to make sure it has plenty of carbide-tipped teeth. The only blade I could find in stock in our local hardware stores was for our 12 inch table saw. (I used this one.) Let me tell you-it cut so smooth! There were no rough edges on the acrylic after I was done. Since it was so thick and it’s acrylic, it goes slowly for sure. You certainly don’t want to force it through the saw and potentially cause it to crack or get away from you.

The dimensions of my finished acrylic pieces are 19.25 inches wide by 17-7/8 inches tall. Now, the reason it’s 19.25 inches wide is because that’s the width of the pre-assembled wood top I bought. So you could totally make it less wide or wider even!

Pre-Drilling with Pilot Bits

To drill the holes in the acrylic, I used a regular wood bit. You want a bit that’s slightly larger than the screws you’re using. The screw should be able to slip through the hole without carving into the acrylic. Mark where you want your holes and use the 1/4″ bit through the acrylic only. Then line up the acrylic and wood top and mark through the acrylic holes on to the edge of the wood. Drill holes on those marks with the 1/8 inch drill bit. Here you want the screw to dig into the wood so it has a good grip!

Do the same for the 1×4 support piece. I highly recommend having a support near the bottom if your table is as wide as mine is at 4 feet.

Paint, Assemble and Stain

Spray paint the screw caps if you want to make them gold like mine before sliding the screws through them to attach the acrylic to the wood. Then pinch the screw caps closed!

You can stain and apply the polyurethane top coat before you assemble if you want. You don’t have to worry about getting stain or poly on the acrylic that way! But no matter what order you do it in, let the last coat of poly dry for a full 24 hours before you set anything on top!

Be sure to watch the video above (you may have to click it to play) and comment with any specific questions!

How To DIY Wood and Acrylic Table

Thanks for Checking In! ~Chelsea

*This post contains affiliate links*
Subscribe for Free Updates!

Stay up-to-date on Chelsea's latest projects, tips, useful resources and more.

Previous Post
Changing a Light Fixture into a Plug-In
Next Post
How To Make A Cute Leaning Mirror With Lights

Related Content

Completed Girls Bedroom Makeover Pink PanelingPink Girls’ Shared Bedroom Evolution1950s Ranch Kitchen Before Renovation1950s Kitchen Renovation IdeasCompleted Wire Shelf Pantry UpgradeWire Shelf Pantry MakeoverTips for Selling Your Stuff OnlineHow to Make Big Money Decluttering Your Home

Comments

  1. Satish Chandra says

    January 3, 2018 at 3:21 am

    Simple and beautiful! Wood and glass (Acrylic) bring out a rich feel. I like the idea of using screw caps coated with gold, it puts in a royal touch.
    Chelsea, have you used softwood (spruce) so that it rests lighter on Acrylic?

    Reply
    • Chelsea Lipford Wolf says

      January 4, 2018 at 8:48 am

      Hi Satish! That seems like a good reason to use a softwood but I actually just used it because it was cheap ($20) and already the perfect size for my table! Ha! So it didn’t require any cutting. ~Chelsea

      Reply
      • Satish chandra says

        January 4, 2018 at 9:23 am

        Hi! Savings n less work, that’s smart!

        Reply
  2. Kay says

    January 9, 2018 at 9:31 pm

    I haven’t been able to get this video & the previous one on my I phone 6. It’s been playing other videos ok.

    Reply
    • Chelsea Lipford Wolf says

      January 9, 2018 at 9:35 pm

      Hmm Kay I’m not sure what’s going on! Sometimes you have to click on the player (anywhere) to get it to play. Did you try that? ~Chelsea

      Reply
  3. Paola Arroyave says

    May 10, 2019 at 1:44 pm

    Beautiful and very easy instructions, thank you for sharing.
    I was wondering if I can use acrylic on top instead of wood?
    Thank you

    Reply
  4. Estelle says

    April 20, 2023 at 9:11 pm

    5 years later and someone like me who loves anything clear is looking at this beautiful video.

    Reply
    • Chelsea Lipford Wolf says

      April 24, 2023 at 11:42 am

      Love it! ~Chelsea

      Reply

Please Leave a Comment Cancel reply

Your email address will not be published. Required fields are marked *

Welcome!

I’m Chelsea. DIY
enthusiast who loves
sharing my victories
and mishaps!
Learn more
here.

CHECK IN WITH CHELSEA ON INSTAGRAM

Pure joy! I put her in the crib so I could do some Pure joy! I put her in the crib so I could do something to her window and she was happy as a clam in there!
.
All of her windows have been blacked out for good sleep purposes. It was refreshing to open all the curtains and see my favorite room in the house aglow with daylight for a change!🙌🏻
.
Happy Monday!✨
Life keeps going and babies don’t keep! We enjoy Life keeps going and babies don’t keep! We enjoyed a quick little trip to New Orleans to meet up with family.🥰
.
I hope they remember these little trips like I do from my childhood. I’m definitely a more fun mom on vacation🤣You want candy? Sure! Beignets for breakfast? Let’s do it! Happy memories all around!👏🏻
.
#sundayfunday #sundaybest #nolalove #neworleanslife #ourbackyard #siblingsgoals #babiesdontkeep
BRB, going to close my curtains. It’s true! Clos BRB, going to close my curtains. It’s true! Closing your curtains during the day while you’re away can keep the heat of the sun from warming up your house and costing you money. Less heat coming in means less energy used to run your air conditioner!👏🏻
.
Check out my profile for the rest of the summer hacks I put together with @theduckbrand, including one for a window AC if you’ve got one!
.
#sponsored by @theduckbrand #summerhacks  #savemoneylivebetter #duckbrand #southernsummer #itshotoutthere
Which room in your house is the hottest during the Which room in your house is the hottest during the summer? It's the baby's room for us.😕
.
Luckily we can just pop an air conditioner in the window to supplement our HVAC system on the hottest days and keep her comfortable!
.
And you might as well make it as efficient as possible by installing AC insulating seal from @theduckbrand at the same time. You only need scissors to install!
.
#sponsored by @theduckbrand #summerhacks  #savemoneylivebetter #duckbrand #itshotoutthere
It also keeps the boogie man out!🤣 I'm a big pr It also keeps the boogie man out!🤣 I'm a big proponent of doing little things that add up to make a big difference.
.
Locking your exterior doors when you're home is one small way that doesn't cost you any money but can help keep your home more comfortable this summer.
.
Check out @theduckbrand if you need to replace your weatherstripping and follow for more quick and easy summer hacks!
#sponsored by @theduckbrand #summerhacks  #savemoneylivebetter #duckbrand #southernsummer
My dad always played this song for us on our birth My dad always played this song for us on our birthdays and what a fun tradition to carry on!🥰 Happy Birthday to the most delightful baby I’ve ever known! This has been the best year of my life knowing and loving you!😘 Here’s to many, many more!🎉
.
.
#happybirthday #firstbirthday #firstbirthdaydress #birthdaygirl #fourthkid #bigfamilylove #bestbaby
Load More... Follow on Instagram

Indoor Projects Outdoor Projects Craft Projects
Facebook Pagelike Widget
  • Contact
  • FAQs
  • Advertise with Chelsea
  • Media
  • Today’s Homeowner

Search This Site

Receive Free Updates Via Email

Copyright © 2023 Checking in With Chelsea • All Rights Reserved