So many school districts are already back in session around the country and I simply can’t believe “summer” is over! Of course in Mobile, summer weather will be around for at least another month, maybe two.
I thought making some DIY coral would be a fun and easy project to do with (or without) the kiddos before school got back in full swing. It’s especially fun if you had a tropical vacation this summer!
Personally, I love the look of coral for bookshelf filler or coffee table conversation fodder. It all started when I saw a piece of pink decorative coral in a vacation home a few years ago. I wanted it so bad! I searched and search online, but the only thing I could find that came close was about $100!! No way I could justify that purchase.
Eventually I did find a nice piece of coral from Ross on sale for $7. (Umm in case you didn’t know, Ross is the bomb-dot-com when it comes to low-priced home decor!) But since that doesn’t come around very often, I thought I’d find a DIY way to create some coral for decorative purposes. This post from Ohoh Blog was a big help!

As I mentioned in the video above, I don’t like to craft alone. So my coworker’s daughter, Hannah Grace, joined me to create these fun coral pieces for her room!
Here are the materials you’ll need to make your own:
- cutting pliers
- 18 & 24 gauge wire
- hot glue gun with lots of glue sticks
- glass from a photo frame
- artist brush
- acrylic paint
- wood blocks
- drill with small drill bit
The first step for the smaller, pink coral is to cut the thicker wire at various lengths, between 5-14 inches. We cut about 10, but you can cut more for a fuller coral. Then bend each piece of wire slightly off center. You’ll want to hold the wire with the pliers or something similar because the wire heats up with the hot glue and can burn your fingers! Use the pliers to hold the wire at the bend while you apply hot glue. Cover most of the wire, but not immediately near the pliers.
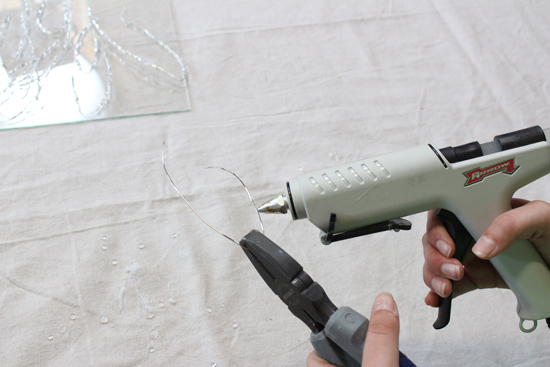
Do this to each wire until they’re all covered in hot glue. You can set them on your glass pane to dry. If some of the wires are looking a little thin after the glue, you can go back and add another layer of glue to make them thicker.
After you like the thickness of each wire and they’re dry, use some acrylic craft paint and a small artist brush to paint the strands. You can set it back on the glass pane to let the paint dry.
While it’s drying, cut several pieces of the thinner wire. Once the paint is dry you can slowly combine your bent pieces together. We combined 2 at first and then added a piece 1 or 2 at a time with a new piece of thin wire. You can continue working with the shape of your coral after you attach it to a wood block.
To attach it to the block, we used the thinner wire that was holding everything together and bent them out like feet. Hold it on the wood block (or whatever your display surface may be) and glue the heck out of it! Make sure you cover all of the wire at the bends that was previously left unglued and unpainted.
Then go back and paint the glue blob and any other spots that need a touch-up. Now it’s ready for display!
But what’s better than one piece of coral? Two pieces of coral!
To create our second, purple coral, we cut 3 long pieces of the thicker, 18-gauge wire and twisted them together at the very bottom. You’ll want to use a few glass panes together or one larger one to lay out your 3 wires. The first time I did it, I had to 2 outside wires come back towards each other at the top. But you’ll want them to fan away from each other so your coral doesn’t end up looking like a leaf! (Again, watch the video above for more details on this! At about the 5 minute mark.)
Again use the hot glue to cover the wires. But this time, apply the glue while it’s laying on the glass. The thicker the better as long as it’s staying on the wire and not falling off. You can always add to it later. Once the main 3 wires are covered, start connecting the wires by running glue between them. This is where the design and look of the coral will come out. Make sure to go outside the wire lines to make it look the most natural. And don’t forget to do several vertical runs of glue as well.
Let the first layer of glue dry then slowly pry the coral off of the glass pane and turn it over. Add more glue strands on the back, either to your existing glue to make it thicker or to create more design. Allow it to dry before painting it with another acrylic paint color. The fun part is coral can be any color of the rainbow!
While your paint is drying, use the drill and bit to drill a small hole in the center of your other wood block. So when the paint is dry you can twist the bottom of the wires really tight together and stick them in the hole as far as they’ll go. I used our cutting pliers to trim any wire that stuck out on the bottom of the block. Then we added a blob of glue to the base around the wire just like the other one before painting the blob and doing any touch-ups.
And at that, your coral is complete!
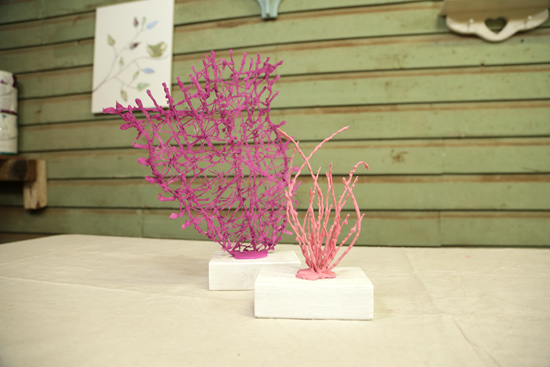
As anyone else found a steal of a deal on decorative coral? Or is coral not your decorating thing? Comment below to let me know!
Thanks for Checking In! ~Chelsea

Please Leave a Comment