Checking In With Chelsea

DIY ideas, crafts, and tips for your home

subscribe and never miss a thing!

Receive Free Email Updates

  • About
  • Videos
  • Projects
    • Indoor Projects
    • Outdoor Projects
    • Craft Projects
  • House Tour

Update: The Bathroom Situation

December 27, 2014 By Chelsea Lipford Wolf 2 Comments

Not too long along I made a few repairs in my bathroom.

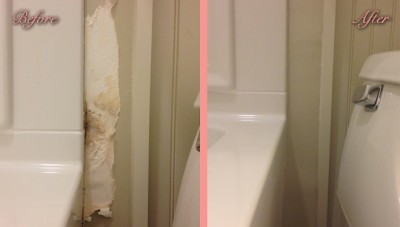
Well one of them didn’t last very long. In fact, it’s even worse than before my “repair”.

crack in grout between tile and bathtub

And to be honest, I kind of figured it would go that way, but thought a $5 bucket of grout to repair it was worth trying.

I guess the grout can’t hold up to the fluctuation in weight that a bathtub goes through. A bathtub full of water and a grown adult certainly weighs more than an empty tub! Perhaps a colored caulk would be a better repair option.

But as I was shopping for supplies for an upcoming webisode of Checking In With Chelsea (look for it January 3rd!), I discovered this baby from Homax*.

homax caulk strip in package in bathroom with tan tile and white bathtub

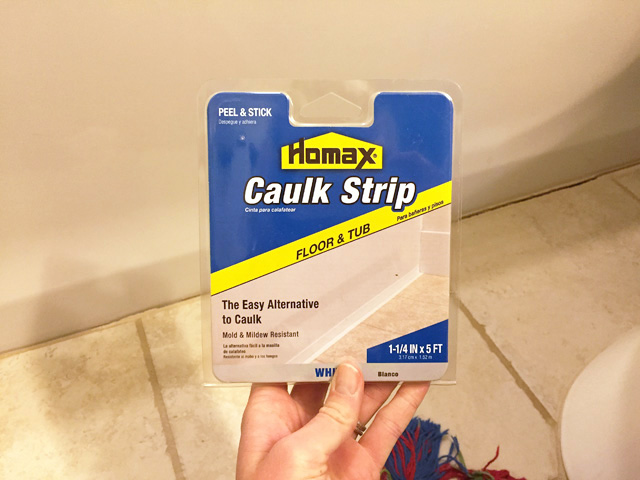
It’s an adhesive strip made exclusively for the joint between flooring and a bathtub. Genius! When applied correctly, it’s waterproof and the adhesive on the back expands and contracts like a quality caulk would.

Basically, you peel the plastic film off and press it onto your tub. Then come back and peel the film off the bottom half and press into the floor. Crack begone!

Homax caulk strip installed at base of white bathtub and tan tile floor

The directions tell you to apply it and let it sit for 12 hours or so before cutting it to length. I ended up cutting about 2 inches off of mine. So it’s plenty long for any tub!

homax caulk strip installed on white bathtub at tan tile

I can’t tell you how nice it is to have a clean line at the base of the tub now. I feel like I’ve had a crack in the grout longer than non-cracked grout! SUCH an easy fix. And cheap too! This cost me around $5-6. Worth it!

Has anyone else used this caulk strip before? How’d it work for you? If you need it for your tub, I found mine in the caulk aisle!

Thanks for Checking In! ~Chelsea

*This post contains affiliate links*

Subscribe for Free Updates!

Stay up-to-date on Chelsea's latest projects, tips, useful resources and more.

Previous Post
Merry Christmasy Projects
Next Post
Transparent Plastic Box

Related Content

Sitting on Back Steps After Finally Sealing BricksStripping Paint from BricksSimple Board and Batten Fireplace UpdateDIY Double Batten Accent WallCompleted Wire Shelf Pantry UpgradeWire Shelf Pantry MakeoverMinty Green Bathroom Vanity with White CountertopUpdating Our 1950s Bathroom with Style

Comments

  1. john says

    January 3, 2015 at 1:09 pm

    Did you have to caulk the top of the strip with a thin coat of caulk to protect water from sitting in between the strip and the tub? I used the strips around the tub and floor to tub and was wondering if it was a good idea to caulk the top seem because the sticky stuff on the back of the strip dont go all the way to the top and will leave water sitting and may cause mildew…. ???

    Reply
    • Chelsea Lipford Wolf says

      January 7, 2015 at 3:30 pm

      I’m not sure about the one going around the tub. Is it the one made for that application? But for the one between tub and floor, I haven’t noticed any sitting water on my strip. I wouldn’t think it would be a problem since this product is made to replace caulks that would mildew.

      Reply

Please Leave a Comment Cancel reply

Your email address will not be published. Required fields are marked *

Welcome!

I’m Chelsea. DIY
enthusiast who loves
sharing my victories
and mishaps!
Learn more
here.

CHECK IN WITH CHELSEA ON INSTAGRAM

Feeling like a million bucks at the Daytime Emmy C Feeling like a million bucks at the Daytime Emmy Creative Arts and Lifestyle Awards with my forever date! 6 more weeks until baby!🤩🏆 
.
.
Hair by me
Makeup by me
Earrings by @elledragoclayco 
Dress @azazieofficial borrowed from @brittany_baugh 
Shoes @lulus borrowed from @emilylipford
B’s suit from @laurenralphlauren

#daytimeemmys @daytimeemmys
Home sweet home!✨It was a nice respite to go on Home sweet home!✨It was a nice respite to go on a work trip to @exploreclt after spending a week on a road trip with 3 small kids.🙉But there’s no place like home!
.
.
Now time to tackle Mt Laundry because thankfully the little people wore clothes while I was away! What’s on your agenda this weekend?
.
.
#homesweethome #sweethomealabama #noplacelikehome #familyroom #familyroomdecor #familyroomdesign #roundcoffeetable #ikeaforthewin #ikeadecor #kidslivehere
An occasion to get dressed up? We are here for it! An occasion to get dressed up? We are here for it!👏🏻 Nothing beats a family wedding on a beautiful spring day!☀️ Happy Memorial Day Weekend!🇺🇸
Happy 3rd birthday🎈to the biggest mama’s girl Happy 3rd birthday🎈to the biggest mama’s girl I’ve ever known! She weighs as much as her big siblings but still likes Mommy to hold her.😜 She’s got plenty of sass and insists on doing everything herself. Which is why she normally has hair in her face and a tornado of chaos all around her. Pretty much our life since she came into it. But the best kind of chaos that grows and stretches you and teaches you to slow down and accept them just the way they are.☺️
.
.
Can’t believe it’s been 3 years!🥺
.
.
#celebratethem #birthdayshoutout #girlbirthday #girlparty #3rdbirthday #springbreak2022 #familyvaca #vacay2022 #vacationmode #visitflorida #staugustinefl
Cheers to the weekend, friends! May it be filled w Cheers to the weekend, friends! May it be filled with plenty of sunshine and bright spots!☀️🥰
.
.
#happyweekend #friyay #feelslikesummer #weekendvibes✨ #mothersdayweekend #beachday #plentyofsunshine #pocketfullofsunshine #girlbedroom #twinbeds #pinkvibes
FINALLY painted this eyesore of a wall and finishe FINALLY painted this eyesore of a wall and finished just before dark last night!🙌🏻 My husband and I decided instead of starting a new project (ahem a baby nursery) we should finish the projects we’ve already started. Since baby is due in the summer, it will be so nice to have our backyard up to par so we can rest and relax out there during recovery. ☺️
.
.
We started this project back in October by stripping and scraping the many layers of paint so we could waterproof the bricks and paint the wall to match the house. But the house was painted exactly a year ago. So it was way past time to knock this huge item of the time-do list. And it feels like such a relief to not have to walk by the unfinished-ness every time we come home now!
.
.
Next up we’ll slowly tackle patching hardwood floors and finish painting and replacing our interior doors that are taking up room in our garage.👏🏻
.
.
What’s something you’ve knocked off your to-do list lately?!
Load More... Follow on Instagram

Indoor Projects Outdoor Projects Craft Projects
Facebook Pagelike Widget
  • Contact
  • FAQs
  • Advertise with Chelsea
  • Media
  • Today’s Homeowner

Search This Site

Receive Free Updates Via Email

Copyright © 2022 Checking in With Chelsea • All Rights Reserved