Upcycle: Potting Bench
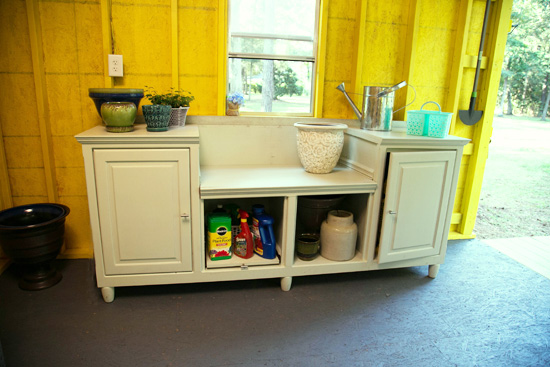
I don’t know if you’ve noticed this about me lately, but apparently I’m on an upcycle and repurpose kick. I really do love giving something new life! Especially when it comes to cheap or free furniture pieces. That’s where this large-and-in-charge potting bench comes into play.

On a recent episode of Today’s Homeowner, we transformed a shed into a gardener’s potting shed paradise for homeowner Delores.

My task was to create a potting bench to go inside. My original idea was to find an old kitchen island or something similar on Craigslist or a local thrift store that could be repurposed. And that’s mainly because that’s exactly what I have in my shed. What can I say? I’m a creature of habit for sure!

But when I stumbled upon this beast at a thrift store for $40, I simply couldn’t resist.

My best guess is it served as an entertainment center in its former life with all of the roll-outs and holes in the back for plugs.

Another phase I’ve been going through is adding furniture feet to everything! Exhibit A. But in order for that to look ‘right’, I needed to remove the baseboard trim. So I started at the bottom using the same Trim Puller I used when I hung shiplap. It really does make it super easy and damage-free!

From there the plan was to cut the middle of the top and lower it down, making it easier to pot larger plants. So that’s where we started. I say we because my dad simply couldn’t stay away from the power tools!

Can you tell how happy I am about it?! He did allow me to make a cut or two. So I used a framing square clamped to the top to guide the circular saw and keep it straight.

Then Dad made a horizontal cut at the height we wanted the middle section to sit at. Most of the cut was made with a circular saw. But he finished the cut with a hand saw and oscillating tool.

After cutting the divider from the bottom of the top piece, we dry fitted it to make sure the height was appropriate.

We reused some of the cleats previously holding the roll-outs as the braces for the modified top.
As with SO MANY projects, a fresh coat of paint makes a world of difference! And this was no different. But before I painted, I installed the wooden furniture feet I picked up at the home center. I think they were about $4 a piece. Since this piece was so long, I needed to put one at each corner and 2 in the middle (one front and one in the back) for a total of 6.

Then it was on with the respirator and paint sprayer!

I only used one of the old roll-outs on the bottom left.

Inside the cabinets on either side were originally shelves that could be moved up and down. I added baskets to help contain smaller stuff in one cabinet, but removed the shelf in the other cabinet to accommodate large bags of potting soil. (We kept the shelf around in case Delores’s storage needs change.)

Besides the piece itself and the new furniture feet, the only other expensive was the new hardware on the cabinet doors and roll-out tray. I was even able to use paint they had leftover from painting the outside of the shed! So for around $75, we were able to give the homeowner way more storage than she had before as well as a beautiful place to pot and maintain her lovely potted plants year-round.
If you’d like more information on how this transformation went down, head over to my sister site to see the video of the process!
This is my last project to share for 2016 (even though it was actually completed in September!). But I’ve got a fun DIY project for you to build starting first thing in 2017 on January 1st! Hope you’ll check back in to see how we made a rolling toy cart! Thanks for Checking In and Happy New Year! ~Chelsea


