Checking In With Chelsea

DIY ideas, crafts, and tips for your home

subscribe and never miss a thing!

Receive Free Email Updates

  • About
  • Videos
  • Projects
    • Indoor Projects
    • Outdoor Projects
    • Craft Projects
  • House Tour
You are here: Home / Videos / DIY Trash Can Cabinet

DIY Trash Can Cabinet

September 1, 2018 By Chelsea Lipford Wolf 1 Comment

Video Playback Not Supported

How to Build a Cabinet to Hide Your Trash Can
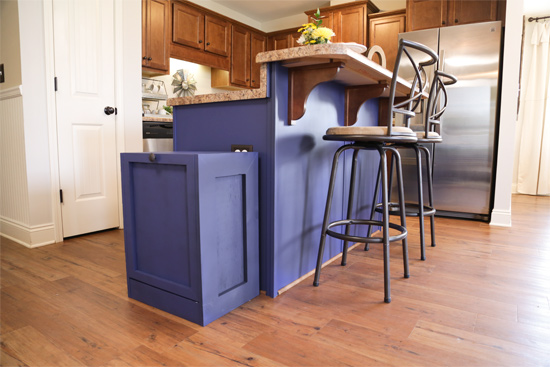
Trash Can Cabinet Painted Blue to Match Kitchen Island

OK, so you don’t have enough cabinet space in your kitchen to conveniently hide your trash can. But that doesn’t mean you have to see your trash can all the time, if you don’t want to. For about $40, you can easily build a small cabinet to house and conceal your trash can. And it tilts out, too, to give you easy access!

Materials

Let’s start this how-to off with the tools and materials you’ll need to gather and pick up from the store.

  • trash can*(look for it at your local Walmart!)
  • tape measure
  • 4’x4’x1/2″ sanded plywood
  • (3) 1″x4″x8′
  • (1) 1″x2″x8′
  • miter saw
  • wood glue*
  • nail gun/1-1/4″ nails
  • wood putty* (It’s cheaper in stores, but sharing link so you know what I used.)
  • 2″ hinges
  • drill
  • sander/220-grit sandpaper
  • paint (Benjamin Moore’s Old Navy)
  • sprayer* or paint brush
  • 2 small wood screws
  • chain
  • cabinet knob

The basic plans for this trash can cabinet are modified from the laundry sorter I built a few years ago. If you’ve never seen it, click here to check it out. It’s a thing of beauty!

Cut List

Plywood-

Rip plywood with the grain at 16 inches wide:

  • (1) at 24.5 inches (tilt-out door)
  • (2) at 12.75 inches (tilt-out bottom and cabinet bottom)

Rip plywood again at 13.5 inches wide:

  • (2) at 28.5 inches tall (cabinet sides)
  • (1) at 17 inches (countertop)

1x4s-

  • (1) 17 inches (front baseboard)
  • (2) 16 inches (back baseboard and top support)
  • (2) 14.5 inches at longest point with 45 degree miters (tilt-out braces)

You’ll cut more from the 1x4s for the ‘picture frame’ on each side once the cabinet is assembled.

Cabinet Assembly

As always, watch the video above for a good visual of how everything gets assembled together. For those of you, like me, who like words and video, here’s a quick description.

Lay the two cabinet side pieces (28.5 inch plywood) on a long edge. Then set the front baseboard (17″x1x4) flush with the bottom where it covers part of the end-grain of the plywood. Use glue and a nail gun to secure it in place.

Flip it over and attach the (2) 16″x1x4s between the plywood sides, one flush at the top and one flush at the bottom. Glue and nail from the outside of the plywood to secure them in place. Nail holes will be covered by the trim later.?

Take one of the 12.75 inch plywood pieces, slide it between the sides and baseboards at the bottom and attach from the outside. This adds stability to the cabinet and gives the tilt-out a stopping point.

Now you can attach the countertop piece on the top, nailing down through the top into the edge of the plywood.

Tilt-Out Assembly

After setting the cabinet aside, take the tilt-out bottom (remaining 12.75″ plywood piece), and attach it flush with the bottom of the tilt-out door.

Then attach the angled 14.5″ 1x4s in the corner where the tilt-out bottom meets the door. On the bottom of the whole tilt-out assembly, attach the small hinges.

(Again, don’t forget to watch the video above for a good visual of all the steps involved!)

Finishing Touches

After attaching the tilt-out to the cabinet itself with the hinges, sand the heck out of everything! Then measure and cut 1x4s and 1x2s to size to create the picture frame trim. I used the 1x2s on the front and the 1x4s for the sides.

Once you putty the nail holes from attaching everything, you can quickly sand again before painting!

Add a small chain inside if you have little ones who might let the trash can fall open! And a knob to match the rest of your kitchen will tie it all together!

Let me know if you use these plans to build a trash can cabinet for yourself!

Thanks for Checking In! ~Chelsea
*This post may contain affiliate links*

Subscribe for Free Updates!

Stay up-to-date on Chelsea's latest projects, tips, useful resources and more.

Previous Post
How to Make a Small Room Look Larger
Next Post
Tips for Painting Interior Doors

Related Content

Completed Hand Painted Pennant Flag Banner Kid BedroomDIY Pennant Banner for Kids RoomCompleted Girls Bedroom Makeover Pink PanelingPink Girls’ Shared Bedroom EvolutionCompleted Large Lighted Two and Zero NumbersDIY Lighted Marquee Numbers1950s Ranch Kitchen Before Renovation1950s Kitchen Renovation Ideas

Comments

  1. Barbara says

    March 10, 2022 at 1:15 pm

    I get so many idea’s from you . But I have a big problem area . We built a home in the Poconos in Pennsylvania. We don’t have grass we have rocks. Lots and lots of rocks. Most of our budget got blown on the house. I just don’t know what to do. We have a really nice house . But all these rocks make it look sad. Last summer I put some containers of flowers out . I like to garden. Both flowers and vegetables. We also have a above ground pool I don’t know how to finish. We didn’t use it last year because the ladder we have needed a deck. We still don’t have a deck. I call people and they don’t get back to me I don’t won’t a big one . Just big enough to get from the house to the pool. So please if you have any ideas for me please pass them along. Thank you

    Reply

Please Leave a Comment Cancel reply

Your email address will not be published. Required fields are marked *

Welcome!

I’m Chelsea. DIY
enthusiast who loves
sharing my victories
and mishaps!
Learn more
here.

CHECK IN WITH CHELSEA ON INSTAGRAM

What else do you use paper plates for besides eati What else do you use paper plates for besides eating?? Spray paint onto a paper plate and dab a small paint brush to do spot touch ups! Life hack when you’re working on a project but don’t need to paint the whole surface!👏🏻
.
.
#lifehack #diyhacks #spraypainting #painttips #paintprep #paintpro #shutters #craftsman #1940style
Didn’t mean for this to be #ASMR but here we are Didn’t mean for this to be #ASMR but here we are!🤷🏼‍♀️ I bought this orchid 15 months ago to use the flowers in our hair for my sister’s wedding. I’ve already repotted it once and it’s bloomed 3-4 times! Time to do it again with a pretty new pot that matches our new kitchen cabinets!🤩
.
.
Steps to repot an orchid:
1-large pot without drainage holes
2-plastic pot slightly smaller with holes
3-trim if needed so plastic pot is at or below outside pot
4-add layer of orchid specific potting mix (it looks like bark!)
5-add orchid, fill in around roots with more bark- don’t forget to add some mix under the leaves!
6-to water, soak bark and fill up outside pot, rinse the leaves too!
7-let sit for 5-10 minutes, then drain and dry the outside of your pot.
8-set in place and enjoy!🌷
New laundry, who dis? Our laundry room was a BLANK New laundry, who dis? Our laundry room was a BLANK slate after the kitchen renovation left it reconfigured too. So Dad and I tackled simple projects that make this space functional and of course visually pleasing too!👏🏻The full project airs this weekend on @todayshomeowner!
.
.
I love that the cabinets and hardware match what we have in the kitchen since the spaces are right next to each other! Synergy!
.
.
What do you love about your laundry room?
So funny the number of people who told us they loo So funny the number of people who told us they looked at our house when it was on the market but didn’t buy. Guess we’re the only suckers🤣🤣We’ve brought her a long way since closing day though! 👏🏻😍🤩
.
.
#ranchrevival #ranchreno #1950shouse #beforeandafter #housereno #pinkgirlroom #girlsbedroom #diningroomdecor #familydining
Exploring new cities is fun but there’s no place Exploring new cities is fun but there’s no place like my hometown! Come visit!💜💛
.
.
#mobilealabama #visitmobile #mardigras #travelbloggervibes #southerncharm
Lookie! It’s a shelf for your bookies! 🤣Build Lookie! It’s a shelf for your bookies! 🤣Building a shelf unit custom for ANY space in your home is so simple and can be done over and over again to add much needed storage aka sanity! The kids were running all over the house at bedtime trying to find a book to read because we had them stashed in baskets and shelves in several different rooms. So I took advantage of this space in the hall next to a closet to create a central location for their books and some of mine too! Plus it adds a little character to an otherwise blah space!🙌🏻
.
.
A full how to video is on checkinginwithchelsea.com! Book nerds can be DIY nerds too!🤓
.
.
#booknerdsunite #diyskills #beginnerdiy #bookshelfie #halldecor #storagesolutions #storageideas #bookstorage #bookstorageideas
Load More... Follow on Instagram

Indoor Projects Outdoor Projects Craft Projects
Facebook Pagelike Widget
  • Contact
  • FAQs
  • Advertise with Chelsea
  • Media
  • Today’s Homeowner

Search This Site

Receive Free Updates Via Email

Copyright © 2023 Checking in With Chelsea • All Rights Reserved