Checking In With Chelsea

DIY ideas, crafts, and tips for your home

subscribe and never miss a thing!

Receive Free Email Updates

  • About
  • Videos
  • Projects
    • Indoor Projects
    • Outdoor Projects
    • Craft Projects
  • House Tour
You are here: Home / Videos / DIY Roman Shade for Any Window

DIY Roman Shade for Any Window

November 18, 2022 By Chelsea Lipford Wolf Leave a Comment

Video Playback Not Supported

A little fabric can add a nice layer and so much warmth to any room! So here’s how to easily create your own DIY Roman shade to fit any window in your home.

What to Buy

  • retro-style iron*
  • cordless mini blinds*
  • fabric (what I used)
  • measuring tape*
  • no-sew hem tape*
  • fabric glue*
  • my favorite clamps*

When we first moved into our house, I wasn’t ready to decorate our primary bathroom or make it over. But we still needed privacy! So I bought the cheapest mini blinds and hung them up.

But after adding wallpaper and really gussying up the joint a few months ago, it was time to jazz up our mini blinds too!

Flower Wallpaper Bathroom Window Curtain

I’ve made this several times before for different rooms and just love how simple it is! And you can’t beat a custom, functional DIY Roman shade for less than $50!

Hem Fabric Panel

The fabric portion of this shade is just a simple square hemmed on 3 sides-right, left, and bottom. You can create the hems with a sewing machine or use the no-sew hem tape as demonstrated in the video above. After measuring your window you’ll want to add 2 and 1/2 inches to the width and height. This allows for a 1/2 inch seam allowance and a little extra so the flowy fabric will still fill up your window.

Prep Mini Blinds

In order to get the mini blinds ready to reuse for your DIY Roman shade, you’ll need to spread them out on a tabletop. Depending on your model, you may need to clamp to the table to keep them open.

Then your goal is to remove all the slats except for 1 or 2, depending on the height of your window. And you’ll want to remove the extra strings.

BUT there are 2 strings that are imperative to the function of your shade. They are a thicker cord that goes inside the bottom rail of the blinds. The thinner strings that look like a ladder are not necessary and should be removed.

Watch video above to see a good visual of what I’m talking about!

My window is about 36 inches tall. And I only ended up needing 1 of the blind slats. So if yours is greater than 40 inches tall, plan on keeping 2 of the slats. The remaining slats can be torn or cut off, just be careful of the important cord that raises and lowers the blinds/your new shade!

Glue DIY Roman Shade

After your fabric panel is hemmed and your blinds are prepped, you’re ready to glue them together. You’ll want to play around with the location of your slats so that your shade will gather nicely when it’s in the raised position. The bottom rail determines the extra fabric flap at the bottom when it’s raised. I wanted mine to be seen so it is layered when up.

So I glued the bottom rail 10 inches from the bottom of my fabric panel. Then the slat in the middle was glued 20 inches from the bottom. Lastly, the top rail is glued at the height of my window. After the glue dries, the extra fabric (that’s not hemmed) at the top can be tucked in or trimmed. (Again watch the video above to see this in action.)

Once your glue is dry, you’re ready to hang your beautiful custom DIY Roman shade and really make your window pop!
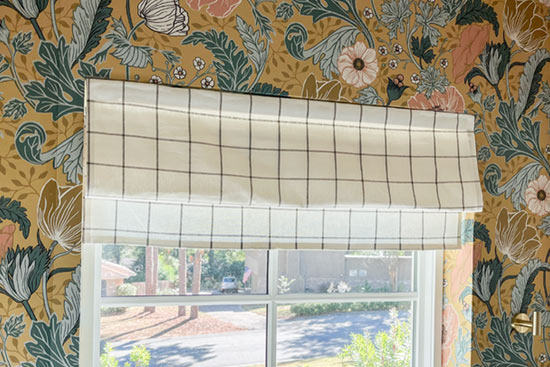
Windowpane Fabric Made into Roman Shade

If you post about your completed window shade on Instagram, be sure to tag me so I can see too! (@checkinginwithchelsea) Follow me there too!

Thanks for Checking In! ~Chelsea

*This post contains affiliate links. I will earn a small commission from your purchase without increasing the price for you!*


Subscribe for Free Updates!

Stay up-to-date on Chelsea's latest projects, tips, useful resources and more.

Previous Post
Rattan Frame for Oval Mirror
Next Post
Replace an Interior Door Yourself

Related Content

Completed Hand Painted Pennant Flag Banner Kid BedroomDIY Pennant Banner for Kids RoomCompleted Girls Bedroom Makeover Pink PanelingPink Girls’ Shared Bedroom EvolutionCompleted Large Lighted Two and Zero NumbersDIY Lighted Marquee NumbersCompleted Updates in Modern Master BathroomHow to Make a Pink Tub Look Cool

Please Leave a Comment Cancel reply

Your email address will not be published. Required fields are marked *

Welcome!

I’m Chelsea. DIY
enthusiast who loves
sharing my victories
and mishaps!
Learn more
here.

CHECK IN WITH CHELSEA ON INSTAGRAM

Pure joy! I put her in the crib so I could do some Pure joy! I put her in the crib so I could do something to her window and she was happy as a clam in there!
.
All of her windows have been blacked out for good sleep purposes. It was refreshing to open all the curtains and see my favorite room in the house aglow with daylight for a change!🙌🏻
.
Happy Monday!✨
Life keeps going and babies don’t keep! We enjoy Life keeps going and babies don’t keep! We enjoyed a quick little trip to New Orleans to meet up with family.🥰
.
I hope they remember these little trips like I do from my childhood. I’m definitely a more fun mom on vacation🤣You want candy? Sure! Beignets for breakfast? Let’s do it! Happy memories all around!👏🏻
.
#sundayfunday #sundaybest #nolalove #neworleanslife #ourbackyard #siblingsgoals #babiesdontkeep
BRB, going to close my curtains. It’s true! Clos BRB, going to close my curtains. It’s true! Closing your curtains during the day while you’re away can keep the heat of the sun from warming up your house and costing you money. Less heat coming in means less energy used to run your air conditioner!👏🏻
.
Check out my profile for the rest of the summer hacks I put together with @theduckbrand, including one for a window AC if you’ve got one!
.
#sponsored by @theduckbrand #summerhacks  #savemoneylivebetter #duckbrand #southernsummer #itshotoutthere
Which room in your house is the hottest during the Which room in your house is the hottest during the summer? It's the baby's room for us.😕
.
Luckily we can just pop an air conditioner in the window to supplement our HVAC system on the hottest days and keep her comfortable!
.
And you might as well make it as efficient as possible by installing AC insulating seal from @theduckbrand at the same time. You only need scissors to install!
.
#sponsored by @theduckbrand #summerhacks  #savemoneylivebetter #duckbrand #itshotoutthere
It also keeps the boogie man out!🤣 I'm a big pr It also keeps the boogie man out!🤣 I'm a big proponent of doing little things that add up to make a big difference.
.
Locking your exterior doors when you're home is one small way that doesn't cost you any money but can help keep your home more comfortable this summer.
.
Check out @theduckbrand if you need to replace your weatherstripping and follow for more quick and easy summer hacks!
#sponsored by @theduckbrand #summerhacks  #savemoneylivebetter #duckbrand #southernsummer
My dad always played this song for us on our birth My dad always played this song for us on our birthdays and what a fun tradition to carry on!🥰 Happy Birthday to the most delightful baby I’ve ever known! This has been the best year of my life knowing and loving you!😘 Here’s to many, many more!🎉
.
.
#happybirthday #firstbirthday #firstbirthdaydress #birthdaygirl #fourthkid #bigfamilylove #bestbaby
Load More... Follow on Instagram

Indoor Projects Outdoor Projects Craft Projects
Facebook Pagelike Widget
  • Contact
  • FAQs
  • Advertise with Chelsea
  • Media
  • Today’s Homeowner

Search This Site

Receive Free Updates Via Email

Copyright © 2023 Checking in With Chelsea • All Rights Reserved