How To Build a Fireplace Mantel
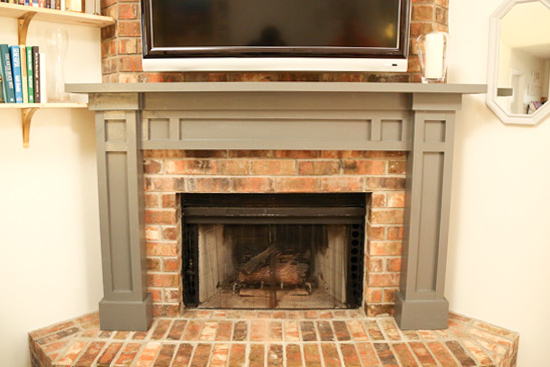
Watch the video above to see how to build a painted fireplace mantel yourself!
Materials
The inspiration came from this image on Pinterest. A simple, clean, Shaker-style mantel. Here’s the lumber we used to build it mantel:
- (3) 1x2x10′
- (1) 1x2x8′
- (3) 1x4x10′
- (1) 1x6x6′
- (1) 1x8x10′
- (1) 2x6x10′
- (1) 2x6x8′
- (1) 1/4″x4’x8′ sanded plywood
- 5/8″ finish nails
- 1.5″ finish nails
- nail gun or hammer
- wood glue
- masonry screws
- painter’s caulk
- paint or stain
This is one of those times when buying the nicer wood is worth it. Straight boards with no knots will give you a better end result!
Cutting and Assembling
We started by cutting and assembling the face of the legs. We used a piece of the plywood cut to an inch and half less than the width of the overall leg. We attached 1x2s on the face of the plywood, leaving 3/4 inch on either side of the plywood (behind the 1x2s). That allowed us room to attach a 1×4 on one side and a 1×6 on the other side later on so they’d sit flush.
To help you understand a little better, watch the video above and check out my drawing below. It’s as if you’re looking down from the top of the column.
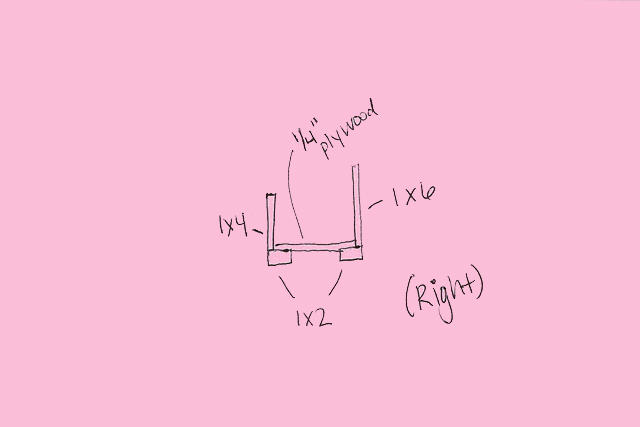
We’re using the 1×6 on the right side since the bricks turn before the end of our leg, so we needed more depth for our leg to turn back and meet the bricks. if you’re working with a flat existing fireplace, then you can use a 1×4 on both sides.
I recently created printable plans to help you build a fireplace mantel like this one! The plans are for a full mantel, without a hearth like the one shown in the video. Click here to sign up for my newsletter and get your FREE plans!
Of course if you’ve got a little more room and wanted to make your mantel legs wider, you can use 1x4s instead of the 1x2s we used. But to keep things proportional, we used 1x2s.
Add Trim
To create the boxes at the top of the legs, we used a 1×2 and 1x4s. The 1x4s were placed at the top and bottom of the leg so that once the trim was nailed, there would only be 1 1/2 inch exposed (which is the actual width of a 1×2).
Almost identical steps were taken to assembly the horizontal breastplate that’s right under the mantel itself. Instead of (2) 1x2s on either side, a 1×4 was nailed on one side for the same reason as above. The trim would cover it and only leave 1 1/2 inches exposed, making everything nice, neat, and even.
Before we assembled the legs to the breastplate, we added the side 1x4s to the legs. We cut out some room for the breastplate so it could be recessed, just like our inspirational picture.

Attach 2x6s to Brick
With the breastplate and legs nailed together, we attached our 2×6 “nailers” to the face of the fireplace. We drilled a few holes through the wood into the mortar using a masonry drill bit. Then we used masonry screws to hold them in place.
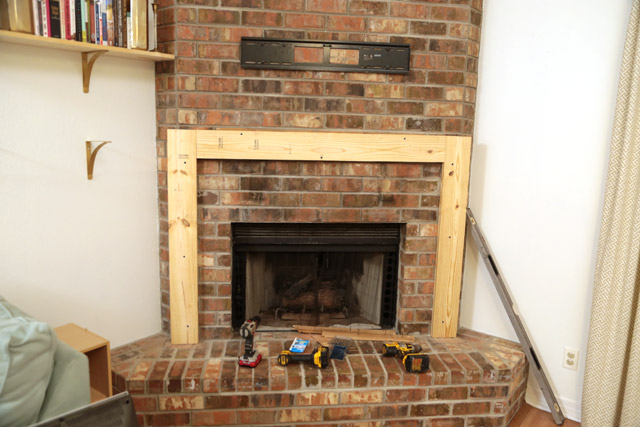
We slowly brought the assembled mantel into place and attached it to the nailers from each side of each leg. You can use a nail gun and compressor, or the old-fashioned way works just fine too! We used small 4d finish nails to do the trick.
We then used some 1×6 to create the baseboard at the bottom of each leg. We simply cut the ends at a 45 degree angle (mitre), applied some wood glue, and nailed them to the leg. 6 small pieces and that was done!
Mantel Shelf
To create the mantel shelf, we nailed an 1×8 cut to length on top of the breastplate and legs. Then with some wood glue and more nails, we attached a second piece of 1×8 cut to the same length. To make it look like one chunky piece of wood, we attached a 1×2 to the edge. We used mitre cuts on the 1×2 so they’d meet up and look flawless! After some caulk and putty, it’s easy to forget that it’s not one solid piece!
Since this mantel extends and sticks out where the brick turns, we had to create some triangle-shaped pieces to fill in the gap for the top of the mantel. It’ll also need to be 2 pieces thick to line up properly. We cut them out, glued and nailed them together from the bottom piece, then nailed them both to the 2×6 nailer underneath.
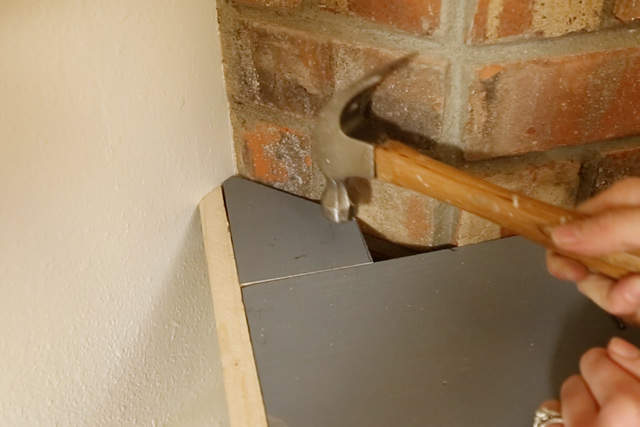
We intentionally left that hole there for a reason I’ll discuss in a moment.
But before we get there, we caulked every joint and putty the nail holes after we set them below the surface with a nail set* and hammer.
Removable Panel for Cords
Now to the hole in the top of the mantel. Sheena had an outlandish idea to hide her TV and DVD cables in the left leg of the mantel. OK, it’s not that outlandish. It’s actually pretty easy to do since we were building this thing from scratch. A LOT easier than trying to hide them behind the brick fireplace! Eek!
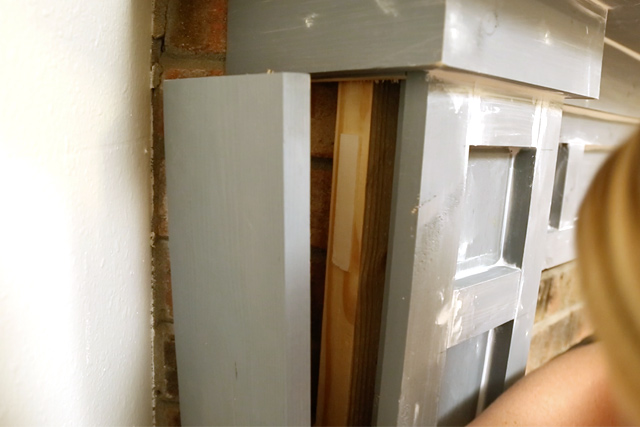
So we created a removable panel by leaving the hole in the top already mentioned. Then we used a 1 1/2 inch hole saw* to drill a hole at the bottom of the left side of the left leg. And instead of attaching that side panel to the face of the leg with nails like we did on the right leg, we used velcro.
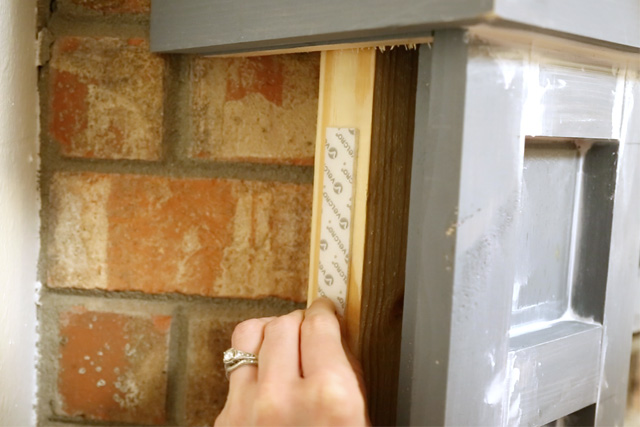
Then the hole at the bottom can be used as a handle to remove and replace the panel in the future without messing up the caulk or paint job!
Painting Time
After making the new mantel wireless, we got out our paint brushes which is both my and Sheena’s favorite way to home improve. The color we used is Welded Iron by Behr in semi-gloss.

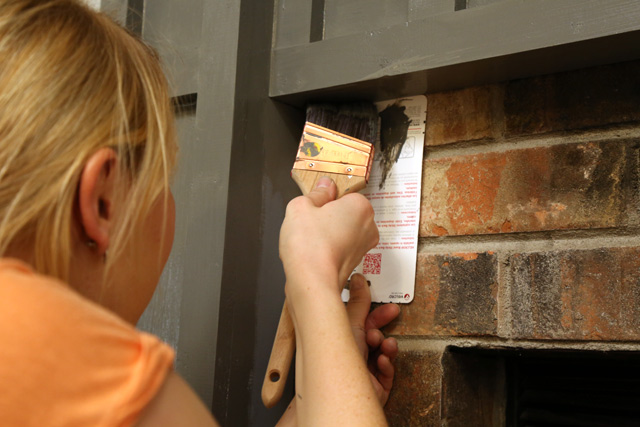
A little tip when painting against a brick surface. Since painter’s tape doesn’t stick well to brick, I slipped a piece of the Velcro packaging (not quite cardboard, but sturdier than computer paper) between the mantel and brick and painted against it. On-the-spot paint shield, for the win!
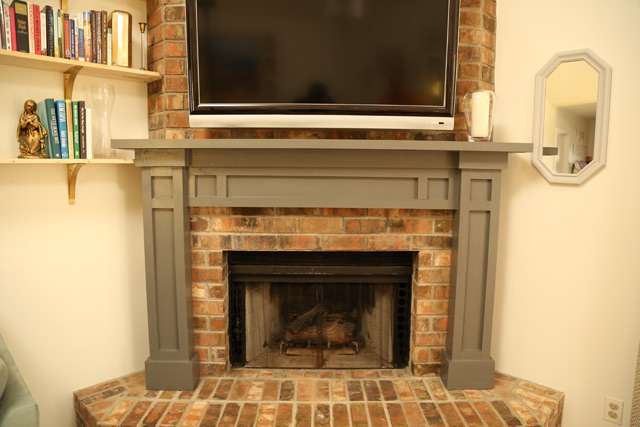
After a long and hard day’s work, Sheena had her dream mantel and I built a mantel for the first time.
Of course there are a bajillion different styles and ways to build a mantel. But if you like this style, I took all of the guesswork (and math) out of it and made FREE printable plans for you! Just head here to sign up for my newsletter and the plans will be sent to your inbox!
The hardest part was measuring and figuring and measuring again to make sure everything evened out and lined up in the end. It’s really easy once you get past the math! Ha!
Thanks for Checking In! ~ Chelsea
*This post may contain affiliate links*


This is awesome LOVE girl power. Yes more detail/instructions please!!
Love this mantel, I would love to get more details!
do you have the measurements you used for this?
I would LOVE to build this mantel! Can you please send me more details? Thanks!
My wife and I really like this style – I would love to try and pull this off on my own (fingers crossed). If you don’t mind, more details would be amazing on how you were able to do this.
Thank you!
I am like everyone else and would love measurement details on the placement of the detail “blocks” etc…. going to give it a try!!
I’m working on a full tutorial for sure!! Might re-create part of it to get pictures of the process. I’ll keep you posted, Patty! ~Chelsea
me too, me too! Would love the details.
Do you have more detailed measurements for this project? Specifically how wide you cut the plywood? Thanks!
Hi Stacey! I’m in the middle of working on 3D plans for the entire mantel piece. I’ll let you know when it’s posted on my site. In the meantime, the plywood for the right and left legs is cut 5.5 inches wide. Hope that helps! ~Chelsea
Hello Chelsea, I was wondering if you were ever able to complete the 3D plans for this mantel. This is the closest I have been able to find that I like and am currently redoing my fireplace. Thanks ~Dianna
Hi Dianna! Yes I’m sending the measurements to my graphic guy today. Will probably have something to share in 2 weeks. In the meantime, let me know if you have any specific questions! ~Chelsea
Chelsea,
Do you have your plans for this mantle to share? Like the style.
Do you have plans with measurements available? I love the style and would appreciate the details to help me build one.
Beautiful! I am in the process of updating my fireplace surround and would love the plans if they are available
Exactly what we where looking for in our new house.
Please send details.
Any updates on the 3d plans?
I’d love to know more details on this. I have a fireplace with way too much slate tile. It would be great to break it up a bit with something like this.
I know you can hide the wires in the leg but where are the wires from the tv?
There is a small hole on top of the mantel going down into the leg that the TV wires are routed into. Hope that helps! ~Chelsea
Signed up twice, no email sent, would really like the plans please.