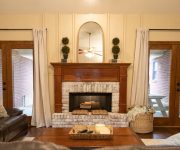
Well, it’s been a while since I’ve posted on here. I think I tried to tackle too much in one post and simply got overwhelmed. But I’m back and have some fun AND informative posts planned to fill you in on what I’ve been up to in my beautiful, yet humble abode.
The fireplace hearth is an area of my house I didn’t think I’d ever be able to do anything about. I thought I’d be stuck with maroon tiles in my living room for the duration of my tenure at this house, but I found a way!
Since I completed this project during the warm months, I haven’t tested its compatibility with the fireplace. Only time will tell, and I’ll be sure to post an update here once I’ve experimented some.
Now let’s get to it! When I first moved in, my fireplace looked something like this.

Not terrible. But it certainly didn’t fit the vision I had for my living room space. So I decided since I had a gas fireplace, I could paint the bricks on the side. No wood burning=no soot to worry about.
I used leftover trim paint (Behr Premium Plus Semi-Gloss in a custom-matched color) to cover the bricks in two coats after I applied a stain-blocking primer to conceal the red.
Originally I thought that since the hearth tile was level with the hardwood, aka on the floor, I couldn’t paint it because of the foot traffic. But after about a year of living with the painted bricks and maroon hearth, I realized that no one would actually step on the hearth unless he or she were hugging the fireplace. It is a pretty awesome fireplace, but I’ve never felt inclined to hug it. So I don’t think any of my visitors would feel the need either.
Moving on to how it actually went down…
I cleaned it as best I could using a rag and some degreaser. Which reminds me of another reason I wanted to paint it. I could never get it clean! I even tried steaming it, but it still looked like it had a dirty film on it.
After it dried, I applied painter’s tape on the hardwood around the perimeter of the hearth. I didn’t want to take a chance on getting anything on my still-new-to-me floors!

Then came the primer. I used the B-I-N I had in my shed, which is the best stain-blocking primer I’ve come across. Since it’s shellac-based, it requires more than soap and water to clean the brush when you’re done.

I painted a few square tiles at a time, starting with the grout and then using straight, long strokes to blend in the brush marks on the face of the tile.

Slowly making my way across, I finished by running the brush over the entire surface from left to right.

Once the primer was dry (about an hour), I got out my trusty Titebond painter’s caulk to touch up any voids.

There was one particularly large space where the brick met the hearth on the right side. I pumped and pumped caulk in there to fill it up good. I also filled any divots in the tile to try and make everything an even surface. After the caulk dried, I added another layer to the bigger voids and let that dry.
The best part about this little after-work project? I was babysitting my little fur-brother! He was such a good boy and didn’t leave any paw prints on my freshly-painted piece of art.

Next, I got the paint brush out again and added two coats of the same semi-gloss latex I used on the bricks. Using the same method as the primer (grout first then tiles), I waited a full 24 hours before proceeding to the finishing touch—several coats of clear finish.
Here I used a water-based protective finish from Minwax.

Most other types of varnish can cause the white to yellow. And I certainly didn’t want anything to ruin my good time! Especially after waiting so long to start this project.
I layered the finish on in three coats to be extra cautious, letting it dry 24 hours between each coat. After the third coat had been on for an hour or so, I pulled up the painter’s tape.

There was a little paint that had seeped through onto the hardwood, but it came off easily with a little nail scratching.

Then I stepped back and admired my handiwork and sighed a sigh of relief and joy. Now that’s a fireplace! It looks so much more refreshing and happy. Yes, a fireplace can look happy!

Has anyone dared to paint their fireplace? How’d it go? Did anything go wrong? Let me know in the comments below!
Thanks for Checking In! ~Chelsea


I would like to somehow make a hall closet into an office area.
Inside measurements 24″ X 55″
4′ bifold door which gives only a 38″ opening.
The small size presents several challenges.
The narrow width and depth make it challenging to have a comfortable chair that “lives” there and allows the doors to close. Trying to have a set of drawers adds yet another challenge. I already have an adjustable hanging shelf system and a white file drawer. Do you have any ideas? Does this sound like a project you would have any interest?
Also, what is a good material to use for a desktop?