Easy Way to Label Bathroom Drawers
How to Add Stylish Labels to Organize Your Vanity

A few months ago I made a few small changes to our small bathroom. (You can watch that video here.) One of the things I did was update the drawer pulls to help them match our new towel bar and just to give the bathroom a fresh look.

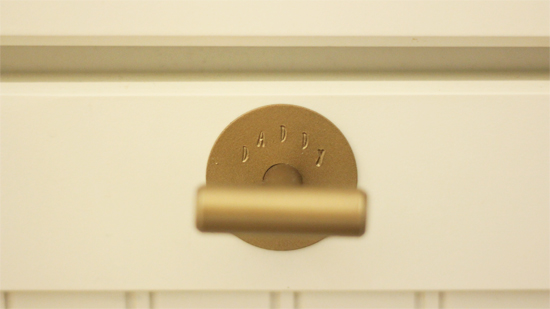
Then ImpressArt* reached out to me and challenged me to incorporate some metal stamping into our bathroom. Challenge accepted! I decided it was the perfect opportunity to help (slowly) teach our toddlers about personal property and that not everything is theirs! AKA, I labeled my drawers, so they know what they shouldn’t touch! Ha!
Materials

- 1-1/2 inch round blanks*
- stamping hammer*
- stamping block*
- stamping guides*
- Lollipop metal stamp set*
- 11/32 inch drill bit
- small clamps*
- scrap wood
- 220-grit sandpaper
- spray paint
**ImpressArt supplied me with materials to do this project free of charge, however opinions are 100% honest and my own. I’ve also included affiliate links to some products. I’ll earn a small commission should you purchase through these links without any added cost to you.
Drill Holes
The first step is to drill holes for the knob screw to go through. This also gives you the center point to base your stamping.
I first started marking the center on the blanks with a marker, but soon realized I could eyeball the center with my drill bit just as easily. And it eliminated a step. So I clamped the metal blanks, one at a time, to a scrap piece of wood.

Then using an 11/32″ drill bit, I slowly drilled a hole through the blank and into the wood beneath. Not every hole was perfectly round, but it was just fine for what I needed.

After all of the holes were drilled, I used some 220-grit sandpaper to knock down any metal shards sticking up. Be sure to sand in the same direction, so it looks uniform when you’re done. (See the lines on the stamping blanks below?)

Stamp Labels
Since spray paint can fill in the indentations of the stamping, I wanted to minimize that as much as possible. So I sprayed some white metal primer and let it dry before I started stamping. You also don’t want to spray all of your coats before stamping in case the stamp slips and scratches the paint.
After placing a round stamp guide sticker in the center of my blank, I set the blank on the stamping block.

I figured out where each letter would go, held them in place (one at a time), and tapped them with the hammer! One thorough tap is enough for each letter. The labels I went with for our drawers are Mommy, Daddy, Extras, Toilet Paper, and Teeth. I’ll let you guess what goes in each drawer.?

Spray Paint
It’s not necessary to paint these, and these same round blanks come in a brass, but I had already sprayed my hardware when I first updated our bathroom. So I needed them to match! The spray paint I used is Rust-Oleum’s Satin Bronze. Deceptive name, but great gold color!
I did 2 light coats, making sure to get some on the edges too. Then after a little dry time, I was able to install them!

I’ll let you in on a little secret…we keep our toothbrushes, toothpaste, and floss in the tilt-out labeled T-E-E-T-H!? I know…clever…?

It’s a subtle and simple way to label drawers in any room in your house! Although the upfront cost of the materials for this project are more than I typically like to spend, the letters and stamping accessories are good for so much more than bathroom drawer labels! Now that I have them, I’m sure I’ll find plenty of uses for them around the house. Just like I always do!
What do you think about labeling drawers and such? Handy or not helpful at all? What would the drawers in your bathroom be labeled? Share in the comments!
Thanks for Checking In! ~Chelsea
*This post contains affiliate links*


