Build an Outdoor Table for Toddlers and Preschoolers

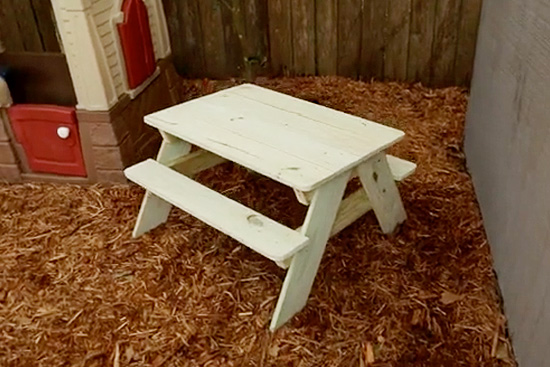
Building a picnic table sized for kids is easy and quick! Plus it’s so adorable! I’d say this would be a great project for a beginner DIY-er since minimal power tools are needed.
Materials
- (4) 1″x6″x8′ pressure-treated wood
- (1) 2″x4″x10′ pressure-treated wood
- tape measure*
- speed square*
- miter saw*
- drill/driver*
- sander* w/ 220-grit sandpaper
- jigsaw*, optional
- 2″ exterior wood screws
- level*
- exterior wood glue*
- round object, like a spray paint can, optional
- exterior wood sealer*
Cut List
1x6s
- (6) 35 inches long
- (4) 25 inches long
2x4s
- (2) 30 inches long
- (2) 21 inches long
Step 1
First, measure, mark and cut everything to size using the cut list above. Then rotate your miter saw to the 30 degree angle. You’ll cut the (4) 25″ 1x6s on each end so that the angle goes in the same direction, parallel to each other. Be sure to line the saw blade up so that you keep all the length. Next, rotate the saw to the 22.5 degree angle. Cut the ends of all of the 2x4s, but this time you want the ends to be in opposite directions. See video above for a good visual of both of these cuts.
Step 2
To assemble the top, set the shorter 2x4s on your work surface with the longer ends facing up. Then lay out 4 of your 35″ 1x6s on top. Use your tape measure to make sure the overhang is equal on each opposite side. My overhang on the sides of the 2x4s was about 1-5/8″ and the overhang on the ends was about 1/2″. Once you like the positioning, apply wood glue before using the exterior screws to attach the 1x6s to the 2x4s. I used 2 screws on each side of each board.
Step 3
Now, turn what you just assembled upside down. Take 2 of the angled 1x6s and attach them with the screws where the boards touch each other in the middle of the 2x4s on each side. These are the legs of the table. Again, the video above will give you a good visual of this step.
Step 4
With the table still upside down, measure from the end of the 1x6s, straight down (not along the edge of the board) 12 inches and make a mark. Since this will be the bench of the able, I used a level to make sure my mark was also level. Then attach the remaining 2x4s on each side where the board sits just above the mark (since the table is still upside down). Once you screw them in, flip it over and the 2x4s should be sitting 12 inches off the ground.
Step 5
Attach the two remaining 1x6s to the top of the 2x4s (1 on each side), pushing them all the way up against the legs. Don’t forget the wood glue!
Step 6
OK, we’re done assembling! This next step is totally optional, but I think it makes the table a tad safer and a lot more pretty! I traced the bottom of a can of spray paint on the 4 edges of the table top and the outside edges of each bench. Then used my jigsaw to cut it out and make the edges rounded. Follow that up by sanding what you just cut plus the entire surface and edges of the whole table!
Step 7
Lastly, you’ll want to wait until the pressure-treated lumber has had time to ‘cure’ before applying a wood sealer, typically around 6 weeks. All you have to do with that is brush it on like paint and let it dry. Or you could paint it for a cute pop of color!
I’d love to see pictures of your table if you use my plans to build one! Send me an email at info@checkinginwithchelsea.com!
Thanks for Checking In! ~Chelsea
*This post contains affiliate links. I will earn a small commission from your purchase without increasing the price for you! Thanks for supporting me and my website!*


Love love love! Ive always thought they were adorable. Another project for spring! With 3 Grandchildren always about, this will be put to good use. Thanks as always Chelsea. Always an inspiration.
Oh definitely, Laura! Thanks for your kind words. ~Chelsea
I love this .I was looking for something to build for my nieces and nephews and for my great grandbabies
Aww! I’m sure they’ll love it! Thank, Betty! ~Chelsea
Perfect “tiny” project! Thanks for the great idea.
Are plans available for the kids picnic table?
Hi Frances! This post has been updated with the plans! ~Chelsea
Thanks Barbi! ~Chelsea
O m g what a great table for the kids an me thank you DC
Awesome! Thanks, DC ~Chelsea
I can’t find the plans
Hi Nancy! There aren’t any plans, per se. The video and written post should be all you need to build a similar table! Sometimes you have to click on the video player at the top of the page to start the video. Let me know if you have any questions. ~Chelsea