If you live in a house or even an apartment, then you have an electrical panel/breaker box somewhere. And sometimes that somewhere is not easy to conceal. That was certainly the case at Jackie’s house. It’s in the corner of a family room. But the worst part is that it’s not even centered on the wall! Whose idea was that?
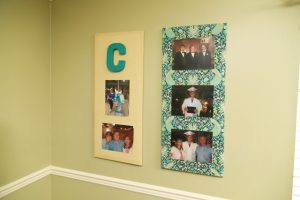
So we decided to create decorative panels with fabric and 1x2s. They could conceal the electrical panel and also add a little extra warmth to her family room. The dimensions of the finished panels are 38 inches tall by 16 inches wide.
If you’re looking to make something similar, here are the materials we used:
- (3) 8-foot 1×2
- Saw
- Tape Measure
- 2-inch Wood Screws
- Pilot Drill Bit
- Drill
- Stapler
- Mod Podge
- Foam Brush
- Hammer
- Wire Nails
- Hinges
- Fabric
- Family Photos
- 1-inch #6 Screws
Now for the work! Using the 1x2s, cut 4 pieces at 38 inches and 4 at 16 inches. And then cut 45-degree angles on all of the ends. Make sure you cut the angles in opposite directions like we did on the Lattice Privacy Wall. You can use a power circular or miter saw. We opted to use the miter box and handsaw for a little upper body workout 😉

Then it was time to create the frames with the cut 1x2s. Since the wood is thin, you’ll want to use a drill bit to drill a pilot hole before driving in the wood screws. By the way, we used the gold wood screws, but there are also silver wood screws that are perfectly fine to use too.
With your frames assembled, it’s time to move on to the fabric. Jackie wanted to use 2 different fabrics that complemented each other. But I love the idea of using the same fabric for both panels too! We started stapling the fabric along one of the short sides. And we stapled it to the inside of the frame so the staples wouldn’t mark up the wall once the panels are hung in place.
After one short side was done, we switched to the other short side and Jackie pulled the fabric tight while I stapled. Up until now, this project would be do-able by yourself. But it’s much easier to stretch the fabric and staple if you have a friend or a spouse give you a hand!
We continued around the frame stapling one long side and then pulling it tight to staple the last side. Multiply all of the times by two, and we had our two fabric panels!
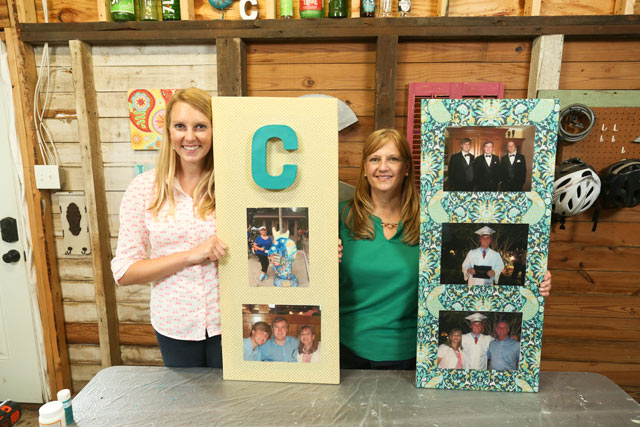
Since Jackie’s children no longer live with her, she wanted to include some family photos to keep them nearby. We ended up using five 8×10 photos, three on one panel and two on the other. Jackie brushed some Mod Podge on the back of the photos in a thin layer. Then we positioned the photos on one panel, and flipped it over to press the photo and fabric firmly together.
Even if you get a little Mod Podge on the front of your photos, don’t sweat it. It dries clear and won’t cause the ink to run like regular glues might. You could brush some over the top of the photos to help preserve them. But since Jackie liked the idea of changing out her photos every once in a while, we skipped that step to make them easier to remove in a few months’ time.
For a little extra personality, we also painted a cardboard ‘C’ (for Jackie’s last name) to match the fabric and attached it at the top of the panel with two photos using Mod Podge and a thumbtack from the back.
 Once we were satisfied with the photo placement, we were ready to attach some teeny, tiny hinges to the panel that would actually be covering the breaker box. This way Jackie wouldn’t have to remove the panel, rehang, and straighten it up every time her or her husband needed to access the box.
We then packed up the hammer, nails, drill, and panels and went to the scene of the uncentered electrical box crime to complete our project. We attached the panel with hinges over the box using 1-inch screws. The hinges came with screws but they were a little short for attaching to the wall.
We used the wire nails and hammer to hang the other panel, making sure it was level and evenly spaced between the other panel and the nearby window.
It’s so fun to be able to create something to fill an odd space that you can’t find in stores! You don’t have to compromise on size or color when you make it yourself!
Plus with Jackie’s TV being in that corner, these fabric panels should enhance the acoustics in the room for when she’s watching the crew and me on the Today’s Homeowner TV show!
Comment below and let me know how you’ve concealed your electrical panel. Or let me know if you’re like me and it’s on the outside of your house! What are some other ideas for covering those ugly things but still leaving them accessible? I’d love to hear from you!


Love this idea. Love seeing home projects that I can actually do without hiring professionals.
Great, Karen! Thanks for watching!