Checking In With Chelsea

DIY ideas, crafts, and tips for your home

subscribe and never miss a thing!

Receive Free Email Updates

  • About
  • Videos
  • Projects
    • Indoor Projects
    • Outdoor Projects
    • Craft Projects
  • House Tour
You are here: Home / Videos / DIY Fluted Bath Vanity Upgrade

DIY Fluted Bath Vanity Upgrade

May 1, 2023 By Chelsea Lipford Wolf 3 Comments

Video Playback Not Supported

Update your existing bathroom vanity to create the trendy reeded or fluted cabinetry look with multi-surface glue and wood dowels from the craft store!

What You’ll Need

  • Titebond Quick & Thick glue*
  • 1/8″ wood dowels* (a whole bunch!!)
  • miter saw*
  • tape measure*
  • sandpaper or sanding blocks*
  • sealer*
  • chip brushes*

I love the texture a reeded (or fluted) piece of furniture brings to a room. But if you’re not in the market for a new table or new cabinets, how do you get that look in your home?? You glue them on, of course!

wood dowels titebond quick & quick multi-surface glue on marble bath vanity

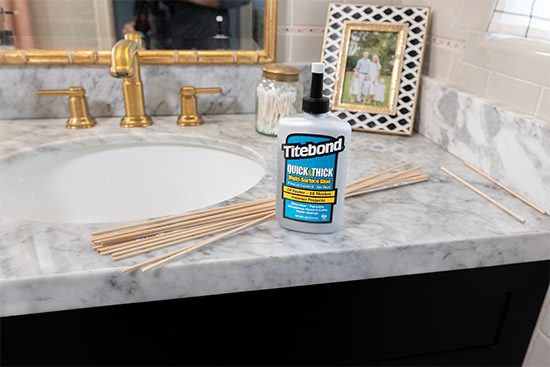
For my particular vanity (on sale now!*)with shaker-style doors and drawers, I measured the depth of the recessed part of the panel. Since it was about 1/8 of an inch, I decided to go with 1/8″ dowels so they wouldn’t stick out. But you could totally do bigger dowels for a different look!

Measure and Cut Reeds to Size

Since we are using wood dowels, you can cut them to size with a regular miter saw. Take the width of each panel and divide by the size of your dowels. That’s how many you’ll need to cut for each section. At only 1/8 of an inch wide, you’ll need a lot of dowels!! I needed 55 just for one drawer. Measure the height of each recessed panel for the length you’ll cut your dowels.

I’ve learned a few tricks over the years. And creating a stop block for quick measuring is the perfect trick for this project! Mark the length you are cutting your dowels. Line up the mark with the saw blade. Then butt a scrap piece of wood to the end and clamp it in place.

trick hack miter saw clamp stop block for cutting wood dowels

Then you’re able to butt 10-15 dowels against it for precise cutting without having to measure again!

Multi-Surface Glue

This project is sponsored by Titebond. So obviously I’m going to use one of their adhesives! But really glue is the perfect way to attach these tiny dowels to my vanity. There aren’t nails small enough!

I used their Quick & Thick multi-surface glue since I’m bonding wood to my painted veneer vanity. Plus, I’m gluing on a vertical surface. So I needed a thicker glue that wouldn’t run down immediately before I could get the dowels situated. And it sets up fast so I don’t have to worry about clamping or taping up the dowels while it dries.

For small areas like my drawer panels, I applied glue over the whole area. Starting at one end, I set dowels into the glue and pushed them tight to each other working my way across to the other end.

chelsea lipford wolf applying titebond glue to bath vanity for wood dowels reeded furniture

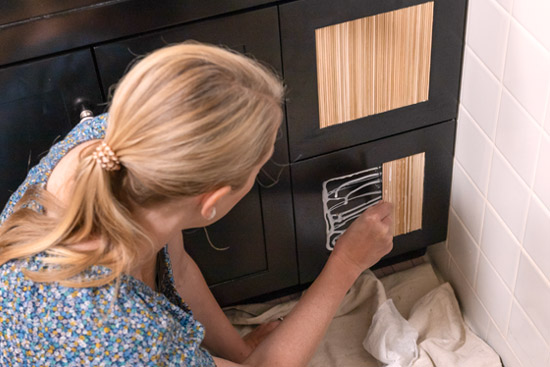
The dowels for the door panels were longer and more wiggly, so it took a little longer to get them situated. I didn’t want the glue to set up before I could get to the other end, so I only applied glue a few inches wide at a time. (It ended up not taking as long as I thought, so I could have glued the whole panel at one time after all.)

After you finish one panel, wipe down any excess glue with a wet rag or paper towel.

Seal Wood Dowels

Once all of your panels are complete and the dowels have dried from being wiped down, you’re ready to protect them with a coat of sealer.

I used some spar urethane I already had on hand from our exterior renovation. It’s specified for exterior use, but bathrooms have a lot of similarities to outdoor spaces, mainly moisture and the potential of dripping water! You could use any polyurethane (water or oil-based) that you may already have on hand too!

I like to use a ‘throw-away’ brush or chip brush to apply oil-based sealers on quick projects like this so I don’t have to clean up a nice brush with mineral spirits. They are inexpensive so I always have a few on hand!

When you’re sealer is dry, you can drill holes for your hardware and re-attach your drawer pulls! This would be a good time to pick out new hardware if you’ve been meaning to anyway! No holes to patch!🙌🏻

Completed bath vanity upgrade with reeded fluted look

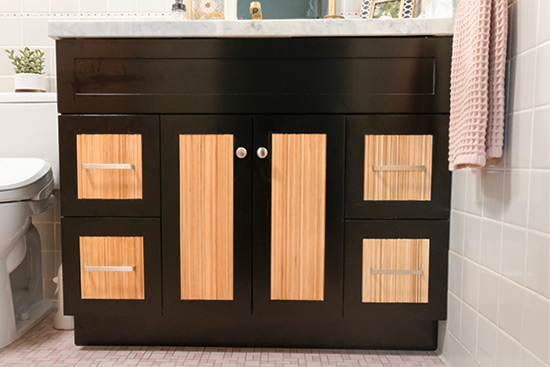
Your DIY reeded bath vanity upgrade is complete! I love adding wood elements in rooms to give them warmth and texture. This project is an easy and inexpensive way to do that to many different kinds of existing pieces of furniture around your house too!

Click here to read about all the other changes I made in this bathroom almost a year ago!

Thanks for Checking In! ~Chelsea

*This post contains affiliate links. I will earn a small commission from your purchase without increasing the price for you!*

Subscribe for Free Updates!

Stay up-to-date on Chelsea's latest projects, tips, useful resources and more.

Previous Post
DIY Bookshelf for Hallway Nook

Related Content

Completed Updates in Modern Master BathroomHow to Make a Pink Tub Look CoolMinty Green Bathroom Vanity with White CountertopUpdating Our 1950s Bathroom with StyleFrosted Windows in Blue Tiled BathroomHow To Install Beautiful Privacy Window FilmLive Edge Shelves Hung Above ToiletDIY Live Edge Floating Shelves

Comments

  1. Helen Seymour says

    May 1, 2023 at 12:47 pm

    Chelsea…what a fabulous idea……I think I can even do this. I love to do projects for my house……Thank you!

    Reply
    • Chelsea Lipford Wolf says

      June 1, 2023 at 2:02 pm

      🤩

      Reply
  2. Susan says

    May 1, 2023 at 2:27 pm

    Fabulous idea!!!!

    Reply

Please Leave a Comment Cancel reply

Your email address will not be published. Required fields are marked *

Welcome!

I’m Chelsea. DIY
enthusiast who loves
sharing my victories
and mishaps!
Learn more
here.

CHECK IN WITH CHELSEA ON INSTAGRAM

Ask me how I know😑Whether you’re doing a smal Ask me how I know😑Whether you’re doing a small patch or a whole room, this drywall sanding hack will keep the dust at bay and keep the rest of your house looking good😎
.
.
#drywall #diyhack #tipsandtricks
A Spring Break to remember! Thanks to CeeCee and P A Spring Break to remember! Thanks to CeeCee and Pop Daddy for bringing the Wolfpack along on vacation! A long travel day ahead of us but it’s always worth it to spend time with family and get some r&r.☀️😴 Happy weekend!
9 years!✨Brandon and I will be celebrating 9 yea 9 years!✨Brandon and I will be celebrating 9 years of marriage this week. And how perfect we were invited to a wedding tonight walking distance from our home.🥰Sometimes reality is better than the movies and this weekend is one of those times. Enjoy, friends!☀️
What else do you use paper plates for besides eati What else do you use paper plates for besides eating?? Spray paint onto a paper plate and dab a small paint brush to do spot touch ups! Life hack when you’re working on a project but don’t need to paint the whole surface!👏🏻
.
.
#lifehack #diyhacks #spraypainting #painttips #paintprep #paintpro #shutters #craftsman #1940style
Didn’t mean for this to be #ASMR but here we are Didn’t mean for this to be #ASMR but here we are!🤷🏼‍♀️ I bought this orchid 15 months ago to use the flowers in our hair for my sister’s wedding. I’ve already repotted it once and it’s bloomed 3-4 times! Time to do it again with a pretty new pot that matches our new kitchen cabinets!🤩
.
.
Steps to repot an orchid:
1-large pot without drainage holes
2-plastic pot slightly smaller with holes
3-trim if needed so plastic pot is at or below outside pot
4-add layer of orchid specific potting mix (it looks like bark!)
5-add orchid, fill in around roots with more bark- don’t forget to add some mix under the leaves!
6-to water, soak bark and fill up outside pot, rinse the leaves too!
7-let sit for 5-10 minutes, then drain and dry the outside of your pot.
8-set in place and enjoy!🌷
New laundry, who dis? Our laundry room was a BLANK New laundry, who dis? Our laundry room was a BLANK slate after the kitchen renovation left it reconfigured too. So Dad and I tackled simple projects that make this space functional and of course visually pleasing too!👏🏻The full project airs this weekend on @todayshomeowner!
.
.
I love that the cabinets and hardware match what we have in the kitchen since the spaces are right next to each other! Synergy!
.
.
What do you love about your laundry room?
Load More... Follow on Instagram

Indoor Projects Outdoor Projects Craft Projects
Facebook Pagelike Widget
  • Contact
  • FAQs
  • Advertise with Chelsea
  • Media
  • Today’s Homeowner

Search This Site

Receive Free Updates Via Email

Copyright © 2023 Checking in With Chelsea • All Rights Reserved