Bar Cart Makeover
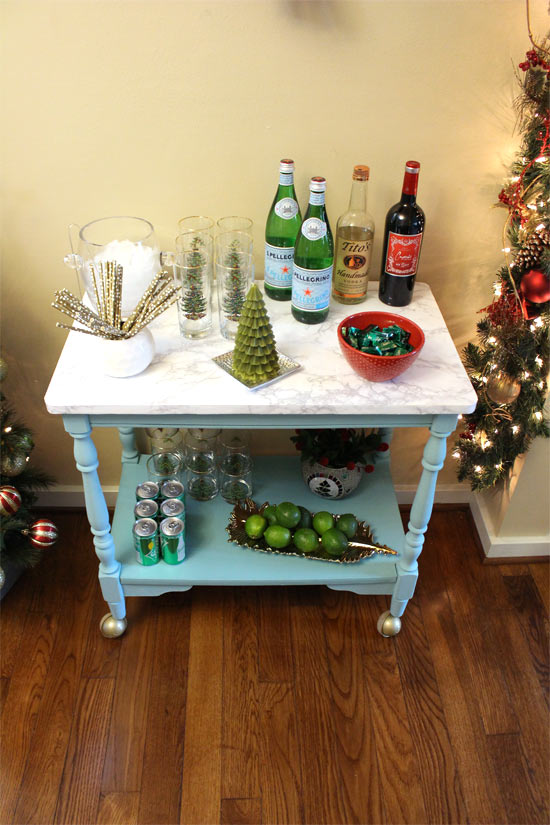
I mentioned in my last episode that I was working on cleaning out my furniture hoards from the garage. The first project of, hopefully, many to come was to take this water-damaged cart pulled from a trash pile almost 2 years ago and upcycle it into a fun, usable bar cart.
A lot of times the steps to completing a furniture makeover or upcycle can be the same-prep, paint, and seal. But you can change it up by using different materials to complete those steps and keep it fun!
For this particular piece of furniture, the frame of the cart was in good shape. The top was the only thing that needed replacing. So my husband and I started there by removing the L-shaped brackets that were holding it in place. While the legs were easily accessible, we tightened all of the nuts holding the legs on since a few were loose. We also removed the casters, setting them aside to be painted and reused.
Speaking of using different materials, we used a paint I’d never used before but quickly fell in love with. It’s made specifically for salvaging old furniture and architectural details like moldings. It’s called Black Dog Salvage and you can find it at Woodcraft stores and woodcraft.com.
It doesn’t require any sanding before application and can be applied to various previously-finished surfaces like polyurethane or varnish. Our cart had a few scratches in the paint that I wanted to make sure were smoothed out, so we lightly sanded it before wiping it down and getting out the paint brushes.
To create our new top, we traced the old one onto a new piece of 3/4″ plywood. We cut the corners out with a jigsaw and then sanded the edges with medium-grit sandpaper and a sander.
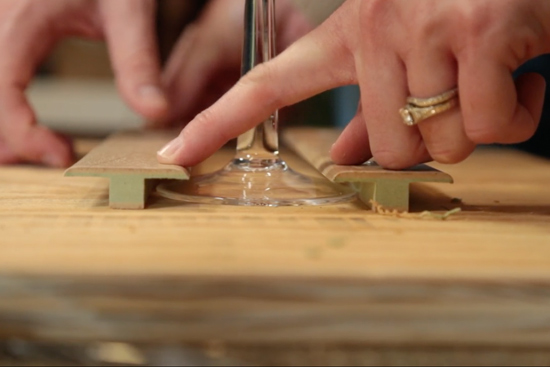
Before we could get to my favorite part of the makeover, I had to add a little something to one-up the old cart. I picked up a piece of T-molding from the home center for around $7. It’s a transition strip for laminate floors, so look for it in the flooring department. We cut 3 equal pieces from it and mounted it to the underside of our cart top to hang wine glasses from.

We drilled a pilot hole to prevent it from splitting before attaching them with 1″ wood screws. We used a very technical technique to measure the distance between the strips. We set a wine glass down and moved the strip to fit the base. 🙂

Now’s my favorite part. I’ve used this stuff before, but had to use it again.

It’s contact paper that looks just like the popular white and gray marble. We cut it to size, peeled the paper backing off and applied it to the top of our plywood. You’ll want to apply it to the smoothest side of your plywood to get the most authentic look. And using something like a drywall knife or credit card helps to smooth out any bubbles after application. Then we cut a skinny strip to wrap around the edges to further give the look and feel of a slab of marble sitting on top of our cart.
With a sharp utility knife, you can easily trim up any excess paper hanging over the edges.
While we were painting the legs and bottom shelf of the cart, we also painted the old casters. New casters can be so expensive and it’s hard to find just the right size and style! So I did what I could to reuse these. The rubber part that actually makes contact with the floor wasn’t new-looking by any means. But it wasn’t terrible either! So we covered the rubber with painter’s tape and sprayed the gold parts of the casters with a fresh coat of gold spray paint.

After the paint had dried on the cart, we sealed it by applying a protective top coat also from Black Dog Salvage. We used the clear matte sheen. Just one coat is all we needed to keep the paint looking fresh!
Finally we were ready to reassemble everything. To reattach the casters we just had to use a little force to get them back where they belonged. For the top we used the same old L-shaped brackets and attached the new top just like the old one, making sure it was squared up and centered on the frame.
And after a little more drying time for the topcoat, we brought it inside to our dining room where it was decked out for Christmas! I wish I could say it’s always dressed to the 9s and ready for guests, but there are 2 tiny hands that like to touch everything in reach and keep that from being the case!

But she just might be cuter than the bar cart, so we’ll keep her around any way!

Even though every upcycle project is different and what I did here may be specific to this piece, I hope it’s inspired you or given you an idea or two for your next project! I’ll be posting again before then, but in case you don’t check back before the 25th, I hope you have a wonderful Christmas with friends and family!
Thanks for Checking In! ~Chelsea

16 Comments
Sabrina
Wow what an amazing transformation. You guys did such a great job and this is such a cute video! Happy Holidays!
Chelsea Lipford Wolf
Thanks, Sabrina! I want to add marble contact paper to all the things now! Ha! ~Chelsea
Shani | Sunshine & Munchkins
Awesome salvage project! I wish we had a space in our home for a cute cart like that. Great job! 🙂
Chelsea Lipford Wolf
We just barely have room for it in our humble abode! So I feel ya! ~Chelsea
Sarah
What a great project!! I love the little wood pieces for wine glasses. I didn’t even know there was paint specifically for salvaged furniture!
Chelsea Lipford Wolf
Thanks for watching, Sarah! ~Chelsea
Colette @ Restyle it Wright
this is so sweet! I love having fellow garbage pickers as friends! You and your husband are too cute. Bar cart turned out great!
Chelsea Lipford Wolf
I’m just glad we don’t live in the same town so we don’t have to compete for the “good” trash! Ha!
Stephanie
Maybe I need to look a little closer the next time I see old furniture tossed to the curb…. this turned out to be a great find and rescue!
Chelsea Lipford Wolf
Thanks, Steph! ~Chelsea
Frances Pierce
Great job! It was so nice to see your husband helping out. And of course I always enjoy seeing your precious baby girl. God Bless you and your family. Merry Christmas. Oh, Yes, and I can’t wait to see photos of the new baby.
Chelsea Lipford Wolf
Thanks for watching, Frances! It’s not easy to rope my husband into my projects. But every now and then I succeed! ~Chelsea
Vanessa @ {nifty thrifty things}
I LOVE this video and the transformation! And those sweaters?! SO cute! 😉
Thank you for sharing the project!
XO! Vanessa
Chelsea Lipford Wolf
Thanks, Vanessa! The sweaters were a lot of fun! ~Chelsea
darla
<3 <3 <3 Chelsea, Do you prefer this Salvage Paint to a Chalk Paint? (your experience and any tips are welcome! – my basement of potential salvage projects is calling…)
Chelsea Lipford Wolf
Darla, the salvage paint was easy to work with! I can’t say I necessarily prefer one over the other. One pro for chalk paint is the greater variety of colors, especially since you can make your own! I do, however, really like the top coat we used here! I’ve used it on several other projects since (coming to the blog soon!) and it goes on so well, dries clear with no sheen to it, and mostly hides the brush strokes! Hope that gets you started! ~Chelsea