Pink Girls’ Shared Bedroom Evolution
Our girls’ shared bedroom has come a long way since we first moved in. See how its design and makeover has slowly evolved over the past year.

I shared the evolution of this room in real time in my Instagram stories. You can watch part 1 here and part 2 here.
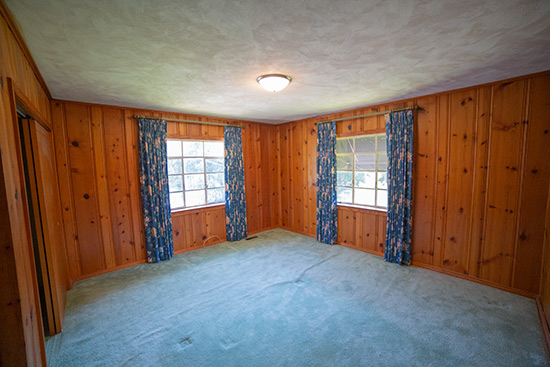
When we bought our house in July 2020, the second bedroom was large but had dated wood paneling and green carpet!

Then before we moved in, I painted the fancy paneling the same pale pink as Lucy’s nursery in our old house and ripped up the carpet.

We started the girls out sharing a bedroom and using the 4th room as a play room. But sleepless nights lead us to move Lucy, the youngest, into her own room and the playroom was no more.
Mary Helen then requested a rainbow room, so I tried to oblige by painting some of the paneling in rainbow stripes.

Unfortunately all of the random hand-me-down furniture that landed here did not do the rainbow wall any justice. So when it was time for Lucy to move back in a year later to make room for our 4th baby, I took the opportunity to design and decorate a girls’ shared bedroom with intention!
Paint the Walls
Thankfully Mary Helen was over the rainbow wall because it was never my favorite. So I started there, by painting over the stripes to make the walls one color and calm the space down. (Behr’s My Sweetheart*)
I also primed and painted the stained wood window trim the same as the walls. I thought I would like the contrast trim but it ended up feeling clownish.🤷🏼♀️I don’t know if it was the color of the stain or what. But at least I tried it!
Ironically, I always like to add a wood element to rooms I’m working in. It adds warmth and a nice layer. So without the window trim bringing the wood tone, I stumbled upon a set of vintage Chippendale-style twin headboards and snatched them right up! I’m obsessed with Chippendale furniture and anything that looks like bamboo right now. They didn’t stand a chance!

Find That One Thing
Every design project needs that one thing that catapults it and acts as a filter for all other decisions. Find curtains you love? Then you’re going to buy a rug, comforter, pictures, etc that coordinate with the curtains.
That *thing* for me was these vintage monthly floral prints.

The antique shop where I picked up the headboards has a bunch of vendor booths. In one of the booths I found these prints. They had exactly 2 of them. One was May and the other October. Which are the exact months Lucy and Mary Helen were born. So I took it as a sign!
Now I was getting somewhere!
I loved the look of the prints with the existing rug. BUT the rug was too small! You really want a rug to go underneath each bed when you’re doing 2 twin beds in a room. And since this room is so large, that meant we needed a 9×12, not the 8×10.
One Item at a Time
Speaking of the rug. That was the next item I purchased for this room makeover.
I’m not a trained designer, so I’m not always confident in selecting all of the items needed for a room at one time. And since there was no deadline to complete the girls’ room (clearly🤣), I took my time and ordered one element at a time. Once an item came in and I cross-checked it against the existing elements, then I moved onto the next item.

/ rug* / bed frame* / comforter* / mattress pad* / lamp* / wall paint* / shelves* /
A rug is a large expense, so I waited for it to go on sale and stacked some coupons! Then it arrived with a cut that went through the package and all the way through the rug. So I called the company and instead of shipping it back, they offered another discount and I stuck the cut part under the bed.🙌🏻
With the headboards, art and rug on hand, I was ready to get 2 matching nightstands for this girls’ shared bedroom. I wanted something charming that added some character to their room. White comforters meant I wanted a little color in the nightstands, even if I had to paint them after purchasing.

/ rug* / comforter* / white clock* / lamp* / sound machine* / nightstands /
If you’ve followed me for a few months, then you know I ended up building my own nightstands that look like dollhouses!
Watch the how-to video and get FREE plans to build your own!
The other DIY I worked into the room was a fabric-covered cornice above the windows. I don’t 100% love the fabric used to make these. But close enough and I can always add another fabric over it later if I want!

/ rug* / comforter* / fabric cornice / roller shade* / lamp* / sound machine* / nightstands /
I love that they add a layer of softness and make the room feel taller since they were installed above the window and not covering it.
Curtains are another layer that always perks up a space. But I didn’t feel like they would be terribly functional in this room since there is so much furniture in front of and next to the windows. We wouldn’t be able to open and close them easily. And opening curtains every morning is a must in my house! I need that natural light!
We did, however, install a blackout roller shade* in each window for privacy and light control for naps and bedtime! A decent price for the size windows we have, but I got ours when they were 45% off which happens often!
So we have the pretty cornice up top and the functional roller shade underneath!
Use What You’ve Got
One element I didn’t have to think about is the dresser and chest for the girls’ clothes. They are both from my childhood bedroom and we’ve been using one or the other for over 7 years. They are hearty and I don’t hate them. So even if they don’t totally match or coordinate, they work well enough not to change them at this time!


/ rug* / comforter* / bed frame* / butterflies* /
I had purchased 2 ceiling fans when we renovated our living room. And the one we didn’t use was perfect for this vintage-inspired girly shared bedroom.

/ ceiling fan* / rug* / comforter* / bed frame* / butterflies* / nightstand / lamp* /
Other things we reused in here furthering my tendency to hoard because ‘you never know when you may need it’: shelves from Gus’s nursery, canvas from Mary Helen’s nursery, and other Precious Moments tchotchkes and framed art from my childhood.🥰

Adding Whimsy
You can’t have a little girls shared bedroom without a little whimsy! And what’s more whimsical than 3D butterflies on the wall?!

/ rug* / comforter* / butterflies* / lamp* /
To create your own butterfly wall, first place the large butterflies to set the flow. Add in the medium-sized ones to start filling in the flow and add height or width where necessary. Last add the small ones in any open spaces. Don’t forget to add to any other furnishings nearby for an extra touch like a lamp or picture frame!
With ALLLL that said, there’s a year’s worth of design evolution in one pretty pink bedroom! I took my time and enjoyed the process. And that’s half the fun! Still waiting on whatever magic keeps the room tidied up and picture perfect. So if you find it, let a sista know!😆
Thanks for Checking In! ~Chelsea
*This post contains affiliate links. I will earn a small commission without increasing the price for you!*


3 Comments
Sheila Kay Sanders
very pretty bedroom for your girls, love it.
Chelsea Lipford Wolf
Thanks Sheila! ~Chelsea
Sleep Center
This shared pink girls’ bedroom is adorable. The color scheme and decor choices make the room feel cheerful and inviting. Thanks for sharing this lovely and inspiring space.