
Closet for Dress-Up Clothes
DIY Dresser Makeover to Store Dress-Up Clothes

I’ve been doing a lot of taping with Today’s Homeowner lately before I go on maternity leave (in just a few short weeks!). So not many projects have gotten done around my house. BUT I was able to help a friend update/makeover/upcycle, her grandmother’s old chest of drawers into a fun and cute ‘closet’ of sorts for her daughters’ princess dresses!
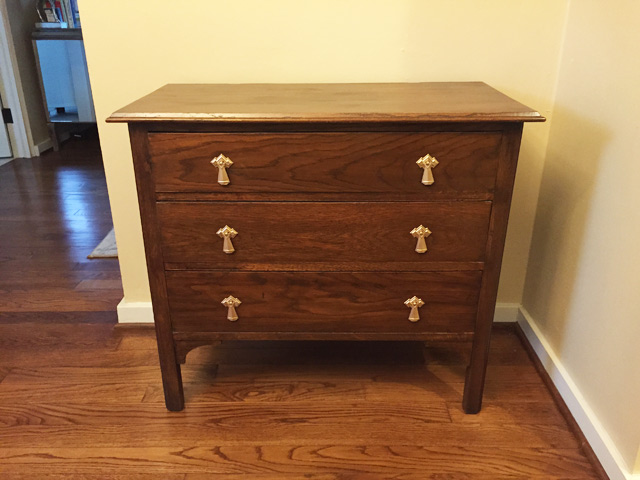
Before
Here’s the modest dresser before:

I don’t know how old it was, but all of the drawers were in great, working shape, and it was structurally sound. It was also very plain and simple. Plus it was a free hand-me-down! My personal favorite!
Demolition First
We knew we wanted space to hang up dresses and possibly a place to store shoes. I, personally, wanted to find a way to keep the flowery scroll detail under the top drawer. I think it adds a little feminine character!
So we started by removing all of the drawers. Simple enough! And then we removed all of the horizontal drawer dividers which were just stapled in place. We made sure to maintain the bottommost drawer glide to use later for a pull-out shoe rack.

We also removed the back panel to give us room to work.
Reassemble Second
Since each furniture makeover varies so much by the actual piece you’re working with, some of this might not make much sense. But I’ll give it my best shot.
We knew at the end of the process we wanted to add a fun pop of color or wallpaper to the back of the dresser. But the way this particular dresser was assembled left the back panel and the vertical corner pieces holding it all together with a 3/8″ difference, depth-wise. So we cut a piece of 3/8″ MDF (you could also use inexpensive plywood) to the same size as the void between the 2 vertical pieces. We used wood glue and a nail gun to hold it all together.
This made it possible for the fabric we ended up choosing to flow from left to right and top to bottom without bumps. It filled the entire back wall. Now maybe this level of detail wouldn’t normally be worth $20-25 for the plywood/MDF. But if you have it leftover from another project like we did, go for it!
We also used some scraps to fill in the void under the bottom drawer. Since we were turning that into a modified pull-out shoe rack, we didn’t want an open bottom for things to get lost. And if you have small children or grandchildren, you know things go missing enough as is!
Repurposed Shoe Rack
For the shoe rack, I removed the face of the old bottom drawer and measured and marked the sides to be the same height as the floral piece previously at the top of the dresser, essentially creating a box.
I carefully used a circular saw to make the cuts and complete the shoe rack. Also worth mentioning is previously the drawer front would have closed and been in front of the dresser, so to speak. So I also cut back the front of the left and right sides so that the floral piece would be flush with the sides once closed.
Then I attached the floral scroll piece using wood glue and a few nails to the front of the ‘new’ shoe rack.
Since the sides of the dresser were fairly thin, I also added 2 blocks from scrap dresser pieces to give support to the future clothing rod. They were attached mostly with wood glue, but a nail or two to held them up while the glue dried.
(Pictured below after the dresser was painted. But you get the idea!)

Primed and Painted
Since the furniture had never been painted before, we primed everything in sight before adding a coat of little girl-approved pink paint! (The pink is a soft shade from Behr called My Sweetheart.)
Once the paint was dry, we worked on attaching the pretty floral fabric to the back using spray adhesive. Leave a little extra on all 4 sides while you spray and attach small sections of fabric at a time, smoothing out with a plastic drywall knife or credit card as you go.
When you’re satisfied with the way it looks, use a sharp X-Acto*, or similar, knife to carefully trim excess fabric on the edges.

We hung the rod and dresses and slid in the shoe rack and it was ready for hours of fun!

Now since this isn’t at my house, I can only assume the little princesses put everything back where it belongs when they’re finished playing…?


It was so fun to work on something ‘light’ and pretty! And totally randomly and separately, I selected the same pale pink for the walls in our third baby’s nursery! More details on that space are coming soon…I wallpapered and it wasn’t nearly as fun as this makeover.?
Could you use a cute space to store dress-up clothes at your house? Let me know!
Thanks for Checking In! ~Chelsea
*This post may contain affiliate links*

One Comment
DAWN A BRATCHER
This is such a precious idea for a little princess! Every girl wants her own dress-up closet…& a shoe rack, too?! WOW!
You are amazing, Chelsea ?